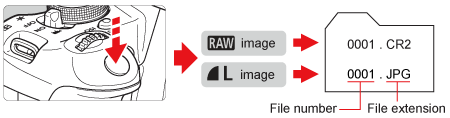
Changing the recording pixels and compression ratio of an image taken (EOS REBEL T5i / EOS 700D)

Article ID: ART140962 | Date published: 05/13/2015 | Date last updated: 08/17/2015
 

Description

Changing the recording pixels and compression ratio of an image taken (EOS REBEL T5i / EOS 700D)

Solution

NOTE
Icons used on this page:
[
]: Shooting tab 1 /<
>: Setting button / [
]: (Fine) / [
]: (Normal) / [
]: (Large) / [
]: (Small 2) / [
]: (Small 3) / [
]: RAW
*The icons and markings indicating the cameras buttons, dials, and settings correspond to the icons and markings on the camera and on the LCD monitor.

Setting the Image-Recording Quality

You can select the pixel count and the image quality.

1. Set the camera's power switch to <ON>.

2. Press the <MENU> button to display the menu.

3. Under the [
] tab, select [Image quality], then press <
>.

4. Select the image-recording quality.

The respective qualitys pixel count and number of possible shots will be displayed to help you select the desired quality. Then press <
>.

REFERENCE
FAQ
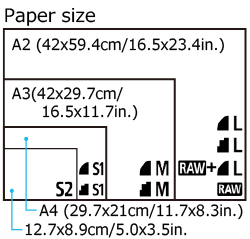
  • I want to select the image-recording quality matching the paper size for printing.
If you want to crop the image, selecting a higher quality (more pixels) such as
,
,
+
,
is recommended.

is suitable for playing the images on a digital photo frame.
is suitable for emailing the image or using it on a Web site.
Refer to the diagram below when choosing the image-recording quality.

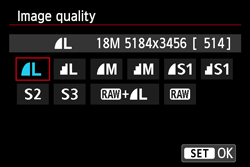
  • Whats the difference between
    and
    .
It indicates a different image quality due to a different compression rate. Even with the same number of pixels, the
image has higher image quality. If
is selected, the image quality will be slightly lower, but more images can be saved to the card. ,
and
have
quality.
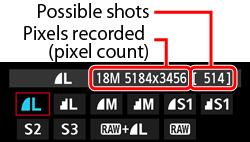
  • I was able to take more shots than the number of possible shots indicated.
Depending on the shooting conditions, you may be able to take more shots than was indicated. It may also be fewer than indicated. The number of possible shots displayed is only approximate.
  • Does the camera display the maximum burst?
The maximum burst is displayed in the viewfinders right side. Since it is only a single-digit indicator 0 - 9, any number higher than 9 will be displayed only as "9". Note that this number will also be displayed even when no card is installed in the camera. Be careful not to shoot without a card in the camera.
  • When should I use
    ?

images require processing with your computer. For details, see the below sections, [About RAW] and [About RAW+JPEG Large (Fine)].
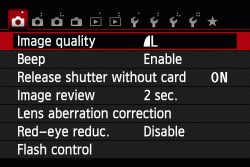
About RAW


is the raw image data before it is made into
. Although RAW images require software such as Digital Photo Professional so that they can be displayed on the computer, they also offer flexibility for image adjustments possible only with RAW. RAW is effective when you want to precisely adjust the image yourself or shoot an important subject.

About RAW+JPEG Large (Fine)


+
records a
and
image with a single shot. The two images are saved to the card simultaneously. The two images will be saved in the same folder with the same file numbers (file extension .JPG for JPEG and .CR2 for RAW).
images can be viewed or printed even with a computer that does not have the software provided with the camera installed.

NOTE
  • To display
    images on a computer, using the provided software is recommended.
  • Commercially-available software may not be able to display
    images taken with this camera. To see if the
    images are compatible with other software, check with the respective software manufacturer.
REFERENCE
  • For details about the number of recordable images, please see the following page.
  • For details about the approximate values for recording pixels, please see the following page.


SIMS Doc Id

8201787800

Rate this Article
Was this article helpful?
Yes, This document is helpful
No, This document needs a clearer explanation
 
Please provide your comments