Preferences
Prior to scanning using MP Navigator EX, confirm the appropriate scanner is selected in the Product Name drop-down of MP Navigator's Preferences window.
Note:
Complete the network settings of the machine beforehand. (Refer to the printed manual: Getting Started.)
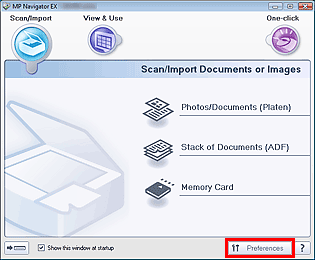
On the Windows desktop, double-click the MP Navigator EX icon  to open MP Navigator EX.
Alternatively, on the Windows taskbar, click 'Start', point to (All) Programs, Canon Utilities, then MP Navigator EX.
Then click 'MP Navigator EX'.
MP Navigator EX opens.
Click Preferences.
The Preferences dialog box opens.
The above screen will vary based on model.
In the Preferences dialog box, click the 'Product Name' drop-down arrow and select the scanner name that matches your model.
For network connection, select (model name) series (Network: XXXXXXXXXXXX) for Product Name.
(Where XXXXXXXXXXXX is the MAC address.)
Note: For USB connection, select (model name) series for Product Name.
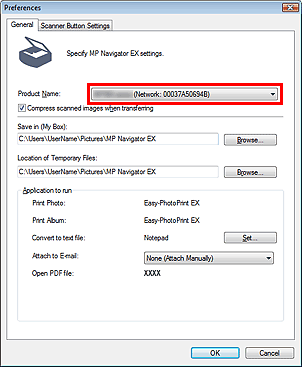
Click OK.
The Preferences dialog box closes. You can now scan via a network connection.
Go to the Main Menu to check whether network scanning is enabled.

Setting for Scanning Using the Operation Panel
You can make settings for scanning using the Operation Panel of the machine.
- Check that Canon IJ Network Scan Utility is running.
- If Canon IJ Network Scan Utility is running, its icon appears in the notification area of the taskbar.
If Canon IJ Network Scan Utility is not running, from the Start menu, select (All) Programs > Canon IJ Network Utilities > Canon IJ Network Scan Utility > Canon IJ Network Scan Utility to start it.
| Menu Item | Function |
|---|
Disable Canon IJ Network Scan Utility
or
Enable Canon IJ Network Scan Utility | Enables or disables Canon IJ Network Scan Utility.
Enabled:  , Disabled: , Disabled:  |
| Settings... | Opens the Canon IJ Network Scan Utility dialog box. You can select the machine you want to use. |
| About... | Displays the version information. |
| Exit | Exits Canon IJ Network Scan Utility and deletes from the notification area of the taskbar. |
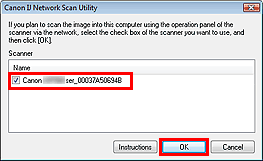
In the notification area of the taskbar, right-click the Canon IJ Network Scan Utility icon and select 'Settings'.

The Canon IJ Network Scan Utility dialog box opens.
- Select Canon (model name) ser_XXXXXXXXXXXX and click 'OK'.
Note:
When multiple scanners are connected via a network, you can select up to three scanners.
 TOP
TOP
