A Canon IJ Printer that you no longer use can be deleted from the printer list.
Before deleting the Canon IJ Printer, disconnect the cable that connects the printer to the computer.
The procedure to delete the unnecessary Canon IJ Printer from the printer list is as follows:
You cannot delete the Canon IJ Printer unless you are logged in as an user with the administrative right. For information about an administrative user, refer to the Macintosh manuals.
The procedure to delete the unnecessary MP Drivers is as follows:
If you are using Mac OS X v.10.6.x or Mac OS X v.10.5.x
- Open System Preferences, and select Print & Fax.
- Delete the Canon IJ printer from the printer list.
From the printer list, select the Canon IJ Printer to be deleted, and then click -.
If you are using Mac OS X v.10.4.11
- Launch the Printer Setup Utility.
- Delete the Canon IJ printer from the printer list.
From the printer list, select the Canon IJ Printer to be deleted, and then click  Delete.
reference:
- Even if a Canon IJ Printer is deleted from the printer list, you can re-register it automatically by connecting the machine to your computer.
-
Insert the Setup CD-ROM.
-
Turn on the computer, then insert the Setup CD-ROM into the CD-ROM drive.
-
Double-click the Setup icon  of the CD-ROM folder to proceed to the following screen. Enter your administrator name and password, then click OK.
-
If the CD-ROM folder does not open automatically, double-click the CD-ROM icon  on the desktop.
-
If you do not know your administrator name or password, click the help  button, then follow the on-screen instructions.
-
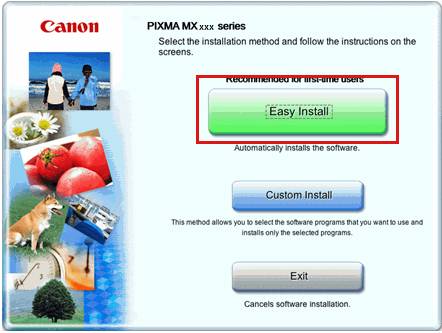
Click Easy Install.
The drivers, application software, and on-screen manuals are installed all together.
-
Click Install.
-
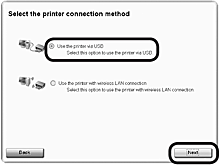
Select Use the printer via USB, then click Next.
Follow any on-screen instructions to proceed with the software installation.
-
Follow any on-screen instructions to proceed with the software installation.
-
When the Printer Connection screen appears, connect the USB cable and turn on the printer.
-
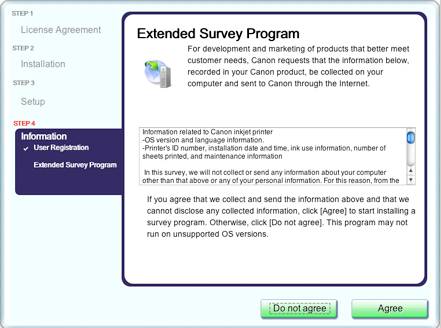
If the Extended Survey Program screen appears:
If you can agree to the Extended Survey Program, click Agree.
If you click Do not agree, the Extended Survey Program will not be installed. (This has no effect on the machine's functionality.)
-
Click Exit.
Solution Menu EX starts when clicking
OK in the
Canon Solution Menu EX dialog.
Remove the Setup CD-ROM and keep it in a safe place.
