Print head alignment corrects the installation positions of the print head and improves deviated colors and lines.
This machine supports two head alignment methods: automatic head alignment and manual head alignment. Normally, the machine is set for automatic head alignment.
If the printing results of automatic print head alignment are not satisfactory, perform manual head alignment.
The procedure for performing manual print head alignment is as follows:
 Note:
Note:  Print Head Alignment
Open the printer driver setup window.
Click Custom Settings on the Maintenance tab.
The Custom Settings dialog box opens.
Switch head alignment to manual.
Check the Align heads manually check box.
Note:
If the machine is off or if communication between the machine and the computer is disabled, an error message may appear because the computer cannot collect the machine status.
If this happens, click OK to display the most recent settings specified on your computer.
Apply the settings.
Click OK and when the confirmation message appears, click OK.
Click Print Head Alignment on the Maintenance tab.
The Start Print Head Alignment dialog box opens.
Load paper in the machine.
Load three sheets of A4 size or Letter size plain paper into the cassette (lower).
Execute head alignment.
Make sure that the machine is on and click Align Print Head.
Follow the instruction in the message.
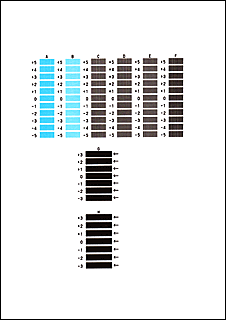
Check the printed pattern.
Enter the numbers of the patterns with the least amount of streaks in the associated boxes.
Even if the patterns with the least amount of streaks are clicked in the preview window, their numbers are automatically entered in the associated boxes.
When you have entered all the necessary values, click OK.
Note:
If it is difficult to pick the best pattern, pick the setting that produces the least noticeable vertical white streaks.
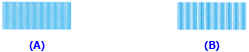
(A) Least noticeable vertical white streaks
(B) Most noticeable vertical white streaks
If it is difficult to pick the best pattern, pick the setting that produces the least noticeable horizontal white streaks.

(A) Least noticeable horizontal white streaks
(B) Most noticeable horizontal white streaks
Confirm the displayed message and click OK.
The second pattern is printed.
 Important:
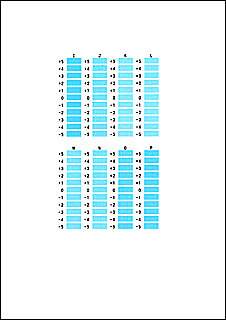
Check the printed pattern.
Enter the numbers of the patterns with the least amount of streaks in the associated boxes.
Even if the patterns with the least amount of streaks are clicked in the preview window, their numbers are automatically entered in the associated boxes.
When you have entered all the necessary values, click OK.
Note:
If it is difficult to pick the best pattern, pick the setting that produces the least noticeable vertical white streaks.
(A) Least noticeable vertical white streaks
(B) Most noticeable vertical white streaks
Confirm the displayed message and click OK.
The third pattern is printed.
Important:
Check the printed pattern.
Enter the numbers of the patterns with the least noticeable horizontal stripes in the associated boxes.
Even if the patterns with the least noticeable horizontal stripes are clicked in the preview window, their numbers are automatically entered in the associated boxes.

When you have entered all the necessary values, click OK.
Note:
If it is difficult to pick the best pattern, pick the setting that produces the least noticeable horizontal stripes.

(A) Least noticeable horizontal stripes
(B) Most noticeable horizontal stripes
Note:
