This section describes how to connect the camera to a computer when importing images to the computer or specifying the camera settings from the computer. NOTE <  ><  >: Cross keys / [  ]: Set-up tab 2 / <  >: Setting button * The icons and markings indicating the cameras buttons, dials, and settings correspond to the icons and markings on the camera and on the LCD monitor. - Connect your camera and computer using the interface cable provided with the camera.
- Start the computer before making the connection.
- For the power source, using AC Adapter Kit ACK-E8 (sold separately) is recommended.
1. Confirm that the camera is not connected to the computer, and then set the camera's power switch to <ON>. 2. Press the <MENU> button to display the menu.  3. Change the camera's Auto power off settings. 3-1. Press the < > keys to select the [ ] tab. Select [Auto power off], then press < >.  3-2. Press the < > keys to select [Disable] from the menu that appears, and then press < >. Please refer to the Instruction manual supplied with your camera for more information about the Auto power off settings.  4. Press the <MENU> button to turn off the display on the LCD monitor, and then turn the camera's power switch to <OFF>. 5. Connect the large plug of the supplied interface cable into the USB port of your computer. For the location and direction of the USB port, refer to the computer Users Manual. 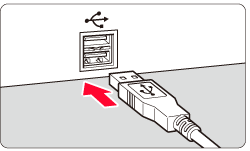 6. With the <  > mark on the plug facing the back of the camera, connect it to the cameras <DIGITAL> terminal. 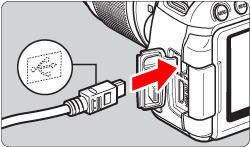 7. Set the camera's power switch to <ON>. 8. Communication between the camera and the computer begins. Click [  ] in the task bar to display the following screen. Click [EOS Utility] to start EOS Utility. 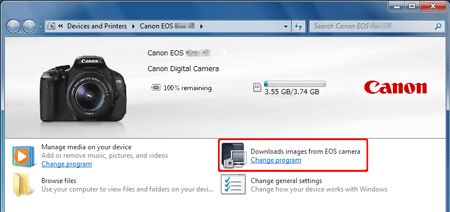 When the camera and computer are able to communicate with each other, EOS Utility will start. If EOS Utility is not displayed, click the [EOS Utility] icon in the Dock. The message that appears on the screen differs depending on the computer's operating system or software installed in the computer, and also depending on whether the camera is being connected to the computer for the first time or has been connected previously. If a window to select a program (application) appears, select [Downloads images from EOS camera / using Canon EOS Utility], and then click [OK]. 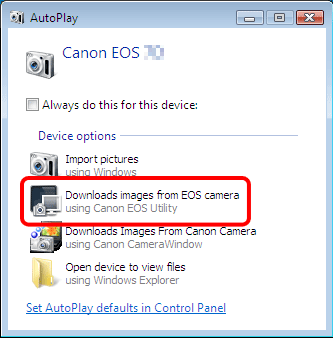 For information about operations after connecting the camera to the computer, please refer to the Instruction manual that was supplied with your camera. This completes the process of connecting the camera to the computer.
| 