NOTE Icons used on this page: [  ]: Shooting tab 4 / <  ><  ><  >: Multi-controller
Customizing a Picture Style You can customize a Picture Style by adjusting individual parameters such as [Sharpness] and [Contrast]. To see the resulting effects, take test shots. To change Picture Style values, follow the procedures below. 1. Set the camera's power switch to <ON>. 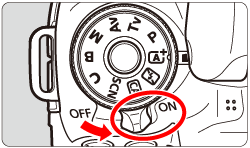 2. Press the <MENU> button to display the menu screen. 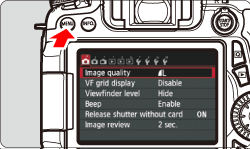 3. Press the < > key to select the [ ] tab. Press the < > key to select [Picture Style], then press <  >. 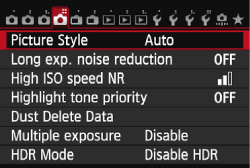 4. Press the < > key to select a Picture Style, then press the <INFO.> button. 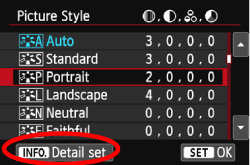 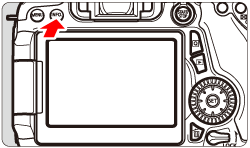 5. Select a parameter such as [Sharpness], then press < >.  6. Press the < > keys to adjust the parameter as desired, then press < >. 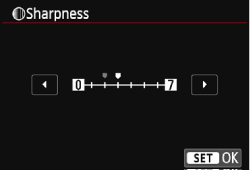 7. Press the <MENU> button to save the adjusted parameters. The Picture Style selection screen will reappear. Any parameter settings different from the default will be displayed in blue. 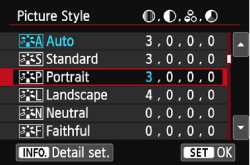 | Parameter Settings and Effects |
|---|
 Sharpness Sharpness | 0: Less sharp outline | +7: Sharp outline |  Contrast Contrast | -4: Low contrast | +4: High contrast |  Saturation Saturation | -4: Low saturation | +4: High saturation |  Color tone Color tone | -4: Reddish skin tone | +4: Yellowish skin tone |
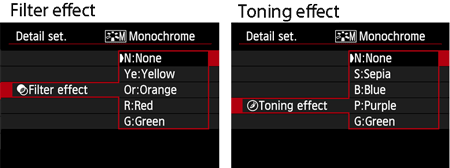
NOTE Monochrome Adjustment - If you select [Monochrome] in Picture Style, it is also possible to set the [Filter effect] and [Toning effect] along with [Sharpness] and [Contrast].
- With a filter effect applied to a monochrome image, you can make white clouds or green trees stand out more.
- By applying a toning effect, you can create a monochrome image in that color.
For details about [Filter effect] and [Toning effect], see the instruction manual supplied with your camera.
Registering a Picture Style You can select a base Picture Style such as [Portrait] or [Landscape], adjust its parameters as desired and register it under [User Def. 1], [User Def. 2], or [User Def. 3]. You can create multiple Picture Styles with different settings for parameters such as sharpness and contrast. You can also adjust the parameters of a Picture Style that has been registered to the camera with EOS Utility. IMPORTANT - If a Picture Style has already been registered under [User Def. *], changing the base Picture Style in step 6 will nullify the parameter settings of the registered Picture Style.
- If you execute [Clear all camera settings] , all the [User Def. *] settings will revert to their defaults. Picture Styles registered via EOS Utility (provided software) will have only their modified parameters reverted to their default settings.
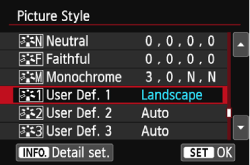
To register a Picture Style, carry out steps 1 to 3 above, and then follow the procedures below. 4. Press the < > keys to select [User Def. *] (the * stands for 1, 2, or 3), and then press <INFO.>. 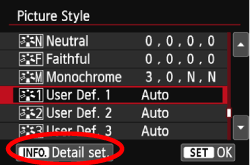 5. With [Picture Style] selected, press < >.  6. Press the < > keys to select the base Picture Style, then press < >. To adjust the parameters of a Picture Style that has been registered to the camera with the provided software, select the Picture Style here. 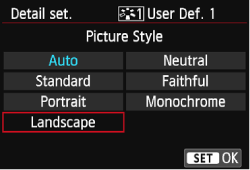 7. Select a parameter such as [Sharpness], then press < >. 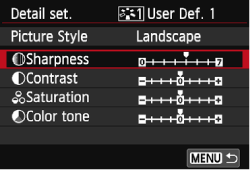 8. Press the < > key to adjust the parameter as desired, then press < >. 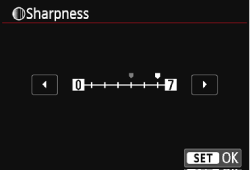 9. Press the <MENU> button to register the modified Picture Style. The Picture Style selection screen will then reappear. - The base Picture Style will be indicated on the right of [User Def. *].
- If the settings in a Picture Style registered under [User Def. *] have been modified from the base Picture Style settings, the Picture Styles name will be displayed in blue.
 NOTE - To use the adjusted Picture Style, select the registered [User Def. *], then shoot
- Regarding the procedure to register a Picture Style file to the camera, refer to the EOS Utility Instruction Manual.
|