Follow the steps below to connect the camera to your computer with a USB Cable.
Before you begin
 Turn on computer before you set up the connection.
-
Connect your camera and computer with the USB interface cable provided with the camera.
-
The AC Adapter Kit ACK-E6 (sold separately) is recommended for the power source.
-
If Wi-Fi® is set to Enable, direct printing is not possible. Set it to Disable, then connect the USB interface cable.
-
For information about operations after the camera is connected to the computer, please refer to the Instruction manual that was supplied with your camera.
USB Connection steps
-
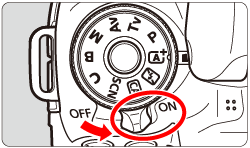
Confirm that the camera is not connected to the computer, and then turn ON the camera.
-
Press the MENU button to display the menu.

-
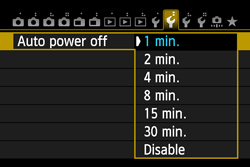
Change the camera's auto power off settings.
-
Press the MENU button to turn off the display on the LCD monitor, and then turn OFF the camera.

-
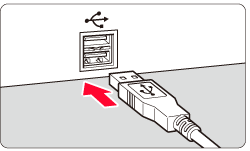
Connect the large plug of the supplied USB interface cable into the USB port of your computer.
For the location and direction of the USB port, refer to the computer user's manual.
-
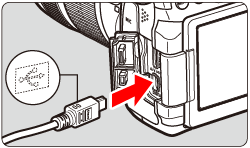
Connect the USB cable to the cameras digital terminal.
-
Turn ON the camera.
-
Communication between the camera and the computer begins.
The message that appears on the screen depends on the computer's operating system, software installed, or if its the first time the camera is connected to the computer.
-
Windows connection
-
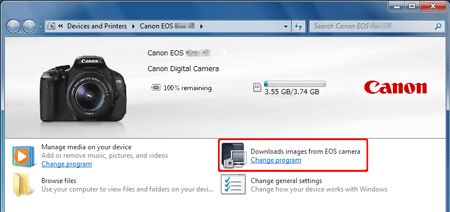
Select the camera icon  in the task bar to display the screen below.
-
Select EOS Utility to launch it.
-
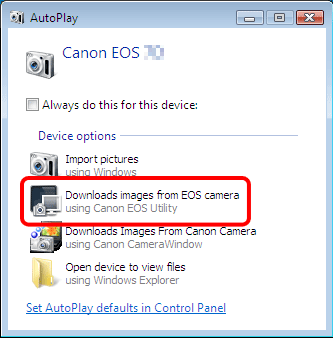
If a window to select a program or application appears, select Downloads images from EOS camera / using Canon EOS Utility, and then select OK.
-
Macintosh® connection
If your product issue was not resolved after following the steps above, or if you require additional help, please create or log in to your Canon Account to see your technical support options.
Or if you still need help, visit our Canon Community by clicking the button below to get answers:

____________________________________________________________________________________________

 to select the yellow setup tab 2
  . Select Auto power off, then press Set button
  .
.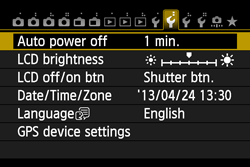
 to select Disable from the menu that appears, and then press the Set button