Viewing still photos and movies on TV sets With this camera, you can view still photos and movies on a TV set. To view images on the camera's memory card, it is necessary to connect the camera and television using a stereo AV cable or an HDMI cable. Viewing images by connecting the camera with non-HD and HD (high-definition) TV sets is explained below. IMPORTANT - Before connecting or disconnecting the cable between the camera and television, turn off the camera and TV set.
- The camera might not be able to play movies shot by another camera.
NOTE <  >: Playback button / [  ]: Set-up tab 3 / <  >: Multi-controller / <  >: Main Dial / <  >: Quick Control Dial * The icons and markings indicating the cameras buttons, dials, and settings correspond to the icons and markings on the camera and on the LCD monitor. - Adjust the movies sound volume with the TV set. The sound volume cannot be adjusted with the camera.
- Depending on the TV set, part of the image displayed may be cut off.
Viewing on High-Definition (HD) TV Sets HDMI Cable HTC-100 (sold separately) is required. IMPORTANT - Do not connect any other devices output to the cameras <HDMI OUT> terminal. Doing so may cause a malfunction.
- Certain TVs may not be able to play back the captured images. In such a case, use the stereo AV cable AVC-DC400ST (sold separately) to connect to the TV.
- The images cannot be output at the same time from the <HDMI OUT> and <A/V OUT> terminals.
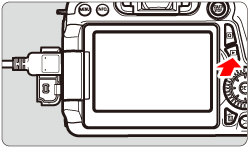
1. Connect the HDMI cable to thecamera's <HDMI OUT> terminal. With the plugs <  HDMI MINI> logofacing the front of the camera, insert itinto the <HDMI OUT> terminal. 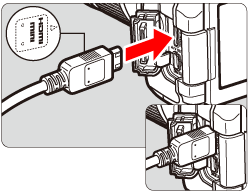 2. Connect the HDMI cable to the TVs HDMI IN port.  3. Turn on the TV and switch the TVs video input to select the connected port. 4. Set the cameras power switch to <ON>. 5. If the < > (Playback) button is pressed, the image will appear on the TV screen. (Nothing will be displayed on the camera's LCD monitor.) - The images will be displayed automatically at the TV's optimum resolution.
- By pressing the <INFO> button, you can change the display format.
- To playback the movie, follow the procedure explained in [Playing Movies].
 REFERENCE Using HDMI CEC TV Sets If the TV set connected to the camera with an HDMI cable is compatible with HDMI CEC*, you can use the TV sets remote control for playback operations. For more information, please refer to the instruction manuals that came with your camera. * An HDMI-standard function enabling HDMI devices to control each other so that you can control them with one remote control unit.
Viewing on Non-HD TV Sets 1. Connect the Stereo AV Cable AVC-DC400ST (sold separately) to the camera. With the plugs <Canon> logo facing the back of the camera, insert it into the <A/V OUT> terminal.  2. Connect the AV cable to the TV set. Connect the AV cable to the TVs video IN terminal and audio IN terminals. 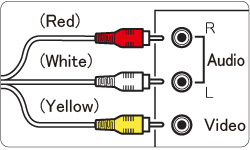 3. Turn on the TV and switch the TVs video input to select the connected port. 4. Set the cameras power switch to <ON>. 5. Press the <  > button. The image will appear on the TV screen. (Nothing will be displayed on the cameras LCD monitor.) - To play back movies, see [Playing Movies].
 IMPORTANT - Do not use any AV cable other than the Stereo AV cable AVC-DC400ST (sold separately). Images may not be displayed if you use a different cable.
- If the video system format does not match the TVs, the images will not be displayed properly. If this happens, switch to the proper video system format with [
 : Video system]. : Video system].
Playing Movies 6. Press < > to select a movie. - On the single-image display, the [
 ] icon displayed on the upper left indicates a movie. If the movie is a video snapshot, [ ] icon displayed on the upper left indicates a movie. If the movie is a video snapshot, [  ] will be displayed. ] will be displayed. - In the index display, perforations at the left edge of a thumbnail indicate a movie. As movies cannot be played on the index display, press <
 > to switch to the single-image display. > to switch to the single-image display.
Single-image Display  Index Display  7. In the single-image display, press < >. The movie playback panel will appear at the bottom of the screen. 8. Turn the < > to select [  ], and then press the < > button to start playing the movie. - You can pause the movie playback by pressing the <> button.
- You can adjust the sound volume by turning the <> dial even during movie playback.
 NOTE - If you connect the camera to a TV set to play a movie, adjust the sound volume with the TV set. (Turning the <> dial will not change the sound volume.)
Items Related to Playback | Icon | Operation | Playback Description |
|---|
| | Play | Pressing < > toggles between play and stop. |  | Slow motion | Adjust the slow motion speed by pressing the < > keys. The slow-motion speed is indicated at the upper right of the screen. |  | First frame | Displays the movies first frame. |  | Previous frame | Each time you press < >, the previous frame is displayed. If you hold down < >, it will rewind the movie. |  | Next frame | Each time you press < >, the movie will play frame-by-frame. If you hold down < >, it will fast forward the movie. |  | Last frame | Displays the movies last frame. |  | Background music* | Plays back a movie with the selected background music. For more information, please refer to the instruction manuals that came with your camera. |  | Edit | Displays the editing screen. |  | Playback position | | mm' SS" | Playback time (minutes:seconds with [Movie play count: Rec time] set) | hh:mm:ss.ff (DF)
hh:mm:ss:ff (NDF) | Time code (hours:minutes:seconds:frames with [Movie play count: Time code] set) |  | Volume | You can adjust the built-in speakers volume by turning the < > dial. |   | Pressing the < MENU > button returns to the single-image display. |
* When background music is set, the movies sound will not be played.
NOTE - With a fully-charged Battery Pack LP-E6, the continuous playback timeat room temperature (23C/73F) will be as follows: approx. 4 hours.
- If you took a still photo while you shot the movie, the still photo will be displayed for approx. 1 sec. during the movie playback.
| 