Understand how to place items on the platen glass to be scanned, copied, or faxed - MX722 & MX922
Article ID: ART142393
|
Date published: 05/13/2015
|
Date last updated: 04/09/2019
Description
Learn how to place your original items on the platen glass to ensure quality results when you scan, copy, or fax using your PIXMA MX722 or MX922 printer.
Solution
Function dependent
You may have to load the original in a different position depending on the function you selected in copying, faxing, or scanning.
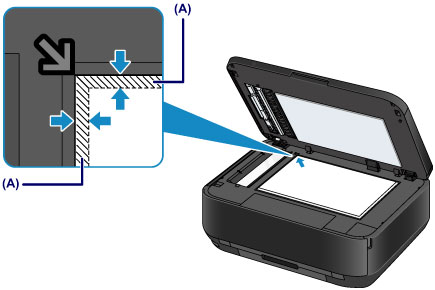
Load the original in the correct position according to the selected function. If you do not load the original correctly, it may not be scanned properly.
Place the original item on the platen glass scanning surface with the side to scan facing down and align it with the alignment mark .
Recommended sizes and settings:
Auto scan for Doc.type to scan text documents, magazines, or newspapers
Set Doc.type to Document or Photo
Specify a standard size (A4, Letter, etc.)
Note: The printer can't scan the shaded area (A) (0.04 inches (1 mm) from the edges of the platen glass).
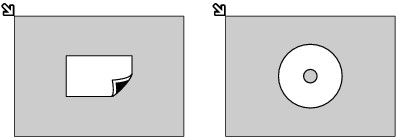
A single photo or disc
Place the original item on the platen glass scanning surface with the side to scan facing down at least 0.4 inches (10 mm) away from the edges of the platen glass.
Recommended sizes and settings:
Scan only one disc in Copy label to disc label
Scan only one printed photo in Photo copy
Use Auto scan for one printed photo, postcard, business card, or disc
Set Doc.type to Photo and specify Auto scan for Scan size to scan one original
Two or more items on the platen glass
Place two or more original items with the side to scan facing down (as shown below).
Place the items at least 0.4 inches (10 mm) away from the edges of the platen glass and at least 0.4 inches (10 mm) apart from each other. (A) - 0.4 inches (10 mm)
Recommended sizes and settings:
Use Auto scan for Doc.type to scan two or more printed photos, postcards, or business cards
Use Photo for Doc.type and specify Auto multi scan for Scan size to scan two or more originals
Note:
The Skew Correction function automatically compensates for the originals placed at an angle of up to approximately 10 degrees. Slanted photos with a long edge of 7.1 inches (180 mm) or more cannot be corrected.
Non-rectangular or irregular shaped photos (such as cut out photos) may not be scanned properly.

 .
.