
Correcting Images and Adjusting Colors with ScanGear (Scanner Driver)
| Article ID: ART142958 | | | Date published: 05/13/2015 | | | Date last updated: 08/17/2015 |
Solution
Correcting Images and Adjusting Colors with ScanGear (Scanner Driver)
Correcting Images (Unsharp Mask, Reduce Dust and Scratches, Fading Correction, etc.)
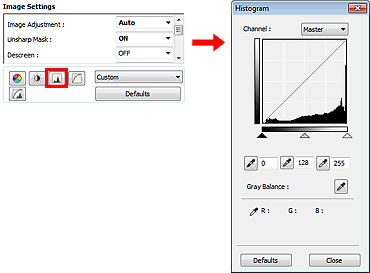
The Image Settings functions on the Advanced Mode tab of ScanGear (scanner driver) allow you to enhance the outline of the subjects, reduce dust/scratches and correct faded colors when scanning images.
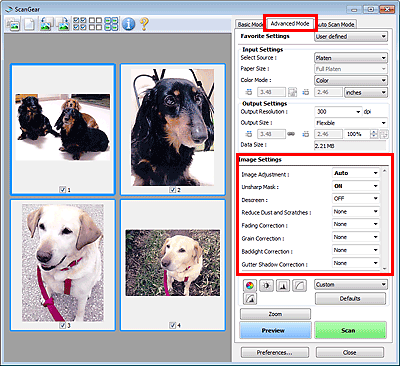
Setting Items
Click  (Arrow) of a function and select an item from the pull-down menu.
 Important
Do not apply these functions to images without moire, dust/scratches or faded colors. The color tone may be adversely affected.
See "Image Settings" for details and precautions on each function.
 Note
NoteSee "Scanning in Advanced Mode" to start the Advanced Mode tab of ScanGear and scan.
Adjusting the image brightness and color tone
Set Image Adjustment to Auto, Photo, Magazine, or Document according to the document type.
None | Auto |
 |  |
Reducing show-through in text documents or lightening the base color in recycled paper, newspapers, etc. when scanning from the ADF (Auto Document Feeder)
Set Reduce Show-through to Low or High according to the degree of show-through or darkness of the base color.
None | Low |
 |  |
Sharpening slightly out-of-focus images
Set Unsharp Mask to ON.
OFF | ON |
 |  |
Reducing gradations and stripe patterns
Set Descreen to ON.
OFF | ON |
 |  |
NotePrinted photos and pictures are displayed as a collection of fine dots. "Moire" is a phenomenon where uneven gradation or a stripe pattern appears when such photos or pictures printed with fine dots are scanned. Descreen is the function for reducing this moire effect.
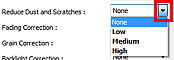
Reducing dust and scratches
Set Reduce Dust and Scratches to Low, Medium, or High according to the degree of dust and scratches.
None | Medium |
 |  |
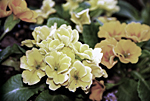
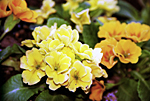
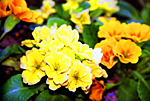
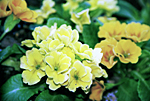
Correcting photos that have faded with time or due to colorcast
Set Fading Correction to Low, Medium, or High according to the degree of fading or colorcast.
None | Medium |
 |  |
Reducing graininess
Set Grain Correction to Low, Medium, or High according to the degree of graininess.
None | Medium |
 |  |
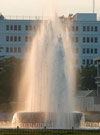
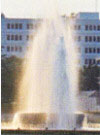
Correcting backlit images
Set Backlight Correction to Low, Medium, or High according to the degree of backlight.
None | Medium |
 |  |
Correcting shadows that appear between pages when scanning open booklets
Set Gutter Shadow Correction to Low, Medium, or High according to the degree of shadows.
None | Medium |
 |  |
Adjusting Colors Using a Color Pattern
You can preview color changes and reproduce natural colors by using the color pattern function in ScanGear (scanner driver)'s Basic Mode tab.
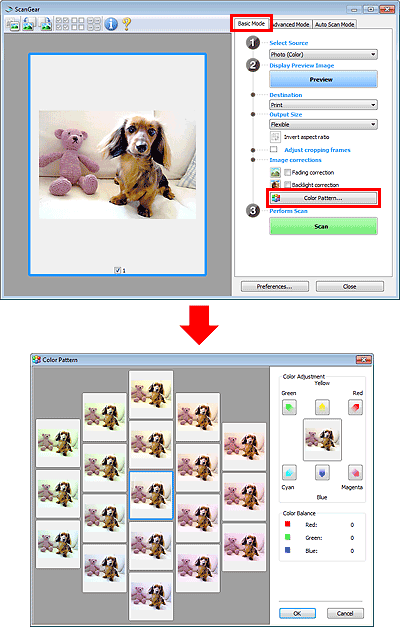
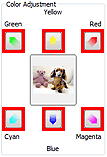
Color Adjustment
Correct colors that have faded with time or due to colorcast. "Colorcast" is a phenomenon where a specific color affects the entire picture due to the weather or ambient strong colors.
Click an arrow in Color Adjustment to emphasize the corresponding color.
Cyan & red, magenta & green and yellow & blue are complementary color pairs (each pair produces a shade of gray when mixed). You can reproduce the natural colors of the scene by reducing the cast color and increasing the complementary color.
It is recommended that you find a portion in the image where it should be white, and adjust the colors so that the portion turns white.
Preview image appears in the center. Preview image colors change as you adjust them.
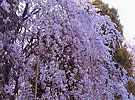
Below is an example of correcting a bluish image.
Since Blue and Green are too strong, click the Yellow and Magenta arrows to correct.
Before | After |
 |  |
NoteColor adjustments are applied only to the cropping frames (scan areas) or the frame selected in thumbnail view.
You can select multiple frames or cropping frames by clicking them while pressing the Ctrl key.
You can also select a color tone from the color pattern displayed on the left of the Color Pattern screen.
You can also use this function to add a specific tint to an image. Increase the magenta to add a warm tint, and increase the blue to add a cool tint.
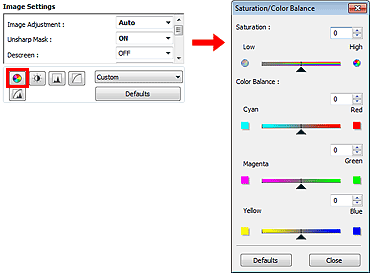
Adjusting Saturation and Color Balance
In ScanGear (scanner driver)'s Advanced Mode tab, click  (Saturation/Color Balance).
 Note
NoteClick Defaults to reset all adjustments in the current window.
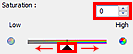
Saturation
Adjust the image's saturation (vividness). You can brighten colors that have faded with time, etc.
Move  (Slider) under Saturation to the left to decrease the saturation (darken the image), and to the right to increase the saturation (brighten the image). You can also enter a value (-127 to 127).
Saturation decreased | Original image | Saturation increased |
 |  |  |
NoteThe natural color tone of the original image may be lost if you increase saturation too much.
Color Balance
Adjust images that have a colorcast. "Colorcast" is a phenomenon where a specific color affects the entire picture due to the weather or ambient strong colors.
Move (Slider) under Color Balance to the left or right to emphasize the corresponding color.
Cyan & Red
Magenta & Green
Yellow & Blue
These are complementary color pairs (each pair produces a shade of gray when mixed). You can reproduce the natural colors of the scene by reducing the cast color and increasing the complementary color.
It is usually difficult to correct the image completely by adjusting only one color pair. It is recommended that you find a portion in the image where it should be white, and adjust all three color pairs so that the portion turns white.
You can also enter a value (-127 to 127).
Below is an example of an image in which the "Cyan & Red" pair has been adjusted.

Cyan is increased | Red is increased |
 |  |
Adjusting Brightness and Contrast
In ScanGear (scanner driver)'s Advanced Mode tab, click  (Brightness/Contrast).
 Note
NoteClick
 (Down arrow) to switch to detailed view. Click
  (Up arrow) to return to the previous view.
Click Defaults to reset all adjustments in the current window.
Channel
Each dot of an image is a mixture of Red, Green, and Blue in various proportions (gradation). These colors can be adjusted individually as a "channel."
Master
Adjust the Red, Green, and Blue combined.
Red
Adjust the Red channel.
Green
Adjust the Green channel.
Blue
Adjust the Blue channel.
NoteOnly Grayscale will be displayed in Channel when Color Mode is Grayscale.
Brightness
Adjust the image brightness. Move (Slider) under Brightness to the left to darken and right to brighten the image. You can also enter a value (-127 to 127).
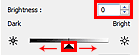
Darkened | Original image | Brightened |
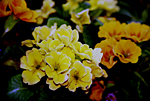 | | 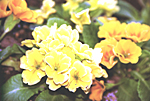 |
NoteHighlights may be lost if you brighten the image too much, and shadows may be lost if you darken the image too much.
Contrast
"Contrast" is the degree of difference between the brighter and darker parts of an image. Increasing contrast will increase the difference, thus sharpening the image. Decreasing contrast will decrease the difference, thus softening the image.
Move (Slider) under Contrast to the left to decrease and right to increase the contrast of the image. You can also enter a value (-127 to 127).
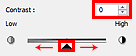
Decreased contrast | Original image | Increased contrast |
 | |  |
NoteIncreasing the contrast is effective in adding a three-dimensional feel to soft images. However, shadows and highlights may be lost if you increase the contrast too much.
Adjusting Histogram
In ScanGear (scanner driver)'s Advanced Mode tab, click  (Histogram).
 Note
NoteClick Defaults to reset all adjustments in the current window.
Channel
Each dot of an image is a mixture of Red, Green, and Blue in various proportions (gradation). These colors can be adjusted individually as a "channel."
Master
Adjust the Red, Green, and Blue combined.
Red
Adjust the Red channel.
Green
Adjust the Green channel.
Blue
Adjust the Blue channel.
NoteOnly Grayscale will be displayed in Channel when Color Mode is Grayscale.
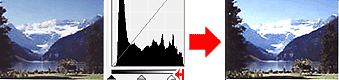
Reading Histograms
You can see the histogram of a specified area for each Channel. The higher the histogram peak, the more data is distributed to that level.
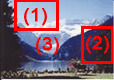
(1) Bright area | (2) Dark area | (3) Whole image |
 |  |  |
More data is distributed to the highlight side. | More data is distributed to the shadow side. | Data is widely distributed between the highlight and shadow. |
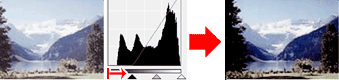
Adjusting Histograms (Using the Slider)
Select a Channel, then move  (Black-point Slider) or
  (White-point Slider) to specify the level to be set as the shadow or highlight.

- All parts to the left of (Black-point Slider) will be black (level 0).
- The parts at  (Mid-point Slider) will turn to the color exactly between the black-point and white-point.
- All parts to the right of (White-point Slider) will turn white (level 255).
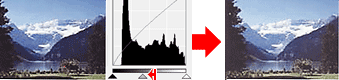
When Image Adjustment is set to anything but None, the adjustments shown below are performed automatically.
Moving the Black-point and White-point Sliders
Move the Black-point Slider or White-point Slider to adjust brightness.
Images with more data distributed to the highlight side
Move the Black-point Slider toward the highlight side.
Images with more data distributed to the shadow side
Move the White-point Slider toward the shadow side.
Images with widely distributed data
Move the Black-point Slider toward the highlight side, and White-point Slider toward the shadow side.
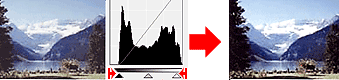
Moving the Mid-point Slider
Move the Mid-point Slider to specify the level to be set as the middle of the tonal range.
Images with more data distributed to the highlight side
Move the Mid-point Slider toward the highlight side.
Images with more data distributed to the shadow side
Move the Mid-point Slider toward the shadow side.
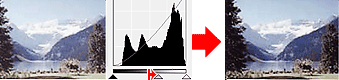
Adjusting Histograms (Using the Droppers)
When you select a Channel and click the Black-point, Mid-point or White-point Dropper, the mouse pointer on the preview image changes to a dropper. Click a Dropper displayed below the histogram to change the setting.

- The point clicked with  (Black-point Dropper) will be the darkest point. You can also enter a value (0 to 245).
- The point clicked with  (Mid-point Dropper) will be the middle of the tonal range. You can also enter a value (5 to 250).
- The point clicked with  (White-point Dropper) will be the brightest point. You can also enter a value (10 to 255).
- Click  (Dropper) for Gray Balance and click the area you want to adjust the color in the preview image.
The clicked point will be set as the achromatic color reference, and the rest of the image is adjusted accordingly. For instance, if snow in a photo appears bluish, click the bluish part to adjust the whole image and reproduce natural colors.
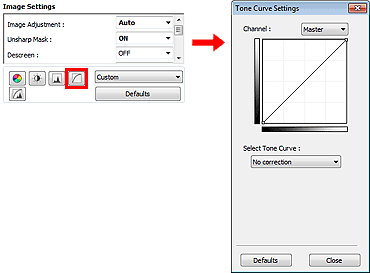
Adjusting Tone Curve
In ScanGear (scanner driver)'s Advanced Mode tab, click  (Tone Curve Settings).
 Note
NoteClick Defaults to reset all adjustments in the current window.
Channel
Each dot of an image is a mixture of Red, Green, and Blue in various proportions (gradation). These colors can be adjusted individually as a "channel."
Master
Adjust the Red, Green, and Blue combined.
Red
Adjust the Red channel.
Green
Adjust the Green channel.
Blue
Adjust the Blue channel.
NoteOnly Grayscale will be displayed in Channel when Color Mode is Grayscale.
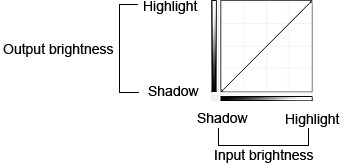
Reading Tone Curves
With ScanGear, scanning images via a scanner is the input, and displaying to a monitor is the output. "Tone Curve" shows the balance of tone input and output for each Channel.
Adjusting Tone Curve
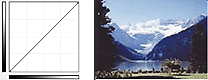
In Select Tone Curve, select a tone curve from No correction, Overexposure, Underexposure, High contrast, Reverse the negative/positive image and Edit custom curve.
No correction (No adjustment)
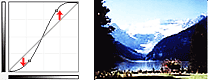
Overexposure (Convex curve)
The midtone data of the input side is stretched toward the highlight of the output side, resulting in a bright-toned image when viewed on a monitor.
Underexposure (Concave curve)
The midtone data of the input side is stretched toward the shadow of the output side, resulting in a dark-toned image when viewed on a monitor.
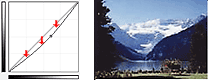
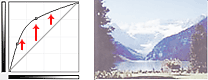
High contrast (S curve)
The highlight and shadow of the input side are enhanced, resulting in a high-contrast image.
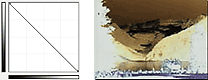
Reverse the negative/positive image (Downward-sloping line)
The input and output sides are reversed, resulting in a negative-positive inverted image.
Edit custom curve
You can drag specific points on the Tone Curve to freely adjust the brightness of the corresponding
Adjusting Tone Curve
In ScanGear (scanner driver)'s Advanced Mode tab, click (Tone Curve Settings).
NoteClick Defaults to reset all adjustments in the current window.
Channel
Each dot of an image is a mixture of Red, Green, and Blue in various proportions (gradation). These colors can be adjusted individually as a "channel."
Master
Adjust the Red, Green, and Blue combined.
Red
Adjust the Red channel.
Green
Adjust the Green channel.
Blue
Adjust the Blue channel.
NoteOnly Grayscale will be displayed in Channel when Color Mode is Grayscale.
Reading Tone Curves
With ScanGear, scanning images via a scanner is the input, and displaying to a monitor is the output. "Tone Curve" shows the balance of tone input and output for each Channel.
Adjusting Tone Curve
In Select Tone Curve, select a tone curve from No correction, Overexposure, Underexposure, High contrast, Reverse the negative/positive image and Edit custom curve.
No correction (No adjustment)
Overexposure (Convex curve)
The midtone data of the input side is stretched toward the highlight of the output side, resulting in a bright-toned image when viewed on a monitor.
Underexposure (Concave curve)
The midtone data of the input side is stretched toward the shadow of the output side, resulting in a dark-toned image when viewed on a monitor.
High contrast (S curve)
The highlight and shadow of the input side are enhanced, resulting in a high-contrast image.
Reverse the negative/positive image (Downward-sloping line)
The input and output sides are reversed, resulting in a negative-positive inverted image.
Edit custom curve
You can drag specific points on the Tone Curve to freely adjust the brightness of the corresponding