Print head alignment corrects the positions of the print head and improves deviated colors and lines.
 These instructions are for a Windows PC. If you use a Mac®, refer to align the print head manually from a Mac.
 These instructions show you how to complete a manual alignment. Refer to automatic alignment if you want the machine to do it for you.
During this process, you will print, then check the printed pattern 3 different times.
Manual print head alignment
-
Open the printer driver setup window.
-
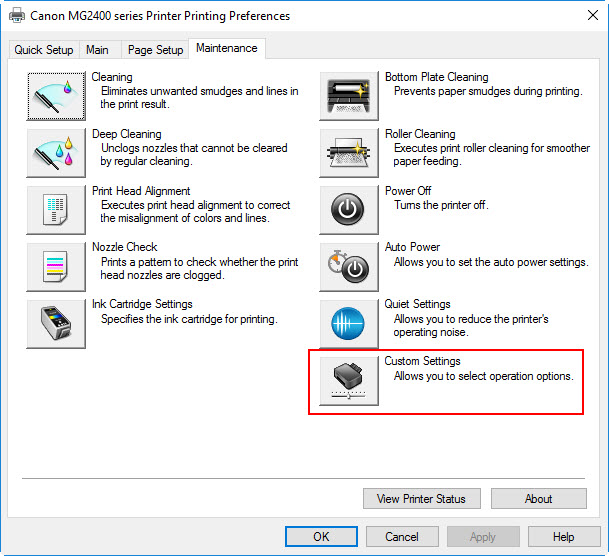
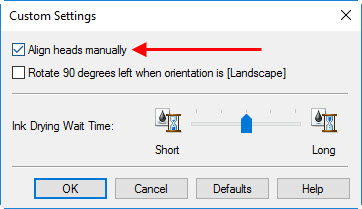
Select Custom Settings on the Maintenance tab. The Custom Settings dialog box opens.
-
Check the Align heads manually check box.
-
Select OK when the prompt appears.

-
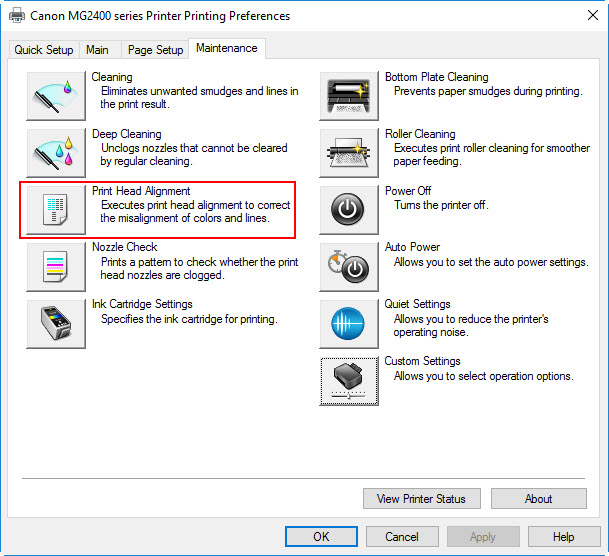
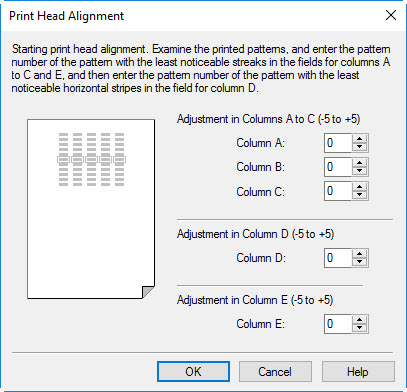
Select Print Head Alignment on the Maintenance tab. The Start Print Head Alignment dialog box opens.
-
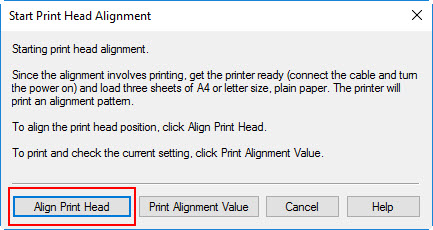
Load 3 sheets of A4 or Letter size plain paper into the rear tray.
-
Make sure that the machine is on and select Align Print Head. Follow the instructions in the message.
- You will get a printed page that looks similar to this. Refer to this page as you follow the next steps.
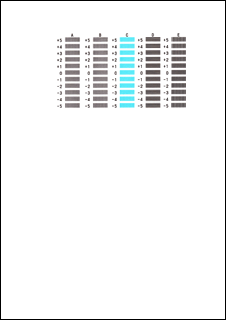
- Enter the numbers of the patterns with the least amount of stripes (see samples below) in the applicable columns. When you have entered all the values, select OK.
Pick the setting that produces the least noticeable vertical stripes.
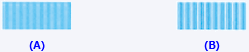
(A) Least noticeable vertical stripes
(B) Most noticeable vertical stripes
Pick the setting that produces the least noticeable horizontal stripes.

(A) Least noticeable horizontal stripes
(B) Most noticeable horizontal stripes
-
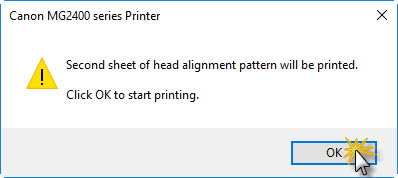
Confirm the displayed message and Select OK. The second pattern prints.
-
Follow the same steps as in number 8-9 above. This time you will choose only the least noticeable vertical stripes. When you have entered all the values, Select OK.
Pick the setting that produces the least noticeable vertical stripes.
(A) Least noticeable vertical stripes
(B) Most noticeable vertical stripes
-
Confirm the displayed message and Select OK. The third pattern prints.

-
Follow the same steps as in number 8-9 above. This time you will choose only the least noticeable horizontal stripes. When you have entered all the values, Select OK.
Pick the setting that produces the least noticeable horizontal stripes.

(A) Least noticeable horizontal stripes
(B) Most noticeable horizontal stripes
- To print and check the adjustments you just made to the settings, open the Start Print Head Alignment dialog box, and select Print Alignment Value.
If you continue to experience misaligned prints after following the steps above, the encoder film in the printer may need to be cleaned. Clean the encoder film.
If your product issue was not resolved after following the steps above, or if you require additional help, please create or log in to your Canon Account to see your technical support options.
Or if you still need help, visit our Canon Community by clicking the button below to get answers:

____________________________________________________________________________________________
