If your printed output is showing quality issues such as streaked prints or incorrect colors, you can follow the steps below to understand and resolve the problem.
Written instructions
There are two parts to the process:
-
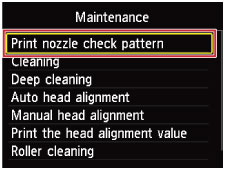
Print the nozzle check pattern.
-
Examine the nozzle check pattern.
1. Print the nozzle check pattern
Follow these steps to print the nozzle check pattern:
-
Turn on the printer and load one or more sheets of letter-sized plain paper in the lower paper tray.
-
Open the paper output tray by holding the sides of the paper output tray.
-
Extend the paper output support.
-
Press MENU.
-
Select Setup, then press OK.

-
Make sure the page prints.
-
If the page is blank, check the ink tanks for ink.
2. Examine the nozzle check pattern
Follow these steps to assess your printed nozzle check pattern:
-
Check if there are missing lines in the pattern (1).
-
Check for horizontal white streaks in the pattern (2).
-
Make sure there are no missing lines or horizontal white streaks (A).
-
Make sure no lines are missing and there are no horizontal white streaks (B).

 Reference (C) above shows the range number of pages printed by the printer.
-
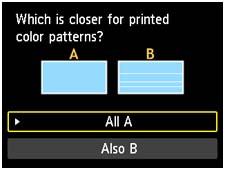
Follow the prompts on the LCD and select the pattern that is closer to the printed nozzle check pattern.
-
If cleaning is not required, ensure All A is selected and then press OK.
-
If cleaning is required, select Also B and press OK. At the cleaning confirmation screen, press OK.
-
Select Yes, then press OK.
To learn more about print head cleaning, refer to:
If your product issue was not resolved after following the steps above, or if you require additional help, please create or log in to your Canon Account to see your technical support options.
Or if you still need help, visit our Canon Community by clicking the button below to get answers:

____________________________________________________________________________________________