Using Wi-Fi, you can send and receive still images and movies from a camera to a smartphone. This section contains explanations for the following two procedures: 1. Connecting to a smartphone and sending images from the camera using the <Mobile device connect> (  ) button. 2. Sending images from the camera by registering a smartphone from the Wi-Fi menu (  ).
NOTE - Smartphones and tablets are collectively referred to as smartphones.
- Before connecting your camera to a smartphone, first install the free dedicated application, CameraWindow, on your smartphone.
- For details on this application (supported smartphones and included functions), refer to the Canon website.
1. Connecting to a smartphone and sending images from the camera using the <Mobile device connect> button. Once you have connected to a smartphone initially via Wi-Fi by pressing the < > button, you can simply press the < > button after that to connect again and view and save camera images on connected devices.
To register multiple smartphones, please refer to 2. Sending images from the camera by registering a smartphone from the Wi-Fi menu.
The procedure for connecting to a smartphone and sending images from the camera using the < > button is explained below.
1. Press the < > button.
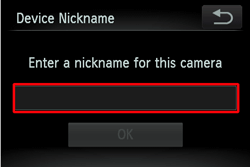
 NOTE When connecting for the first time, a nickname registration screen will be displayed. This nickname will be displayed on the screen of target devices when connecting to other devices via Wi-Fi. Touch inside the frame shown above to display the keyboard. Enter a nickname, and then press [OK].
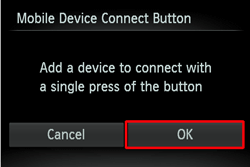
2. Confirm the details, and touch [OK].
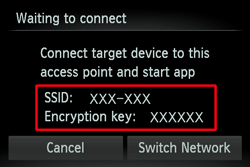
3. The cameras SSID and encryption key are displayed on the screen.
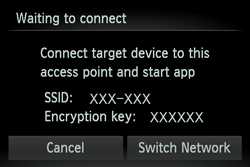 REFERENCE When you are in the vicinity of an access point that you have previously connected to, the camera will automatically connect to it. To change access points, select [Switch Network] from the screen that will be displayed when the connection is being established.
4. Use the smartphone to connect to the network displayed on the camera screen. - Choose the displayed SSID (network name) from the smartphones Wi-Fi setting menu.
- Enter the encryption key displayed on the camera screen into the password field on the smartphone.
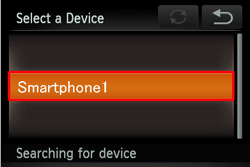
5. Start CameraWindow on the smartphone. Once the smartphone is recognized on the camera, the device connection screen will be displayed on the camera.
6. Touch the name of the smartphone you want to connect to.
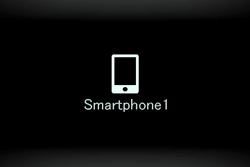
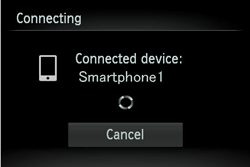
 After a connection is established with the smartphone, the smartphone name is displayed on the camera. (This screen will close in about one minute.)
7 Import images. - Use the smartphone to import images from the camera to the smartphone.
- Use the smartphone to end the connection; the camera will automatically turn off.
NOTE - To control the camera manually, either end the connection from the smartphone or restart the camera after pressing the power button to turn it off momentarily.
- Once a connection has been established with a smartphone, you can automatically reconnect to the registered device by simply pressing the < > button, even if the camera has been turned off.
- The image quality level for movies that can be sent may differ depending on the smartphone. Refer to the instruction manual provided youre your smartphone for details.
- To remove a registered smartphone, touch [FUNC.] and then [MENU], and on the [
 ] tab, choose [Mobile Device Connect Button]. After the confirmation message, touch [OK]. ] tab, choose [Mobile Device Connect Button]. After the confirmation message, touch [OK].
REFERENCE To assign a different one, clear the current assignment. Touch [FUNC.] and then [MENU], and on the [ ] tab, choose [Mobile Device Connect Button]. After the confirmation message, touch [OK], and then assign the new smartphone to the button.
2-1. Sending images from the camera by registering a smartphone from the Wi-Fi menu The procedure for registering a smartphone from the Wi-Fi menu is explained below. NOTE The procedure for adding a smartphone through the Wi-Fi menu varies from the < > button approach as follows: - The connection is established through the Wi-Fi menu. You cannot connect to a smartphone by pressing the <> button.
- The camera will remain on, even after you have disconnected from the smartphone.
- You can operate the camera to send images to the smartphone.
- Multiple smartphones can be added.
- After selecting a smartphone, the privacy settings screen (where you decide whether to allow images on the camera to be displayed on the smartphone) is displayed. If you select [No], images on the camera will not be displayed on the smartphone.
1. Press the <Playback> (  ) button to turn on the camera.
2. Touch ( ).

3. Touch (  ).

4. Touch [Add a Device].
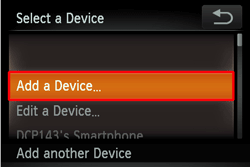 NOTE - The names of smartphones previously registered will be displayed on the screen in step 4. In this case, simply touch the smartphone name to connect again.
5. The following screen appears.
Use the smartphone to connect to the access point displayed on the camera screen. - Choose the displayed SSID (network name) from the smartphones Wi-Fi setting menu.
- Enter the encryption key displayed on the camera screen into the password field on the smartphone.
6. Start CameraWindow on the smartphone.
7. Touch the name of the smartphone you want to connect to.
8. The following screen appears.
 To display the cameras images on the smartphone, select [Yes]. If you do not want to display the images select [No]. If you select [Yes] you can use the smartphone to send the cameras images to the smartphone.
9. The following screen appears.
10. After connection to the smartphone has been established, the following screen appears.
 REFERENCE - To add multiple smartphones, repeat the procedure from step 4 for each device.
- To change privacy settings for registered smartphones, choose the smartphone in [Edit a Device], and then choose [View Settings].
- To disconnect from the camera, touch (
 ) in the upper right of the screen, and then touch [OK] in the disconnection confirmation screen. You can also use the smartphone to end the connection. ) in the upper right of the screen, and then touch [OK] in the disconnection confirmation screen. You can also use the smartphone to end the connection. - For more information [Touch Actions], please refer to the cameras instruction manual.
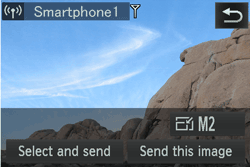
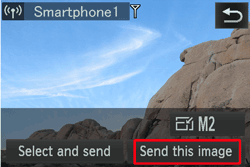
2-2. Sending images to a smartphone individually 11. To send an image, touch [Send this image].
 To select the image you want to send, either touch the right or left edge, or drag left and right across the screen. REFERENCE You can choose the resolution (size) of images to send by touching [  ] on the image transmission screen. - To send images at original size, select [No] as the resizing option.
- Choosing [
 ] [ ] [  ] will resize images that are larger than the selected size before sending. ] will resize images that are larger than the selected size before sending. - Movies cannot be resized.
NOTE - Keep your fingers or other objects off the Wi-Fi transmitter-receiver. Covering this may decrease the speed of your image transfers.
- On the screen, wireless signal strength is indicated by the following icons.
[  ] high, [  ] medium, [  ] low, [  ] weak However, no icon is displayed when the camera is used as an access point.
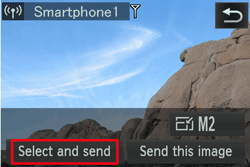
13. After sending images to a smartphone, [Transfer completed] will be displayed, and the display will return to the image transfer screen displayed in step 11. 2-3. Sending multiple images to a smartphone 11. Touch [Select and send].
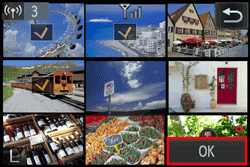
12. Choose images. - Touching an image to send will label it with a (
 ) icon. ) icon. - To cancel selection, touch the image again. () is no longer displayed.
- Repeat this process to choose additional images.
- After you finish choosing images, touch [OK].
NOTE You can also choose images by switching to single-image display and dragging left or right across the screen.
13. Touch [Send] to send images to the smartphone.
 REFERENCE You can choose the resolution (size) of images to send by touching [ ] on the image transmission screen. - To send images at original size, select [No] as the resizing option.
- Choosing [ ] [ ] will resize images that are larger than the selected size before sending.
- Movies cannot be resized.
14. After sending images to a smartphone, [Transfer completed] will be displayed, and the display will return to the image transfer screen displayed in step 11.
|