|
Refer to the following explanation if images cannot be successfully downloaded to the computer using EOS Utility.
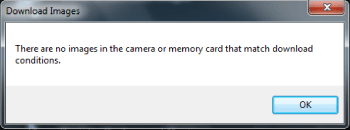
The Cause and Meaning of the Error Message The following problem is a possible cause of the [There are no images in the camera or memory card that match download conditions] message being displayed after clicking the [Starts to download images] button in EOS Utility.
- All of the images in the camera have previously been downloaded and there are no new images, or the [Settings for downloaded images] in the [Download Images] tab of the [Preferences] of EOS Utility are set to [Images not yet downloaded].
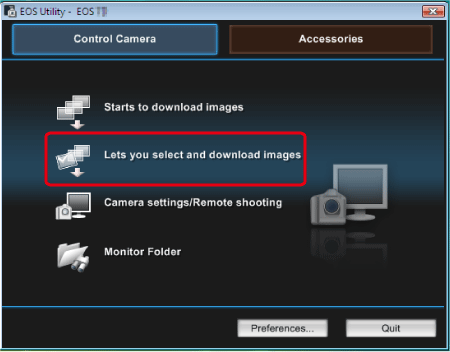
Clicking [Lets you select and download images] in EOS Utility will allow download of the same image.
NOTE
- When the same image is downloaded more than once, "_xxx" (underscore and 3 numbers) will be appended to the end of the file name.
- Movies can be downloaded in the same was as still images. Depending on file size however, downloading may take time.
- The procedure is shown in Windows 7 for the purposes of explanation. The procedure is similar for Windows 8.1, Windows 8, Windows Vista, Windows XP, and Mac OS X.
REFERENCE
- If the [Settings for downloaded images] in the [Download Images] tab of the [Preferences] of EOS Utility are set to [All images], clicking [Download] after reconnecting the camera will download all images. However, if images are not erased from the camera, the same images will be downloaded every time images are downloaded using EOS utility.
- If the [Settings for downloaded images] in the [Download Images] tab of the [Preferences] of EOS Utility are set to [Images not yet downloaded], previously downloaded images will not be downloaded again.
Select and Download Images
- Make sure to install all of the software on the Solution Disk that came with your camera* onto your computer before proceeding.
* If the EOS DIGITAL Solution Disk was not included with your camera, please download it from the Canon homepage.
- For Windows users, it will be necessary to log in to an account with administrator privileges.
- EOS Utility has been developed for use on Windows 8.1, Windows 8,Windows 7, Windows Vista, Windows XP, and Mac OS X. However, supported operating systems may differ depending on the version of EOS Utility.
For downloading only necessary images, refer to the following procedure.
1. Connect your camera and computer using the interface cable provided with your camera.
- Make sure to set the [Auto Power Off] feature on your camera to [OFF].
- For more information on connecting the camera to a computer, refer to the cameras Instruction Manual.
2. Set the cameras power switch to <ON>.
3. EOS Utility will start.
If EOS Utility does not start automatically, click the [Start] menu > [Show all Programs] > [Canon Utilities] > [EOS Utility] > [EOS Utility].
NOTE
In Mac OSX, click the EOS Utility icon in the dock.
If the select application screen is displayed, click [Download Images from Canon Camera] ([Canon EOS Utility] in Windows XP.)
4. If the screen in the image below is displayed, click [Lets you select and download images].
*The screen may differ depending on the model you use.
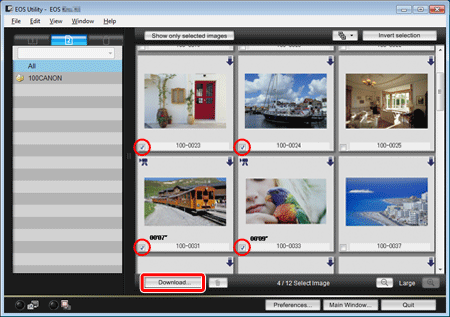
5. The viewer screen will appear, and all the images currently in the memory card will be displayed.
Select the images you want to import by appending them with a checkmark, and then click [Download].
(In the example below, four images have been selected.)
NOTE
- An [
 ] icon will be displayed in the upper left of movie files. ] icon will be displayed in the upper left of movie files.
- Clicking the [
 ] icon in the upper right of the screen will bring up preferences for image selection and download. ] icon in the upper right of the screen will bring up preferences for image selection and download.
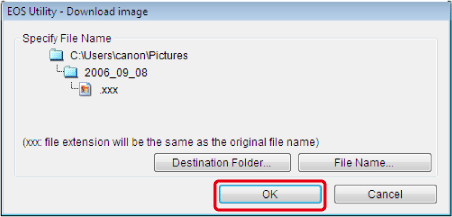
6. The [Download image] dialogue box will be displayed. If you want to change the location images are saved to, click [Destination Folder] and change the location.
NOTE
- Images will be saved in folders that correspond to the shooting date in the [Pictures] folder by default.
7. Click [OK] on the screen shown in the image above to start downloading the images.
After the selected images have been downloaded, Digital Photo Professional will start automatically and the downloaded images will be displayed.
This concludes the procedure for downloading images.
|
