|
By connecting the camera to a TV, you can view your shots on the larger screen of the TV.
For details on connection or how to switch inputs, refer to the TV manual.
IMPORTANT
- Images will not display correctly if the camera's video output setting (NTSC / PAL) does not match the TV system. Press the [
 ] button, and then select the [Set up] ( ] button, and then select the [Set up] ( ) tab > [Video System] to switch to the correct video output setting. ) tab > [Video System] to switch to the correct video output setting.
- Some information may not be displayed when viewing images on a TV.
1. Turn off the camera and the TV.
2. Connect the AV Cable (sold separately) to the camera’s [A/V OUT / DIGITAL] terminal.
3. Connect the AV Cable (sold separately) to a TV’s video-in terminal and audio-in terminal.
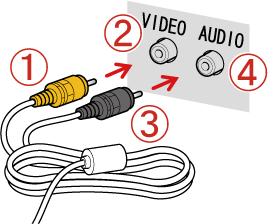
 Plug the yellow terminal of the [AV Cable] into the  VIDEO IN jack on the TV.
 Plug the black terminal of the [AV Cable] into the  AUDIO IN jack on the TV. If the TV has two AUDIO IN jacks (for right and left), plug the AV Cable to either one of them.
4. Turn on the TV and switch it to video input.
5. Press the <Playback> (  ) button to turn on the camera.
The image will appear on the TV (nothing will appear on the screen of the camera).
When you want to stop playing back images, turn off the camera and the TV first before removing the [AV Cable] or [Stereo AV Cable].
|
