
Wireless LAN setup using WCN (Windows Connect Now) method - MG5320
| Article ID: ART148726 | | | Date published: 05/20/2015 | | | Date last updated: 05/12/2016 |
Description
Solution
Wireless Setup Using WCN (Windows Connect Now) Method
To connect the printer to your network, Advanced Setup method will have you manually enter the access point (network name) and network key (password / passphrase).
IMPORTANT: If you don't have the access point or network key, a tool built into the setup software may be able to retrieve it for you. However, you will need to know the access point's security protocol.
REFERENCE:
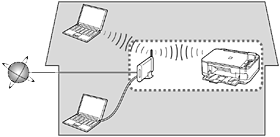
Make sure that the computer and access point or router are connected.
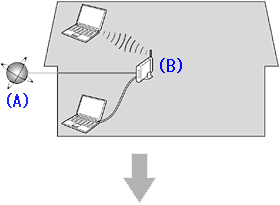
After confirming the connection, perform the following instructions to add (connect) the machine to the network.
(A) Internet
(B) Access point or wireless router, etc.
- Notes on Wireless Connection
- The configuration, router functions, setup procedures and security settings of the network device vary depending on your system environment. For details, refer to the manual of your network device or contact its manufacturer.
- Check if your device supports IEEE802.11n, 802.11g or 802.11b.
- For office use, consult your network administrator.
- Take added care when connecting to a network that is not protected with security measures, as there is a risk of disclosing data such as your personal information to a third party.
REFERENCE:
An "Ad-hoc connection," which establishes a direct connection to the computer over a wireless connection without an access point, is not supported. Be sure to prepare an access point.
IMPORTANT:
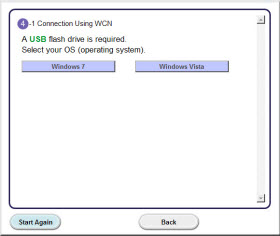
A USB flash drive is required.
Wireless Setup Using WCN (Windows Connect Now)
IMPORTANT:
- Quit all applications before installation.
- Log on using an administrator account.
- Internet connection may be required during the installation. Connection fees apply.
Screens are based on Windows 7 operating system Home Premium. Actual screens may differ depending on the OS version.
- Press the ON button to turn off the machine.
Operating noise stops after about 1 minute.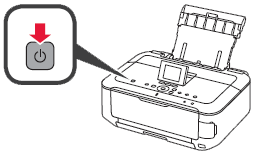
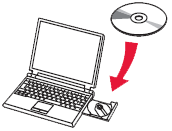
- Insert the CD-ROM into the computer.
IMPORTANT:
If the USB cable is already connected, unplug it. If a message appears on the computer, click Cancel. - Click Run Msetup4.exe on the AutoPlay screen, then click Yes or Continue on the User Account Control dialog box.
If the User Account Control dialog box reappears in following steps, click Yes or Continue.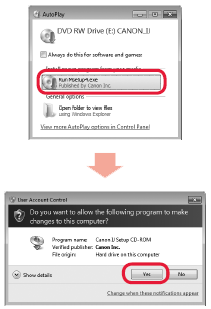
REFERENCE:
If the CD-ROM does not autorun:
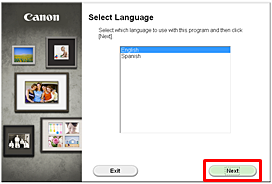
Double-click (My) Computer ->CDROM icon ->MSETUP4.EXE. - Select which language to use with this program and then click Next.
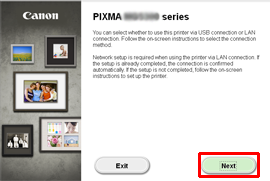
- Click Next.
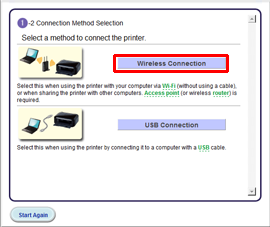
IMPORTANT: The Setup Guide will launch in a window on the computer screen (as shown in the below step). The Setup Guide includes instructions to set up the printer in WCN mode. Follow the instructions on each Setup Guide window pressing the appropriate buttons on the printer's operation panel. Then click the Next button to proceed to the next Setup Guide window. Now go to the next step. - At step 1-2 (Connection Method Selection), click Wireless Connection.
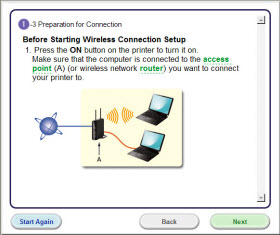
- At step 1-3 (Preparation fo Connection), press the ON button on the printer to power it on and then click Next on the Setup Guide window.
- At step 2-1 (Printer Setup), click Next.

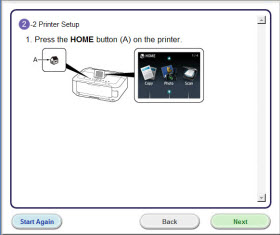
- At step 2-2 (Printer Setup), press the HOME button on the printer and then click Next.
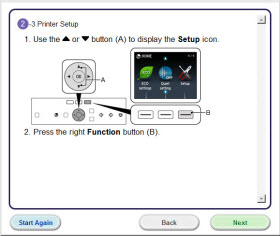
- At step 2-3 (Printer Setup), press the up or down arrow on the printer to display Setup, press the right Function button (the button underneath the Setup icon) and then click Next.
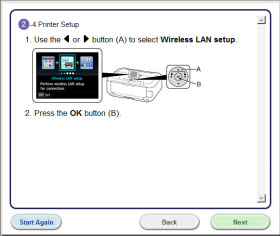
- At step 2-4 (Printer Setup), press the left or right arrow to select Wireless LAN setup, press the OK button and then click Next.
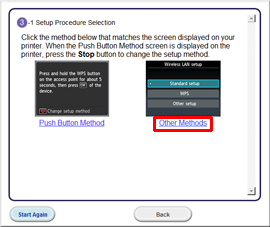
- At step 3-1 (Setup Procedure Selection) window, if the Push Button Method window appears on the printer's display, press the Stop button on the printer and then click Other Methods on the Setup Guide. If there is no WPS enabled access point, Wireless LAN Setup will appear on the printer's display. Click Other Methods on the Setup Guide to proceed to the next step.
REFERENCE
If another message appears, refer to Troubleshooting on the right.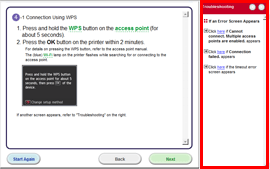
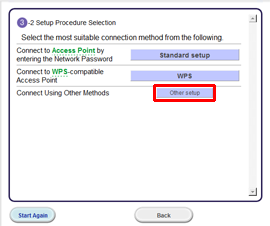
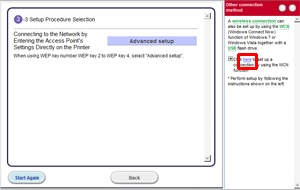
- At step 3-2 (Setup Procedure Selection), click Other setup at Setup Guide window.
- At step 3-3 (Setup Procedure Selection), click the word here on the right-hand pane of the Setup Guide window.
- At step 4-1 (Connection Using WCN) window, click on the link that matches your computer's operating system.
For Windows 7, click here to go to step 16.
For Windows Vista, click here to go to step 23.
The next set of instructions, will have you copy the computer's network profile to a USB flash drive. Follow the instructions on the Setup Guide window and perform the steps on your computer. After the steps are complete, click the Next button on the Setup Guide to go to the next window. Now, go to the next step.
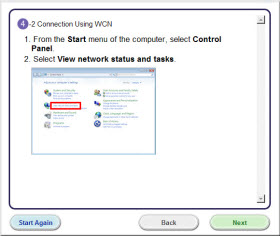
At step 4-2 (Connection Using WCN) window, click Start, Control Panel and then View network status and tasks. Click Next to go to the next step.
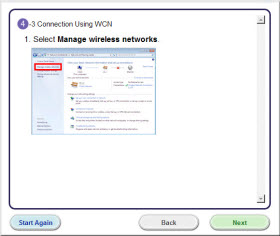
At step 4-3 (Connection Using WCN) window, click Manage wireless networks on the left pane and then click Next to go to the next step.
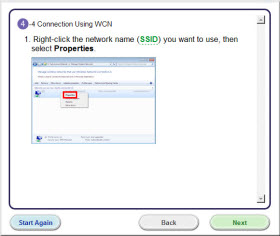
At step 4-4 (Connection Using WCN) window, right-click on your network's name, select Properties and then click Next to go to the next step.
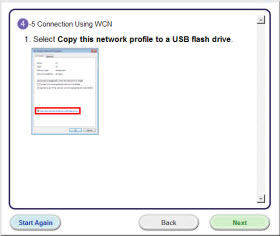
At step 4-5 (Connection Using WCN) window, click Copy this network profile to a USB flash drive and then click Next to go to the next step.
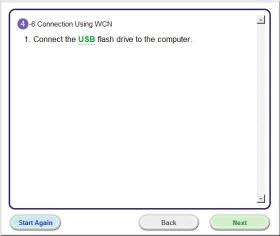
At step 4-6 (Connection Using WCN) window, connect the USB flash drive to your computer and then click Next to go to the next step.
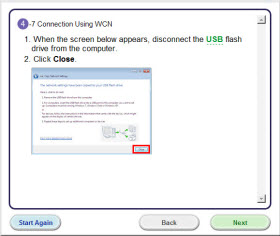
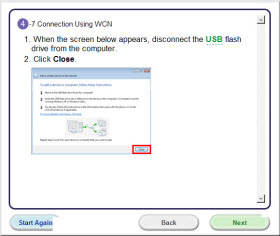
At step 4-7 (Connection Using WCN) window, ensure screen The network settings have been copied to your USB flash drive appears on your computer monitor. Disconnect the USB flash drive from your computer, click Close at the computer screen and then click Next on the Setup Guide window. Click here to go to step 30.
- The next set of instructions, will have you copy the computer's network profile to a USB flash drive. Follow the instructions on the Setup Guide window and perform the steps on your computer. After the steps are complete, click the Next button on the Setup Guide to go to the next window. Now, go to the next step.
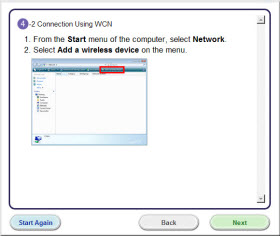
At step 4-2 (Connection Using WCN) window, click Start, Network and then Add a wireless device. Click Next to go to the next step.
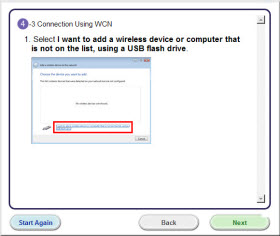
At step 4-3 (Connection Using WCN) window, click I want to add a wireless device or computer that is not on the list, using a USB flash drive and then click Next.
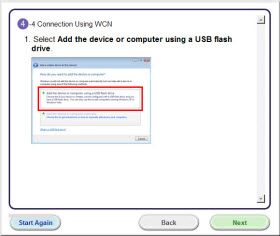
At step 4-4 (Connection Using WCN) window, click Add the device or computer using a USB flash drive and then click Next.
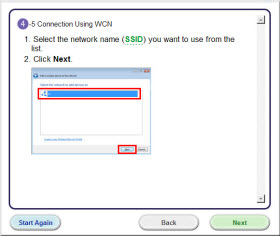
At step 4-5 (Connection Using WCN) window, select your network's name, click Next on the same window and then click Next on the Setup Guide.
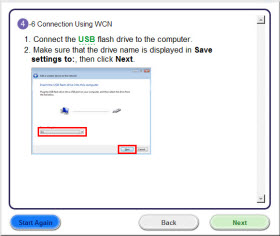
At step 4-6 (Connection Using WCN) window, insert the USB flash drive into your computer, ensure the drive name appears in Save settings to: click Next on the same window and then click Next in the Setup Guide window.
At step 4-7 (Connection Using WCN) window, ensure screen To add a device or computer, follow these instructions appears on your computer monitor. Disconnect the USB flash drive from your computer, click Close at the computer screen and then click Next on the Setup Guide window. Click here to go to step 30.
You will now setup the printer to accept the network profile from the USB flash. Follow the steps on the Setup Guide and then click Next to proceed to the next step.
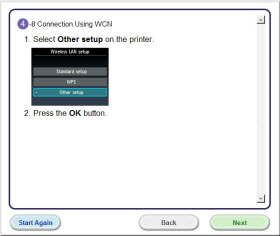
At step 4-8 (Connection Using WCN) window, use the up or down arrow to select Other setup, press OK on the printer and then click Next to proceed to the next step.
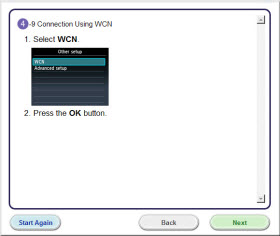
At step 4-9 (Connection Using WCN) window, use the up or down arrow to select WCN, press OK on the printer and then click Next to proceed to the next step.
At step 4-10 (Connection Using WCN) window, insert the USB flash drive into the printer's direct print port as shown, press OK on the printer and then click Next to proceed to the next step.
If a different message appears then what is shown, refer to Troubleshooting on the right-hand pane.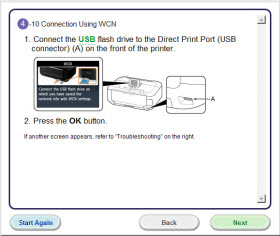
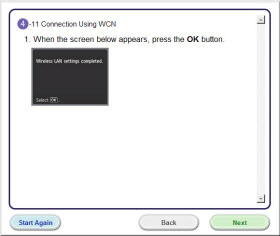
At step 4-11 (Connection Using WCN) window, when message Wireless LAN setup completed appears on the printer's display, press OK on the printer and then click Next to proceed to the next step.
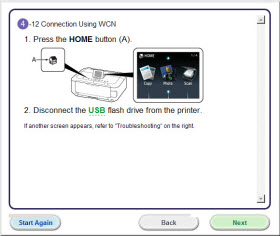
At step 4-12 (Connection Using WCN) window, press the HOME button on the printer. Disconnect the USB flash drive from the printer and then click Next to proceed to the next step.
- Network connection setting is complete.
Click Next and then install the software.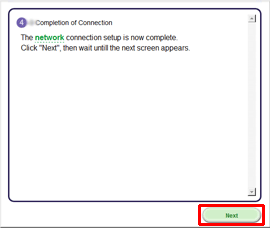
Install the Software (Information)
Let's perform the software installation.
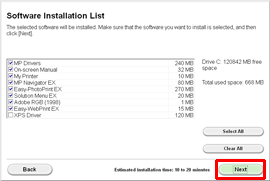
- At the Software Installation List screen, select the items to install and then click Next.
REFERENCE:
Easy-WebPrint EX
Easy-WebPrint EX is Web print software that is installed on the computer when installing the supplied software. Internet Explorer 7 or later (Windows) is required to use this software. An Internet connection is required for installation.
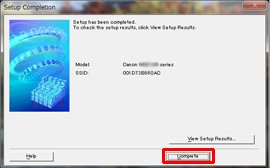
Follow any on-screen instructions to proceed with the software installation. - When the Setup Completion dialog box appears, click Complete.
IMPORTANT: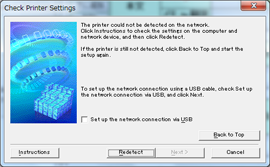
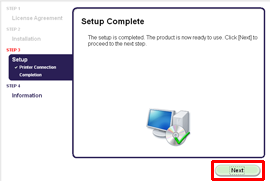
When this printer has not been detected, the Check Printer Settings dialog box is displayed. In such a case, refer to [The printer cannot be detected (the message that the printer could not be detected on the network is displayed) ]. - At the Setup Complete screen, click Next.
- Important Information for the Installation
Necessary Information for the User Registration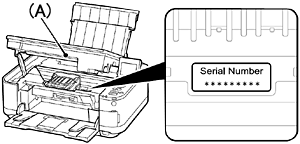
When the serial number is not displayed on the registration screen automatically, input the serial number located inside the machine (as shown in the illustration).
IMPORTANT:
If the power is on, the Print Head Holder will move when the Scanning Unit (Cover) (A) is opened.
If the Extended Survey Program screen appears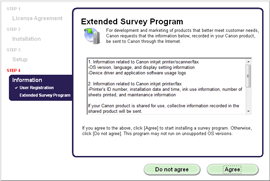
If you can agree to Extended Survey Program, click Agree.
If you click Do not agree, the Extended Survey Program will not be installed.
(This has no effect on the machine's functionality.)
When the Test Print window is displayed
Test printing will be performed to check the printer's operation.
Load plain paper into the printer and click Execute.
After test printing, click Next.
To skip test printing, click Next instead of Execute. - Click Exit to complete the installation.
Remove the Setup CD-ROM and keep it in a safe place.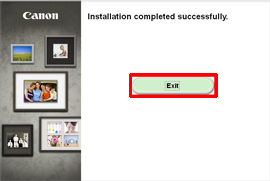
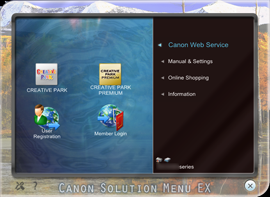
- Solution Menu EX starts.
The end of the procedure of the wireless LAN setup.
Check Printer Settings
During the wireless setup in the software installation, when the Check Printer Settings dialog box is displayed, try the solutions 1 to 4 one by one in order.
1. Before checking the wireless setting1-1. First make sure all devices, namely, i) printer, ii) access point or iii) router is powered ON. Then, turn OFF every device and turn them ON again.
1-2. Please the printer and access point, or router, in the way there are no obstacles between them.
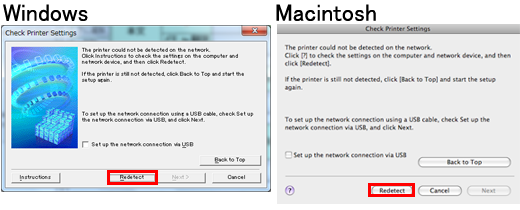
After doing step 1 and 2, click [ Redetect ] to continue the setup.
If the problem persists, check the following solution [ 2. Confirm whether the setting of the main unit is correct or not]:
2.Confirm whether the setting of the main unit is correct or notConfirm that the wireless LAN connection is active.
step 1.
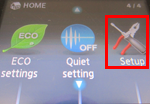
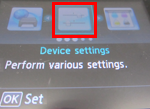
Click "Setup," which is one of the function buttons.
step 2.

Use the  or
or  button to select "Device settings" then push the OK button.
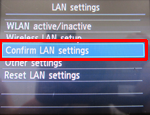
step 3.

Use the  or
or  button to select "LAN settings" then push the OK button.
step 4.

Use the or button to select "Confirm LAN settings" then push the OK button.
step 5.
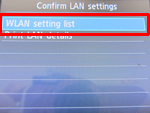
Use the or button to select "WLAN setting list" then push the OK button.
step 6.
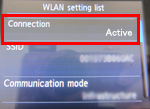
When "WLAN setting list" is displayed, confirm that "Active" is displayed in "Connection".
If "Active" is not displayed in "Connection" ("Inactive" is displayed), the printer is not connected with the access point or the router. Please do the wireless setting again.
3. Review the setting of the "Firewall" security software3-1. The "Firewall" software interferes with the necessary network communication.
[How to confirm]
The operation of the "Firewall" security software may interfere with the communication for the wireless setup.
Register the following files to the "Firewall" security software as a file with access permit, or perform the setup with "Firewall" paused.
- For Windows
File name: Setup.exe
- For Macintosh
File name:
BJ Network Tool.app
canonijnetwork.bundle
CIJScannerRegister.app
CNNSelectorAgent.app
Canon IJ Network Scanner Selector EX.app
ATTENTION:
- Regarding how to stop the operation of the "Firewall" security software, refer to the instruction manual for the security software, or contact its manufacturer.
IMPORTANT:
- Before disabling the "Firewall" operation of the security software, disconnect from the Internet.
If you still have the problem, try the next solution menu "4. Review the setting of the access point or the router."
4. Review the setting of the access point or the router4-1. As the following setting interferes with the communication for the wireless setup, change the setting. After the setting is changed, perform the installation.
ATTENTION:
- Regarding how to change the settings of the access point, and the cautions along with its change, refer to the instruction manual for the access point, or contact its manufacturer.
- MAC address filtering function is enabled:
Change the setting of the access point so that the MAC address of the printer can be permitted.
- The same SSID is used between the computer and the printer, and the privacy separator or the network disconnection function is enabled:
Disable the privacy separator or the network disconnection function.
- The different SSID is used between the computer and the printer, and the privacy separator or the network disconnection function is enabled:
Use the same SSID for the computer as the one for the printer.
REFERENCE:
- How to confirm the MAC address of the printer
step 1.

Click "Setup," which is one of the function buttons.
step 2.
Use the or button to select "Device settings" then push the OK button.
step 3.

Use the or button to select "LAN settings" then push the OK button.
step 4.
Use the or button to select "Confirm LAN settings" then push the OK button.
step 5.

Use the or button to select "WLAN setting list" then push the OK button.
step 6.

When "WLAN setting list" is displayed, confirm the MAC address using the or button.
4-2. Confirm whether the firmware of the access point or the router has been updated to its latest version or not.
For how to update the firmware, refer to the instruction manual for the access point or the router, or you may contact each manufacturer for help.
Character Entry
You can enter the characters when the keyboard is displayed on the printer. Follow the procedure below.
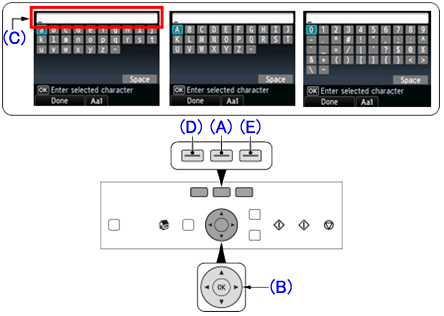
(1) When an on-screen keyboard shown above is displayed, press the center Function button (A) to switch to a keyboard that supports characters you want to use.
Three types of keyboard (upper case alphabetical, lower case alphabetical and numeric/symbolic) are available. Each press of the center Function button switches the keyboard type.
(2) Use the  buttons (B) to select a character from the on-screen keyboard, then press the OK button to enter it.
Entered characters appear in the upper section (C) of the on-screen keyboard.
(3) Repeat 1 and 2 to enter more characters.
(4) After entering all characters, press the left Function button (D).
* To insert a space, select Space on the on-screen keyboard and press the OK button.
* To insert characters, select the section (C) of the screen using the  or
or  button, move the cursor to the character on the right of the target position using the
  or
or  button, then enter characters.
* To delete a character, select the section (C) of the screen using the or button, move the cursor to the target character using the or button, then press the right Function button (E).