Print head alignment adjusts differences in the print head position and corrects horizontal and vertical shifts when you print graphs, lines, and text.
Before you begin
Print head alignment can be performed automatically or manually.
-
Manual print head alignment corrects minute differences that may not be corrected with automatic print head alignment.
-
Automatic print head alignment takes approximately 14 minutes to print the patterns.
Print head alignment
-
Confirm that the printer is connected to the computer, and the printer is turned ON.
-
Open the Printers menu.
Windows 10 / 8.1 / 8
-
Hold the Windows  key on the keyboard and type the letter R. In the Run box, type control printers and select OK.
-
Right-click and select Printing Preferences from the menu that appears.
Windows 7
Windows Vista
-
Select the Start > Control Panel > Hardware and Sound > Printers. If you are in Classic view, select Printers directly from the Control Panel.
-
Right-click then select Preferences from the menu that appears.
Windows XP Home Edition
-
Select the Start > Control Panel > Printers and Other Hardware > Printers and Faxes.
-
Right-click, then select Preferences from the menu that appears.
Windows XP Professional Edition
For Windows 2000
-
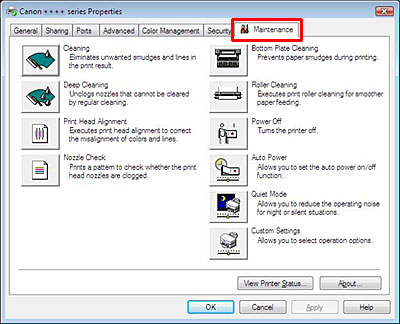
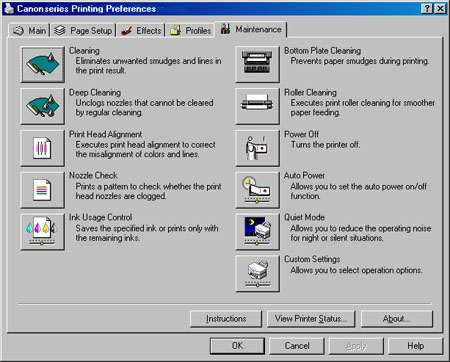
Select the Maintenance tab.
Choose automatic or manual alignment
-
In the Maintenance window, select Custom Settings.
-
To perform print head alignment automatically, make sure Align heads manually is not selected, or for to perform a manual alignment make sure Align heads manually is selected, and select Send.

-
Select OK.
Automatic alignment
-
In the Maintenance window, select Print Head Alignment.
 Display varies based on the printer model.
-
Load one sheet of letter-sized Matte Photo Paper (MP-101) in the rear tray, then select Print Head Alignment at the bottom of the screen.
-
Print head alignment starts. Don't perform any other operations until your print completes.
-
The pattern prints. When printing completes, the print head is aligned.
Manual alignment
-
In the Maintenance window, select Print Head Alignment.
Display varies based on the printer model.
-
Load two sheets of letter-sized plain paper in the paper source selected on the Paper Feed Switch, then select Print Head Alignment.
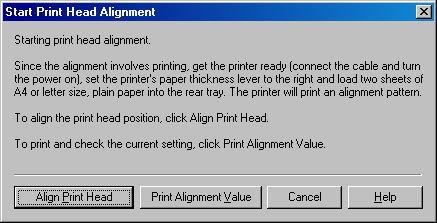
If you select Print Alignment Value, the printer prints out the current setting and the display goes back to Maintenance tab. To see the current setting first, load a sheet of plain paper in the auto sheet feeder and select Check Setting.
-
The print job starts. Don't perform any other operations until the printing completes.
-
The pattern prints. Wait for it to finish.
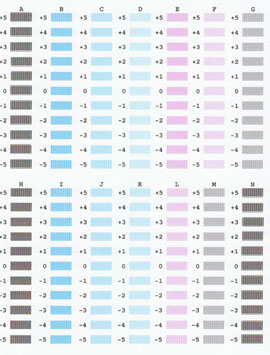
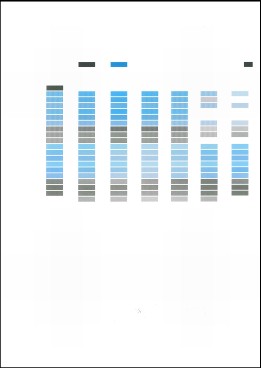
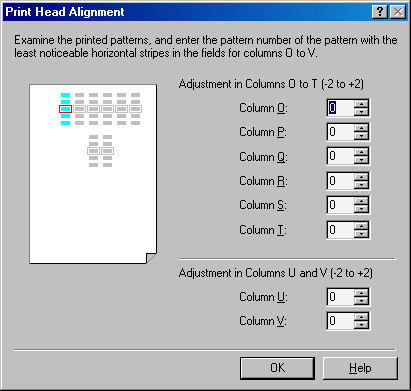
- Refer to the printed sheet, and enter the numbers on the Print Head Alignment window.

-
Select the pattern with the least amount of visible, vertical streaks in the field for Column A.
-
Enter the pattern number of the selected pattern in the Column A box on the right side of the screen.
- Similarly, enter the numbers of the selected patterns in the Column B to N boxes.
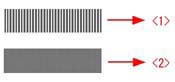
(1) An example of the pattern with highly visible amount of streaks.
(2) An example of the pattern with less visible amount of streaks.
-
Now, print the second pattern sheet. Load one sheet of letter size plain paper in rear tray, then select OK.
-
The print job starts. Don't perform any other operations until the printing completes.
-
The pattern prints.

-
Refer to the printed sheet, and enter the numbers on the Print Head Alignment window in the same way as step 5.
-
After you enter all the numbers, select OK.
-
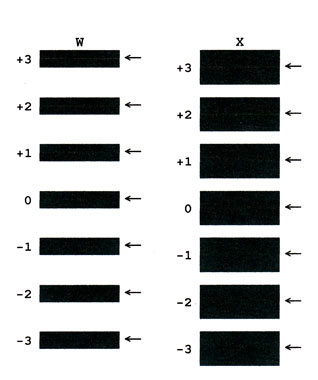
Print the third pattern sheet. Set one sheet of letter size plain paper in either of the paper sources selected at the Paper Feed Switch, then select OK.
-
The print job starts. Don't perform any other operations until the printing completes.
-
The pattern prints.
-
Check the printed patterns and select the number of the pattern in columns W and X that have the least noticeable streaks.

- After you enter all the numbers, select OK. The manual print head alignment is now complete.
If your product issue was not resolved after following the steps above, or if you require additional help, please create or log in to your Canon Account to see your technical support options.
Or if you still need help, visit our Canon Community by clicking the button below to get answers:

____________________________________________________________________________________________