Deleting queued print jobs
When printing documents from a Macintosh, if the printing stops halfway or the documents cannot be printed for some reason, these data may be temporarily stored on the computer as documents in the print queue.
If there are documents in the print queue in the Macintosh, there are cases where new documents added to the print queue cannot be printed.In that case, you need to delete the documents in the print queue, and then print again.
Note: After confirming that the cable is connected and that the printer is powered on, perform the following.
Click here for Mac OS X 10.5 instructions.
- Open 'Applications', and 'Utilities', and double-click the Printer Setup Utility icon.
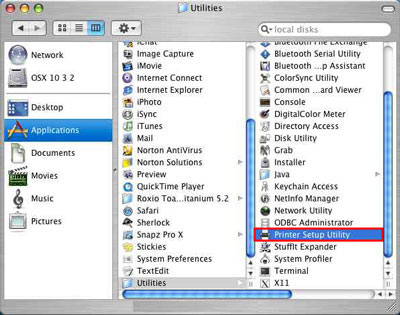
Note: In versions prior to OS X 10.2, double-click the Print Center icon.
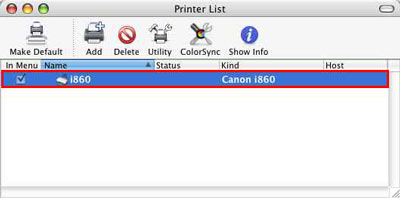
- Select the printer name you are using, in the Printer List.
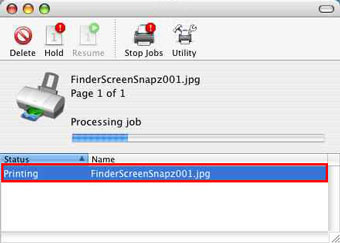
- Click to select the document to be deleted (document name) from the print queue list in the queue window.
- Click 'Delete' in the toolbar.
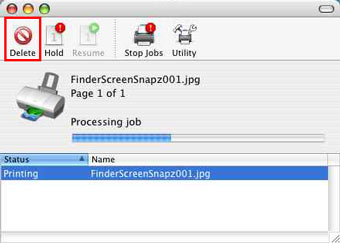
Deleting the accumulated and queued documents in the computer is completed.
Note: If the print job does not complete, it may be necessary to disconnect the printer cable, power the printer off and on, and then reconnect the cable.
In Mac OS X 10.5.x
attention:
- Depending on the version of Mac OS X, screen displays and operating procedures may slightly differ.
- This Printing Guide uses the [SELPHY CP760] as an example for explanatory purposes. The [SELPHY CP770] also has the same operational features.
- Depending on the version of Mac OS X, screen displays and operating procedures may slightly differ.This Printing Guide uses the [SELPHY CP760] as an example for explanatory purposes. The [SELPHY CP770] also has the same operational features.
Follow the procedures below to print the documents again after having deleted the documents in the print queue.
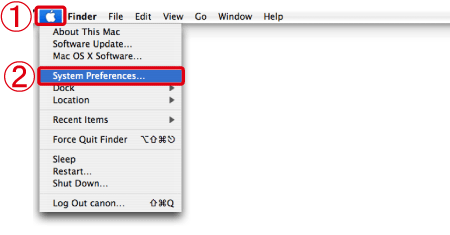
- From
 [Apple menu] (
 ) of [Menu bar], select
  [System Preferences].
- The following screen appears, so click [Print & Fax].

- The following screen appears.

Select your printer.
Click [Print Queue].
- The following screen appears.

In the [Status] column, select the document in the print queue that is displayed as [Hold].
Click [Delete].
- Confirm that the document in the print queue has been deleted.

- Print the document again.
note:
If you are using more than one printer, confirm whether there are also documents in the print queue for other printers. If there are documents in the print queue, delete all documents in the print queue following the instructions above.
If you cannot delete the documents in the print queue even after having performed these procedures, restart the Macintosh and delete the documents again.
