Setting up for Bluetooth printing (Windows)
In order to print via Bluetooth communication with Windows, the following system requirements must be satisfied.
|
Computer
|
A computer in which an Bluetooth module is installed or a computer to which an optional Bluetooth adapter (available from various manufacturers) is attached.
Note: Refer to your computer or device documentation for steps to verify the Bluetooth module is installed properly.
|
|
OS
|
Microsoft Windows 7 (Satisfying the following condition is required)
- Add a Bluetooth Device is displayed in Hardware and Sound under Control Panel
|
In order to connect the Bluetooth unit and print via Bluetooth communication, the following steps are required.
STEP 1
Check that the Bluetooth unit is properly attached to the printer.
See Attaching the Bluetooth Unit.
STEP 2
Install the printer driver.
See Installing the Printer Driver.
STEP 3
Check the device name of the printer using the Canon Setup Utility.
See Setting the Printer.
STEP 4
Register the printer as a Bluetooth device using Bluetooth Devices.
When using Windows 7, and when Add a Bluetooth Device is displayed in Hardware and Sound under Control Panel
Authenticate the printer as a Bluetooth device on Add a Bluetooth Device in Printers and Other Hardware under Control Panel.
See Registering the Printer.
Attach the Bluetooth Unit (BU-30) to the Printer
You can attach the Bluetooth unit to the Bluetooth Unit Connector (inside the printer) (A) or to the Direct Print Port (B).
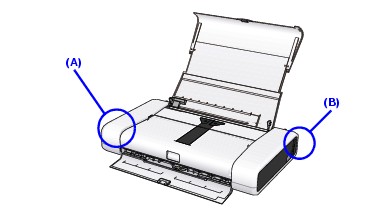
If printing is often performed through Bluetooth communication, we recommend that you attach the Bluetooth unit to the Bluetooth Unit Connector (inside the printer).
If printing is performed temporarily through Bluetooth communication, we recommend that you attach the Bluetooth unit to the Direct Print Port of the printer.
Attaching the Bluetooth Unit to the Inside of the Printer
Attaching the Bluetooth Unit to the Direct Print Port of the Printer
Attaching the Bluetooth Unit to the Inside of the Printer
Attach the Bluetooth unit to the inside of the printer in accordance with the following procedure.
Note: For how to attach the Bluetooth unit to the Direct Print Port, see Attaching the Bluetooth Unit to the Direct Print Port of the Printer.
- Turn off the printer. Press the Power button and wait until the Power lamp stops flashing.
Caution: Do not attach the Bluetooth unit while the printer is on. A failure can result.
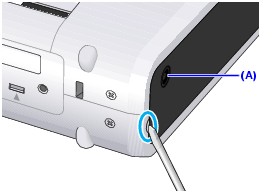
- Remove the Side Panel from the side of the AC adapter connector (A).
(1) Insert a small screwdriver or something similar into the hole on the side of the printer as illustrated bellow.
(2) Unlock the end of the Side Panel by moving the screwdriver that was used in Step (1) as illustrated bellow. Do not bend the Side Panel too far; otherwise, the Side Panel may be broken.
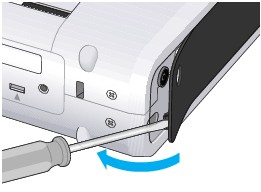
(3) Slide out the Side Panel as illustrated below. Detach the Side Panel carefully not to break the Side Panel protrusion.

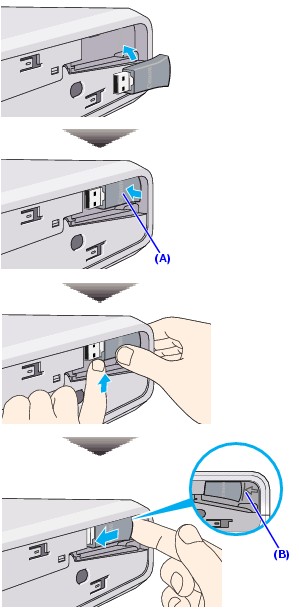
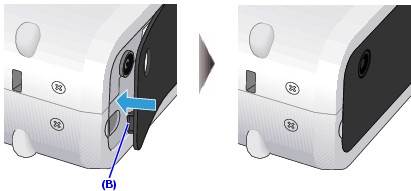
- Attach the Bluetooth unit. Align the head of the Bluetooth unit to the Bluetooth Unit Connector with the "Canon" logo (A) at the front and then insert the Bluetooth unit until the line (B) can be seen as illustrated below.
Note: Before attaching the Bluetooth unit, detach its cap. Store the cap in a safe location.
- Attach the Side Panel to the printer.
(1) Fit the five protrusions on the back of the Side Panel, and then slide the Side Panel as illustrated below.
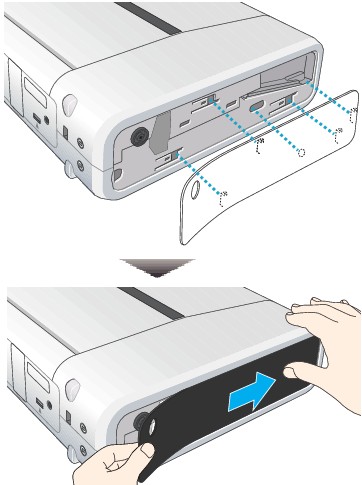
(2) Fit the Side Panel protrusion (B) into its corresponding hole on the printer. Make sure that the whole Side Panel is correctly attached to the printer.
- 5 Turn on the printer.
Attaching the Bluetooth Unit to the Direct Print Port of the Printer
Attach the Bluetooth unit to the Direct Print Port of the printer in accordance with the following procedure.
Note: For how to attach the Bluetooth unit to the Bluetooth Unit Connector (inside the printer), see Attaching the Bluetooth Unit to the Inside of the Printer
- Turn off the printer. Press the Power button and wait until the Power lamp stops flashing.
Caution: Do not attach the Bluetooth unit while the printer is on. A failure can result.
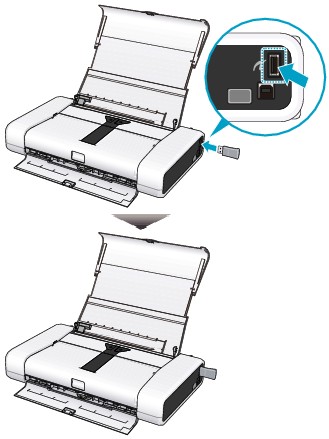
- Attach the Bluetooth unit.
Note: Before attaching the Bluetooth unit, detach its cap. Store the cap in a safe location.
- Turn on the printer.
Installing the Printer Driver
If you use the printer with USB connection, the printer driver has already been installed. The printer driver for the iP100 is built into the Windows 7 operating system. In this case, move to the next step. See Setting the Printer.
Setting the Printer
This section describes the procedures for checking the settings of the Bluetooth unit using the Canon Setup Utility in preparation for Bluetooth printing.
You will need to download and install the latest version of the Setup Utility from our download library for Windows 7 compatibility:
Go to the iP100 Downloads
The Canon Setup Utility is the software which allows you to make settings of Bluetooth communication. Install the printer driver in the Easy install mode from the Setup CD-ROM and the Canon Setup Utility will also be installed automatically.
- Ensure that the printer is connected to the computer with a USB cable, and that the Power lamp on the printer is lit.
Note: If this is the first time that you have connected the printer to the computer with the USB cable, Windows 7 will install the printer driver automatically. Please wait until the driver has installed before proceeding to the next step.
- Start the Canon Setup Utility. Click Start and select All Programs, Canon Utilities, Canon Setup Utility 2.x, and the Canon Setup Utility 2.x. The Canon Setup Utility screen will be displayed.

- Select the Bluetooth Settings tab, and then click Change in the Bluetooth Settings sheet.
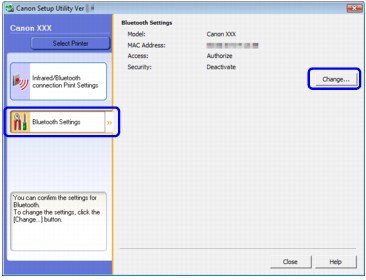
Note: If the Bluetooth Settings tab does not appear on the Canon Setup Utility screen, the Bluetooth unit may not be attached correctly. Turn off the printer and attach the Bluetooth unit again. For attaching the Bluetooth unit, see Attaching the Bluetooth Unit to the Inside of the Printer. If the Bluetooth Settings tab still does not appear, the Bluetooth unit may be faulty. In this case, service is required
For support and service options, sign into (or create) your Canon Account from the link below.
My Canon Account.
- Enter a passkey.
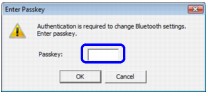
The passkey is an identification number to be determined by the user. It is used to prevent unwanted access from other Bluetooth devices. Enter the default value, "0000", and click OK. For more information about the settings of a passkey, see Security Dialog Box in "Bluetooth Settings Sheet (Windows)".
- Check the model name.
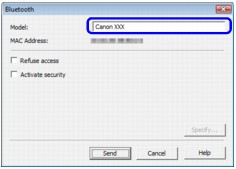
The model name is necessary to register the printer as a Bluetooth device. Be sure to note the model name.
Note: You can change the device name to identify the printer you will use through Bluetooth communication. Model names can be changed using a maximum of 24 characters. After changing a model name, click Send. When the model name has been checked, click Cancel.
- Quit the Canon Setup Utility.
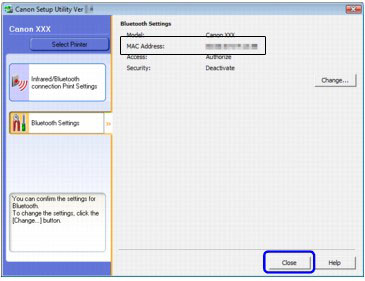
Click Close on the Canon Setup Utility screen. Disconnect the USB cable and then proceed to the next step.
See Registering the Printer.
Registering the Printer
Register the printer as a Bluetooth device from Devices and Printers.
- Log into a user account with the administrator privilege.
- Disconnect the USB cable from the printer.
- Click 'Start', then 'Devices and Printers'
- Click 'Add a Printer' at the top of the Devices and Printers page.
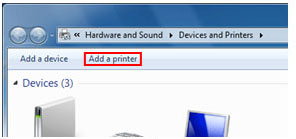
Note: Be sure that you use the Add a printer button and not Add a device.
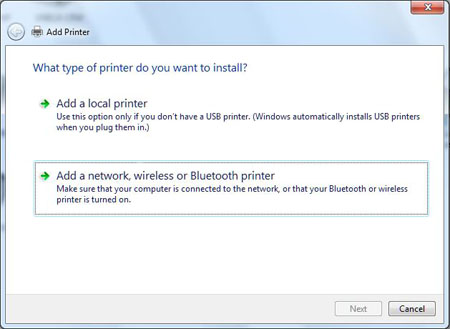
- Ensure that the printer is turned on, and then click 'Add a network, wireless or Bluetooth printer'.
- Select the device name of the printer and click 'Next'. Select the same device name as that checked under Setting the Printer.
Note: If the device name is not displayed, make sure the printer is still powered on and in range.
- Follow the on-screen instructions to complete the installation.
Note: If a new icon for your printer is not created after this procedure, reboot your computer and check the Device and Printers window again. If the icon for your printer still is not present, try adding the Bluetooth device by clicking on the Bluetooth icon in the System Tray (down in the corner of your screen by the time). Follow the on-screen instructions for adding a Bluetooth device.
