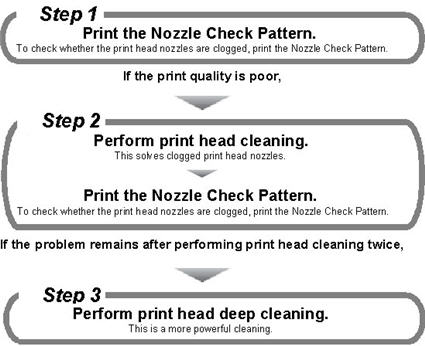
When the print result is blurred, tinted or streaks appear, the nozzles may be clogged or the ink tank almost empty. If the print head nozzles are clogged, print quality can be improved by performing print head cleaning (Cleaning) or print head deep cleaning (Deep Cleaning). You can also check the cleaning results by printing a Nozzle Check Pattern after cleaning the print head nozzles.
Note: If the printed result does not improve even after doing print head deep cleaning, turn off the printer. Then, after 24 hours or later, do print head deep cleaning again.
How to display the Maintenance screen
1. Ensure that the printer is powered on.
2. Press the <Menu> button.
3. Use the  or
or  cursor button to select 'Tool box', then press the <OK> button.
4. Use the
or
cursor button to select 'Maintenance', then press the <OK> button.
How to print a nozzle check pattern
1. Open the paper support.
2. Load a sheet of 4' x 6' sized paper in the auto sheet feeder.
3. Display the Maintenance screen.
4. Print the nozzle check pattern.
4-1. Use the
or
cursor button to select 'Nozzle check', then press the <OK> button.
5. Use the
or
cursor button to select 'Yes', then press the <OK> button. The nozzle check pattern is printed.
6.. Confirm the nozzle check pattern.

< 1 > The normal nozzle check pattern
< 2 > The abnormal nozzle check pattern
< 3 > White lines are present in the color ink pattern.
< 4 > Color inks are not present.
- When all patterns are printed normally, press the

/

cursor button to select 'All A' and press the <OK> button.
- When any patterns are printed abnormally, press the
/
cursor button to select 'Also B' and press the <OK> button.
How to do print head cleaning
Note: Cleaning the print head consumes a certain amount of ink.
1. Display the Maintenance screen.
2. Use the or cursor button to select 'Cleaning' and press the <OK> button.
3. Use the or cursor button to select 'Yes', then press the <OK> button to start print head cleaning.
Note: Do not do any other operations until print head cleaning is completed.
4. Print the nozzle check pattern and check the print head status.
How to do print head deep cleaning
Note: Print head deep cleaning consumes more ink than print head cleaning. Perform this procedure only when print head cleaning cannot resolve the print problem.
1. Display the Maintenance screen.
2. Use the
or
cursor button to select 'Deep cleaning' and press the <OK> button.

3. Use the or cursor button to select 'Yes', then press the <OK> button to start print head deep cleaning.
Note: Do not do any other operations until print head deep cleaning is completed.
4. Print the nozzle check pattern and check the print head status.
Note: If the printed result does not improve even after doing print head deep cleaning, turn off the printer. Then, after 24 hours or later, do print head deep cleaning again. After a given time interval, ink could dissolve itself, resulting in ink unclogging. When the printed result does not improve even after these steps, replacement of ink cartridges may be required.
Top of Page
How to install the print head / ink tanks
1. Ensure that the printer is powered on.
2. Open the cover by sliding the cover open switch to the right. The print head holder will move to the replacement position.
Note: When the top cover is opened more than ten minutes, the print head moves to the right side.
If this occurs, close the top cover, and open it again.
When installing the print head, proceed to step 3.
When installing the ink tank, proceed to step 4.
3. Install the print head.
3-1. Raise the print head lock lever.

3-2. Pull out the print head from its package, then remove the orange protective cap from it.
Caution: Do not touch the ink supply ports <1> and the print head nozzles <2>.
Doing so may cause printing problems.
3-3. Place the print head in the holder and lower the print head lock lever carefully until you hear a click.

4-1. Unpack the ink tank and remove the orange protective cap.
Caution: Do not touch the ink ports <3>. Doing so may occur printing problems.
Do not reattach the protective cap once you have removed it.
4-2. Insert the ink tank into the print head.
Note: Insert the ink tank at an angle so that the triangular marks are aligned with each other. Press the mark "PUSH" on the ink tank firmly until you hear a click.

5. Close the cover. The print head holder will move to the right side.
Note: When the ink tank is replaced with a new one, be sure to reset the ink counter.
Top of Page