Assigning the Scanner Buttons
Click MP Navigator EX on the taskbar to bring the MP Navigator EX screen to the front.
Steps to start MP Navigator EX when a Scanner Button is pressed.
Specifying the Scanner Button settings using MP Navigator EX allows you to scan documents easily.
See [ ].
important:
Log on to an administrator account before making the settings.
Windows Vista
- From the Start menu, select Control Panel > Hardware and Sound > Scanners and Cameras.
- Select WIA CanoScan (model name), then click Properties.
- In the User Account Control dialog box, click Continue.
- In the WIA CanoScan (model name) Properties dialog box, select the Event tab.
- In Actions on the Event tab, set MP Navigator EX as the application to start.
Set MP Navigator EX 2.0 for all events in Select an event.
MP Navigator EX is already set, click Cancel to end.
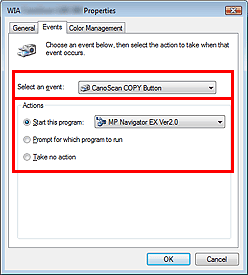
- Click OK.
Windows XP
- From the Start menu, select Control Panel > Printers and Other Hardware.
- In the resulting screen, click Scanners and Cameras.
- Right-click WIA CanoScan (model name), then click Properties.
- In Actions on the Event tab, set MP Navigator EX as the application to start.
Set MP Navigator EX 2.0 for all events in Select an event.
If MP Navigator EX is already set, click Cancel to end.
- Click OK.
Windows 2000
- From the Start menu, select Settings > Control Panel.
- In the resulting screen, click (or double-click) Scanners and Cameras.
- The Scanners and Cameras Properties dialog box opens. Select WIA CanoScan (model name), then click Properties.
- Select an event in Scanner events, then set MP Navigator EX 2.0 for Send to this application.
If MP Navigator EX is already set, click Cancel to end.
- Click OK.
Restart the computer.
important:
The settings are not effective until you restart the computer.
Macintosh
To start MP Navigator EX automatically when a Scanner Button is pressed, configure Image Capture in the Applications folder of Mac OS X to set MP Navigator EX as the application to start.
Specifying the Scanner Button settings using MP Navigator EX allows you to scan documents easily.
important:
This setting is required only if you are using Max OS X v.10.3.x (10.3.9 or later).
- Open the Applications folder on the hard disk, then double-click the
 Image Capture icon.
Image Capture starts, and scans preview images automatically.
- Click Options... on the bottom left.

- In the Settings screen, select MP Navigator EX 2 for Application to launch when scanner button is pressed.
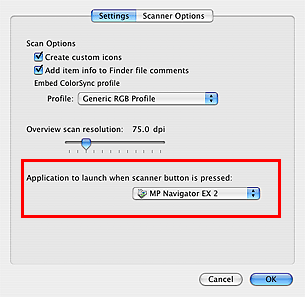
- Click OK to close Image Capture.
The next time you press a Scanner Button, MP Navigator EX will start automatically.
important:
If the TWAIN screen appears instead of scanning preview images, follow the procedure below to disable TWAIN software.
- Select Preferences... in the Image Capture menu.
- In the Scanner screen, deselect the Use TWAIN software whenever possible check box.\
- Click OK to close Image Capture.
The next time you start Image Capture, preview images will be scanned.
