Registering Your Fax/Telephone Number and Name
You can register sender information (Transmit Terminal Identification (TTI)) in your machine so that your name, your fax/telephone number, and the date and time of transmission are printed in small type at the top of each page to be received. Thus, whenever you send a fax from this machine, the recipient receiving the fax knows who sent it, and when it was sent. Below is an example of how your sender information would print on a fax sent from your machine:
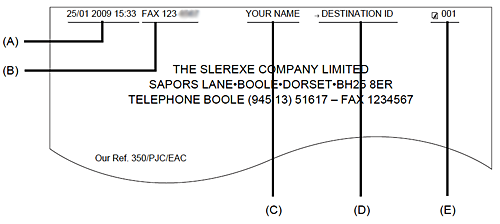
(A) Date and time of transmission
(B) Your fax/telephone number
You can select <FAX> or <TEL> to be displayed in front of the number.
(C) Your name
(D) Displays the name of the destination when sending from one-touch or coded speed dialing.
(E) Page number
- Entering the Date and Time
1. Press [Menu].
2. Use [  ] or [
  ] to select <DATA REGSTRATION>, then press [Start/Copy] three times.
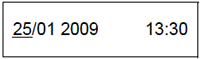
3. Use the numeric buttons to enter the date and time (in 24-hour format), then press [Start/Copy].
- Precede single digits with a zero.
- Enter only the last two digits of the year.
4. Press [Stop/Reset].
Registration ends and the fax returns to standby mode.
- Registering Your Fax/Telephone Number and Name
This information appears at the top of each document you send.
1. Press [Menu].
2. Use [ ] or [ ] to scroll through the menus and select <DATA REGSTRATION>, then press [Start/Copy] twice. The LCD displays <DATE & TIME>.
3. Use [ ] or [ ] to select <UNIT TELEPHONE #>, then press [Start/Copy].
4. Enter your fax number (up to 20 digits) using the numeric buttons, then press [Start/Copy] twice .
You can enter a space to make your number easier to read.

5. Enter your name (up to 24 letters) using the numeric buttons, then press [Start/Copy] .

6. Press [Stop/Reset].
Registration ends and the fax returns to standby mode.
- Setting Daylight Saving Time (Summer Time)
Some countries adopt the daylight saving time (summer time) system that shifts the clock time forward or back at certain periods of the year.
You can set your machine to automatically change the time by registering the day and time that daylight saving time (summer time) begins and ends.
1. Press [Menu].
2. Use [ ] or [ ] to select <DATA REGSTRATION>, then press [Start/Copy].
3. Use [ ] or [ ] to select <SYSTEM SETTINGS>, then press [Start/Copy].
4. Use [ ] or [ ] to select <DAYLGHT SAV TIME>, then press [Start/Copy]. The LCD displays <ON>.
5. Use [ ] or [ ] to select <ON> or <OFF>, then press [Start/Copy].
6. If you cancel by selecting <OFF> in step 5, press [Stop/Reset] to return to standby mode.
If you select <ON> in step 5, use [ ] or [ ] to select <START DATE/TIME>, then press [Start/Copy] twice. The LCD displays <MARCH>.
7. Use [ ] or [ ] to select the month in which the summer time starts, then press [Start/Copy] twice. The LCD displays <LAST WEEK>.
8. Use [ ] or [ ] to select the week in which the summer time starts, then press [Start/Copy] twice. The LCD displays <SUNDAY>.
9. Use [ ] or [ ] to select the day in which the summer time starts, then press [Start/Copy] twice.
10. Use the numeric buttons to enter the time at which the summer time will take effect, then press [Start/Copy]. The LCD displays <END DATE/TIME>.
11. Use [ ] or [ ] to select <END DATE/TIME>, then press [Start/Copy] twice. The LCD displays <OCTOBER>.
12. Repeat steps 7 to 9 to set the month, week, the day of the week, and time when the summer time ends.
13. Press [Stop/Reset].
Setting ends and the fax returns to standby mode.
