Adjusting the Image Position
To adjust the screen position up, down, left, or right, press the LENS-SHIFT button on the remote control or the LENS button on the projector. This function is referred to as “lens shift” because the position of the projected image is changed by moving the lens position.
• The available range for lens shift (percentage of movement relative to the screen size) varies depending on the lens unit which is used.
Standard Zoom Lens (RS-IL01ST): Down 15% - Up 55%, Left 10% - Right 10%
Long Zoom Lens (RS-IL02LZ): Down 15% - Up 55%, Left 10% - Right 10%
Short Fixed Lens (RS-IL03WF): Down 5% - Up 5%, Left 2% - Right 2%
• There are areas where each lens is unable to move. With the Standard Zoom Lens and the Long Zoom Lens, the areas are at the top left and top edges. With the Short Fixed Lens, the areas are at the four corners
1 Press either the LENS-SHIFT button on the remote control or the LENS button on the projector 3 times in order to display the window shown on the lower right.
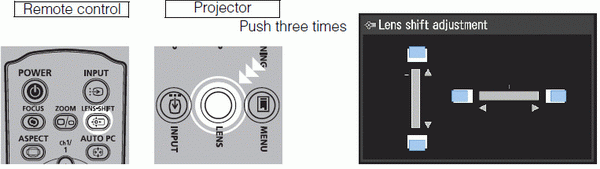
2 Press the pointer buttons to adjust.

3 When the desired position is reached, press the OK button.
Resetting the Position
The lens position after movement with the lens shift function is not returned when the power is turned off. To return it to its original position, perform reset. During screen position adjustment, press and hold the LENS-SHIFT button on the remote control or the LENS button on the projector to display the [Lens shift Reset] window. The selections for the lens currently used are displayed. Use the pointer buttons to select one, then press the OK button.

