Setting an IP Address
Following is an explanation of how to set the PC IP address for each operating system.
Windows 7
1 From the PC [Start] menu, select [Control Panel].
2 Click on [Network and Internet Connections], then click on [View network status and tasks].
3 From the menu on the left side of the window, click on [Change adapter settings].
4 Right-click [Local Area Connection], and open [Properties].
5 Select [Internet Protocol Version 4 (TCP/IP)] and click the [Properties] button. Take notes of the original network settings (IP address, subnet mask, default gateway, etc).
6 Select [Use the following IP address] and set the IP address and subnet mask. The factory default IP address for the projector is “192.168.254.254”. Set an IP address which is different from this.
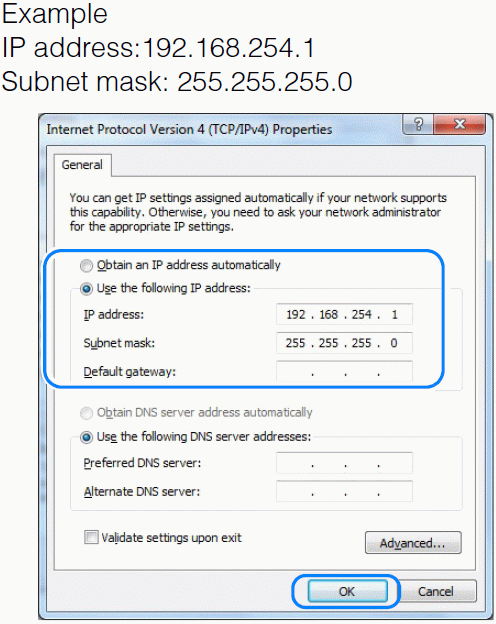
7 When the settings are completed, click the [OK] button and then click the [OK] button on the [Local Area Connection Properties] window to close it
Windows Vista
1 From the PC [Start] menu, select [Control Panel].
2 Click on [View network status and tasks].
3 From the menu on the left side of the window, click on [Manage network connections].
4 Right-click [Local Area Connection], and open [Properties].
5 Select [Internet Protocol Version 4 (TCP/IP)] and click the [Properties] button. Take notes of the original network settings (IP address, subnet mask, default gateway, etc).
6 Select [Use the following IP address] and set the IP address and subnet mask. The factory default IP address for the projector is “192.168.254.254”. Set an IP address which is different from this.
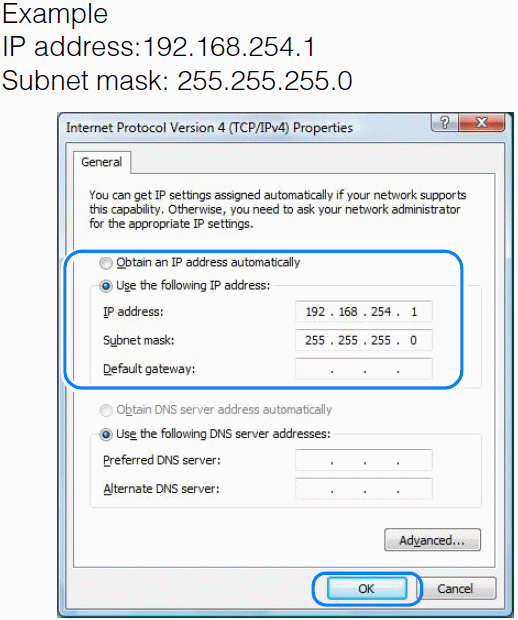
7 When the settings are completed, click the [OK] button and then click the [OK] button on the [Local Area Connection Properties] window to close it.
Windows XP
1 From the PC [Start] menu, select [Control Panel].
2 Select [Network and Internet Connections] and open [Network Connections].
3 Right-click [Local Area Connection], and open [Properties].
4 Select [Internet Protocol (TCP/IP)] and click the [Properties] button. Take notes of the original network settings (IP address, subnet mask, default gateway, etc).
5 Select [Use the following IP address] and set the IP address and subnet mask. The factory default IP address for the projector is “192.168.254.254”. Set an IP address which is different from this.
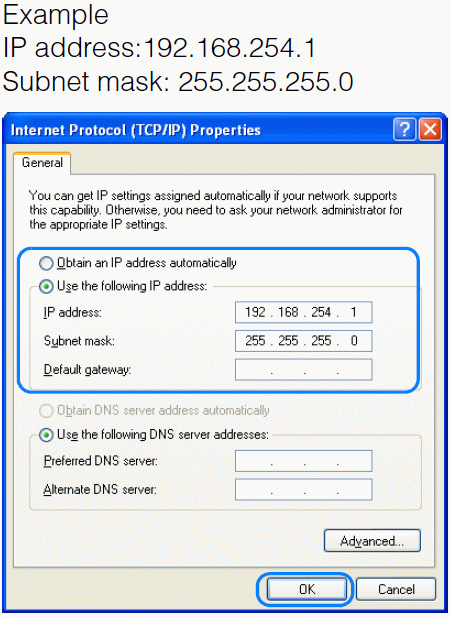
6 When the settings are completed, click the [OK] button and then click the [OK] button on the [Local Area Connection Properties] window to close it.
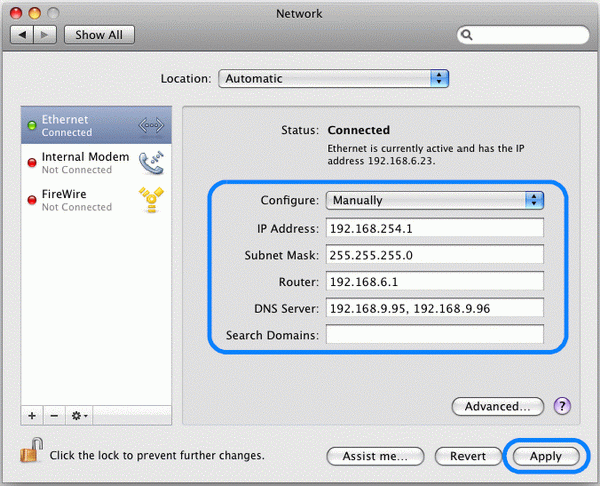
Mac OS X
1 Open the Apple Menu and select [System Preferences].
2 In the System Preferences window, click [Network] to display the Network preference window.
3 Select [Built-in Ethernet] and click the [TCP/IP] tab. Take notes of the original network settings (IP address, subnet mask, router, DNS server, etc.).
4 Create a new network environment and set the IP address and subnet mask. The factory default IP address for the projector is “192.168.254.254”. Set an IP address which is different from this.
Example
IP address:192.168.254.1
Subnet mask: 255.255.255.0
Click [Apply] to close the network preference window.
Resetting the IP Address Setting of the Computer
Follow the same procedure as for changing the IP address and reset the values to the original values based on the notes taken before the change.
