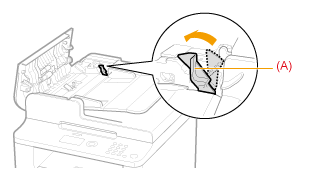
When <Paper jam.> appears on the screen, a paper jam has occurred in the feeder or somewhere inside the machine. To remove the jammed document or paper, follow the onscreen instructions. Press [  ] to view the next step. Document Jams in the Feeder Referring to the procedure on the display, follow the steps below to remove jammed documents. 1. Remove any document loaded in the feeder. 2. Open the feeder cover.
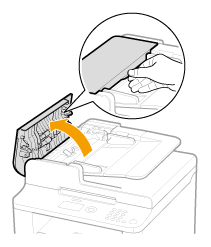 3. Lift the lock release lever (A).
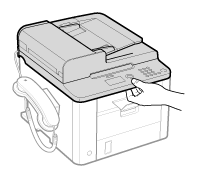
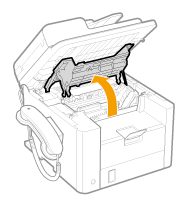
 4. Remove any jammed document by pulling it gently. 5. Hold the green grip (A), and then open the inner cover. 6. Remove any jammed document by pulling it gently. 7. Close the inner cover. 8. Replace the release lever (A). 9. Close the feeder cover. 10. Place documents in the feeder. Paper Jams Inside the Machine Referring to the procedure on the display, follow the steps below to remove jammed paper. 1. Hold the operation panel. 2. Lift the scanning platform. NOTE If you cannot lift the scanning platform: - Ensure that the feeder is completely closed. Do not try to forcefully lift the scanning platform as this may damage the machine.
* If you set thick documents such as a book, the feeder may not be completely closed. Remove the documents.
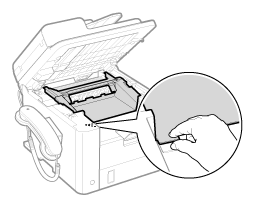
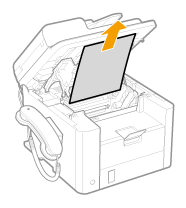
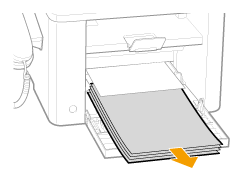
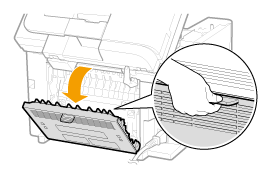
3. Hold the grip on the left front side of the toner cover. 4. Open the toner cover. 5. Remove the toner cartridge. 6. Remove any jammed paper by pulling it gently.  If you do not see the leading edge of the jammed paper: Do not force to pull the paper, and proceed to the next step. 7. Push up the green colored part (A), and then pull the paper exit guide to open. 8. Remove any jammed paper by pulling it gently. If you do not see the leading edge of the jammed paper: Do not force to pull the paper, and proceed to the next step. 9. Lift the paper exit guide, and then firmly close it. Ensure that each end of the paper exit guide is closed. 10. Remove any jammed paper by pulling it gently. (1) Gently pull any jammed paper downward from between the fixing unit (A) and roller (B) until the leading edge emerges from the machine. (2) When the leading edge emerges, hold sides of the jammed paper and carefully pull it out. 11. Open the front cover and lower front cover. 12. Remove any paper loaded in the paper cassette. 13. Remove any jammed paper by pulling it gently. 14. Reload paper into the paper cassette and close the front cover and lower front cover. Next, continue to clear jams in the rear cover. 15. Open the rear cover. 16. Remove any jammed paper by pulling it gently. 17. Close the rear cover. 18. Insert the toner cartridge. Fit the protrusions (A) on each side of the toner cartridge into the guides located on each side of the machine. Slide the toner cartridge into the machine until the toner cartridge meets the back of the machine. 19. Close the toner cover. NOTE If you cannot close the toner cover: - Make sure that the toner cartridge properly installed in the machine. Do not try to forcefully close the toner cover, as this may damage the machine.
20. Lower the scanning platform. The machine is ready to print. Precautions When Removing Jammed Paper WARNING When removing jammed document or paper: - Use caution to avoid cutting your hands.
When removing jammed paper or when inspecting the inside of the machine: - Do not allow necklaces, bracelets, or other metal objects to touch the inside of the machine, as this may result in burns or electrical shock.
CAUTION If loose toner comes into contact with your skin or clothing: - Wash with cold water only. Avoid warm water, as this will set the toner and cause it to stain your skin or clothing.
When removing jammed document or paper: - If paper is jammed, remove the jammed paper so that any pieces of paper do not remain inside the machine according to the displayed message. Also, do not put your hand in an area other than indicated areas, as this may result in personal injuries or burns.
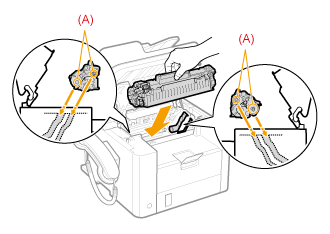
Do not touch the fixing unit (A). - Touching the fixing unit (A) may cause burns as it becomes very hot during use.
IMPORTANT Perform the operation while the machine is still ON: - If it is turned OFF, the data that is printing will be erased.
If the jammed paper is torn: - Remove all torn pieces of paper to avoid further jams.
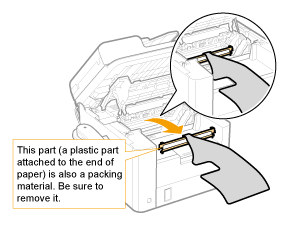
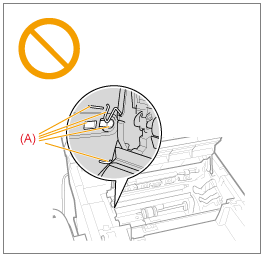
If paper jams occur repeatedly: - Make sure that the following packing material is completely removed. - Fan the paper stack and tap the edge on a flat surface to align the paper before loading it into the machine. - Make sure that the paper you are using meets the requirements for use. - Make sure that you have removed all scraps of paper from the inside of the machine. Do not touch the high-voltage contacts (A). - This may result in damage to the machine.
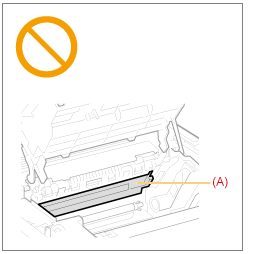
Do not touch the transfer roller (A). - This may result in deterioration of print quality.
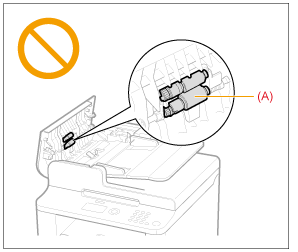
Do not touch the feeder roller (A). - This may result in malfunctions or damage to the machine.
NOTE Do not force the jammed document or paper out of the machine. - Contact your local authorized Canon dealer or the Canon help line for assistance, if needed.
|