This article provides instructions on placing a printable disc into your PIXMA PRO-10 / PRO-100.
Solution
Placing a Printable Disc
To print onto a printable disc, place it on the disc tray supplied with the printer, then insert it into the printer.
Important Do not attach the disc tray until the message asking you to load the printable disc is displayed. Doing so can damage the printer. Remove any paper in the manual feed tray.
Open the paper output tray (A) gently.
When the message asking you to load the printable disc is displayed, open the inner cover (B).
Place the printable disc with the printable surface facing up.
Important:
Make sure that there is no dirt on the disc tray before placing a printable disc on the disc tray.
When placing a printable disc on the disc tray, do not touch the printing surface of the disc or the reflectors (C) on the disc tray.
Attach the disc tray to the printer.
Important:
Do not attach the disc tray while the printer is operating (the POWER lamp is flashing white).
Note:
The disc tray may be ejected during preparation by the printer for printing.
Wait until the POWER lamp stays lit after flashing, then follow the on-screen instructions to attach the disc tray (1) Place the disc tray on the inner cover. (2) Insert the disc tray straight until the arrow () on the inner cover is almost aligned with the arrow () on the disc tray.
Important:
Do not insert the disc tray beyond the arrow () on the inner cover.

 Do not attach the disc tray until the message asking you to load the printable disc is displayed. Doing so can damage the printer.
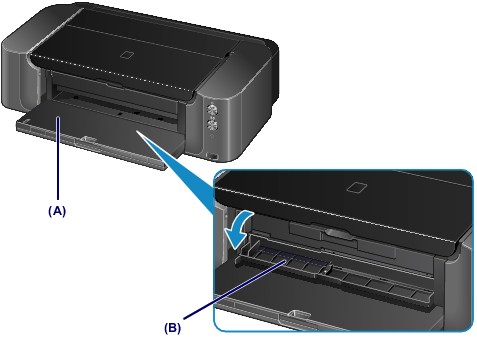
 Important:
 Note:
Note: ) on the inner cover is almost aligned with the arrow (
 ) on the disc tray.