Printing directly from the camera (Camera-direct) (PowerShot N)
| Article ID: ART153116 |
| |
Date published: 05/22/2015 |
| |
Date last updated: 01/26/2016 |
Description
Printing directly from the camera (Camera-direct) (PowerShot N)
Solution
| Printing directly from the camera (Camera-direct) (PowerShot N)
ID : 8201826100 _ EN _ 2
|
| Solution |
Easily print your shots by connecting the camera to a PictBridge-compatible printer (sold separately) with the included interface cable.
IMPORTANT
- A Canon SELPHY CP series compact photo printer is used here for the sake of illustration. Screens displayed and available functions vary by printer. Also refer to the printer manual for additional information.
- The position and shape of the operation buttons, screens displayed, and setting items may differ according to the model you use
1. Make sure the camera andprinter are off.
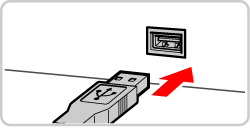
2. Connect the camera's <DIGITAL> terminal to the printer's USB terminal using the interface cable.
- Open the cover. Holding the smaller cable plug in the orientation shown, insert the plug fully into the camera terminal.

- Connect the larger cable plug to the printer. For other connection details, refer to the printer manual.
3. Turn the printer on.
4. Press the <Playback> (
 ) button to turn the camera on.

5. Browse images by dragging left or right, and then touch an image to choose it.

6. Touch <FUNC.>, and then touch [Print] (
 ).

IMPORTANT
- Use the printer to configure the paper size, layout, and so on. These settings cannot be configured from the camera.
- If the printer or settings are unconfigurable, default printer settings will be used. For details on default printer settings, refer to the printer manual.
|
