Copying Onto Sides Of The Paper (Two-Sided Copy)
To copy a two-sided document (or, to copy a single two-sided document) onto one sheet of paper, you will need to reload the document and the paper to copy the second document on the back of the first printed copy.

Note: Legal-sized documents can only be copied or scanned using the ADF.
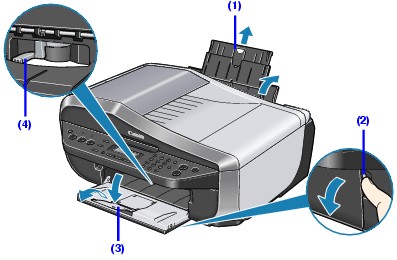
- Confirm that the printer is powered on then open the paper output tray (2) and extend the output tray extension (3).
- Load paper in the rear tray.
Note : You cannot load paper other than A4, Letter, or B5-sized plain paper in the Front Tray. When specifying a page size other than A4, 8.5"x11"(215 x 279), or B5, load paper in the Rear Tray.
-
Load the document on the platen glass or in the Automatic Document Feeder (ADF).
Note: Legal-sized documents can only be copied or scanned using the ADF.
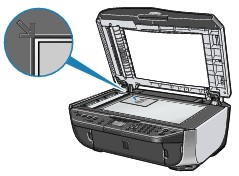
Platen Glass -
- Lift the document cover.
- Load the original with the side to be copied, scanned, or faxed faced down on the platen glass.
- Place the original in landscape orientation and align the upper corner of it with the alignment mark as shown in the figure below.
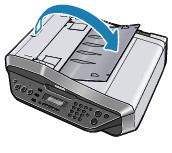
ADF -
- Remove any documents from the platen glass.
- Open the document tray.
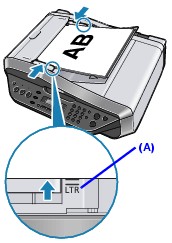
- Load the document in the ADF with the side you want to copy face up. If it is loaded correctly, you will hear a beeping sound.
Note: When ALARM VOLUME in AUDIBLE TONES is OFF, it does not sound.
- Align the document guides to sides of the document.
- Confirm that the printer is in Copy mode. If the printer is not in Copy mode, press the <COPY> button to switch into Copy mode.
-
Set the correct paper size .
- Press <Settings> button .
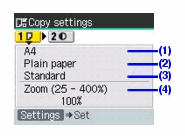
- Use the
 or
or  cursor buttons to select the paper size setting (1). [Page size] will appear on the top row.
- Use the
 cursor buttons to select the correct paper size (dependent on the original), then press <OK>.
- To change the media type, use the or cursor buttons until [MEDIA TYPE] appears on the top row.
- Use the cursor buttons to select [PLAIN PAPER], then press <OK>.
- Press the <Color> button for color copying, or the <Black> button for black & white copying. (The printer starts copying.)
- After the first side is printed, flip the sheet over so that the blank side will be printed. (When printing from the (rear tray), the blank side of the paper should face the front of the printer.)
Orient the paper making sure the text or image is properly aligned.
- Now, flip over the document to scan the next side or insert the next document into the ADF. (The new side should face-up.)
- Press <Color> for color copying, or <Black> for black & white copying.
Note: Press the same button you pressed in step 6.
- To cancel copying, press <Stop/Reset>.
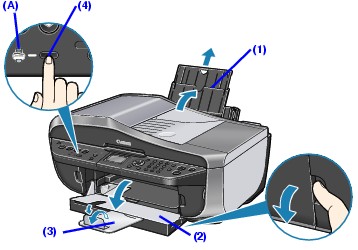
Loading Paper
-
Load the appropriate paper size in the rear tray.
- If paper is not installed, open the rear tray and pull our the paper support (1).
- Open the Paper Output Tray (2). Put your finger in the rounded indent beside the Paper Output Tray and open it gently.
- Open the Output Tray Extension (3). Open up and set the Output Tray Extension completely by pressing down the hollow on its front side.
- Adjust the position of the Paper Thickness Lever (4). Set it to the right when printing on envelopes or T-shirt transfers, and left when printing on any other type of paper.
-
Place a stack of paper (print side up) in the rear tray (1).
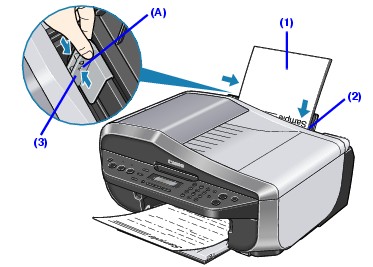
- Align the paper stack against the right side of the Rear Tray (2).
- Pinch the Paper Guide (3) and slide it against the left side of the paper stack.
Note: Do not load the paper higher than the Load Limit Mark (A).
