
Printer Properties Page Setup tab Win2000/XP L120
| Article ID: ART154136 | | | Date published: 06/09/2015 | | | Date last updated: 01/20/2016 |
Description
Solution
Printer Properties-Page Setup tab (Win2000/XP)
Page Setup Tab
Specifies the page settings including the paper size, scaling, number of copies, orientation, and number of pages per sheet.
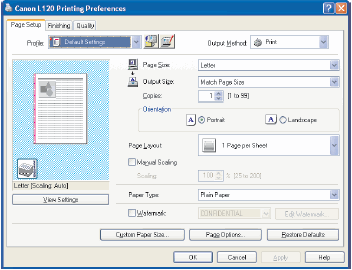
Default settings depend on the country/region of purchase.
| Preview Image | Displays the image with the currently selected settings reflected. | |
| [Page Size] | Selects the original page size to work with in an application. Available options are: [Letter], [11x17], [Legal], [Executive], [A5], [B5], [A4], [B4], [A3], [Envelope Monarch], [Envelope COM10], [Envelope DL], [Envelope C5], and [Custom[Named Fixed]]. However, when [11x17], [B4], or [A3] is selected in the [Page Size], the original page size is automatically reduced to fit [Letter] size. | |
| [Output Size] | Selects the output paper size to print on. When this option is set to anything other than [Match Paper Size], the original page size is automatically reduced or enlarged to fit the selected output paper size when printed. | |
Up to 50 sizes can be defined for [Custom Paper Size] with the [Custom Paper Size Settings] option. |
||
| [Copies] | Specifies the number of copies to be printed (1 to 99). | |
| [Orientation] | Selects the direction of printing relative to the paper ([Portrait] or [Landscape]). | |
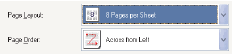
| [Page Layout] | Selects the number (1, 2, 4, 6, 8, 9 or 16) of original pages per sheet or [Poster] (2x2, 3x3 or 4,4 pages to comprise one sheet). When this option is set to anything other than [1 Page per Sheet] and [Poster], the original page size is reduced to fit the selected page layout when printed. | |
-When [Poster] is selected, [Manual Scaling], [Watermark] and [Layout Options] are disabled. -When [1 Page per Sheet] is selected, [Manual Scaling] appears. When this option is set to anything other than [1 Page per Sheet] and [Poster], [Manual Setting] disappears and [Page Order} appears in its place. |
||
| [Manual Scaling] | Reduces or enlarges the original page size. Selecting this check box enables the edit box on the right side to specify the magnification factor (25 to 200%). | |
 If you select enlarge/reduce ratio on the [Print] screen of an application software, select 100% in [Manual Scaling]. |
||
| [Page Order] | Selects the order in which the original pages are placed on each sheet of the output paper when more than one page is printed per sheet. |
| [Paper Type] | Selects the paper type to print. Available paper types are as follows: -Plain Paper (17 to 24 lb (64 to 90 g/m2 )) -Plain Paper L (17 to 24 lb (64 to 90 g/m2 )) -Heavy Paper (24 to 43 lb (91 to 163 g/m2 )) -Heavy Paper H (24 to 43 lb (91 to 163 g/m2 )) -Transparencies |
|
- - - - |
If paper curls excessively when printed with [Plain Paper] selected, select [Plain Paper L]. If print fixing is not sufficient when printed with [Heavy Paper] selected, select [Heavy Paper H}. Depending on [Output Size] and [Page Layout] settings, [Transparencies] is not displayed. If you selected [Envelope Monarch], [Envelope COM10], [Envelope DL], or [Envelope C5] as [Output Size], [Paper Type] is automatically set to [Envelope]. |
|
| [Watermark] | Inserts the selected watermark to be printed on each page. 8 types of watermark are available as default: -CONFIDENTIAL -COPY -DRAFT -FILE COPY -FINAL -PRELIMINARY -PROOF -TOP SECRET Selecting this check box enables [Edit Watermark] to add a watermark. |
|
This option is disabled when [Page Layout] is set to [Poster]. |
||
| [Edit Watemark] | Click this button to specify detailed watermark settings. | |
| [Custom Paper Size] | Click this button to specify the dimensions for a paper size other than the provided standard paper sizes.. | |
You can specify the dimensions for a paper size only in the [Printer Properties] dialog box ([Start], [Printers and Faxes] (Windows 2000: [Printers])). You can specify the dimensions from the [Document Properties] dialog box (software application). |
||
| [Page Options] | Click this button to select options for printing dates, user name, page numbers, and borders, etc.. | |
This option is disabled when [Page Layout] is set to [Poster]. |
||
| [Restore Defaults] | Resets all the current settings to their default values. | |
| [View Settings] | Click this button to display the [View Settings] dialog box. This dialog box allows you to view and confirm all of the current page settings in a listed form. |
 Edit Watermark
Clicking [Edit Watermark] in the [Page Setup] tb sheet opens the [Edit Watermark] dialog box. Tis dialog box enables you to insert a text string as a watermark onto pages. This options is enabled only when the [Watermark] check box is selected in the [Page Setup] tab sheet.
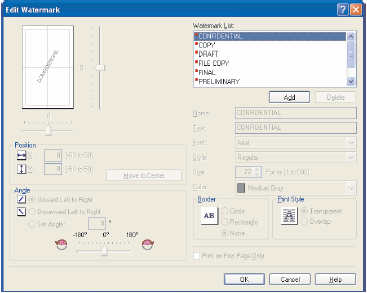
| [Watermark List] | Displays the names of registered watermarks. The preview image in the upper left part of the dialog box displays the selected watermark with the specified settings reflected. | |
| [Add] | Registeres a new watermark. Clicking this button adds a blank name field in [Watermark List] in which you enter the name of the watermark to be registered. Up to 50 watermarks can be registered. | |
| [Delete] | Removes the selected watermark from [Watermark List]. | |
You cannot delete a pre-defined watermark or a watermark selected in the [Page Setup] tab. |
||
| [Position] | Specifies the position where the watermark is printed on each page. You can enter the values in the [X] and [Y] edit boxes (in a range between -50 and +50), or use the X and Y slide bars to move the position. | |
| [Move to Center] | Relocates the watermark to the page center. | |
| [Angle] | Sets the angle of watermark ([Upward Left to Right], [Downward Left to Right] or [Set Angle]). You can select the corresponding radio button, or use the slide bar to move the angle or enter a desired value in the [Set Angle] edit box (in a range between -180 and 180). | |
| [Name] | Displays the name of the currently selected watermark. | |
| [Text] | Displays the text string of the currently selected watermark. | |
| [Font] | Selects the font type of the watermark. | |
| [Style] | Selects the font style of the watermark. Available styles are [Regular], [Italic], [Bold] and [Bold Italic]. | |
| [Size] | Specifies the font size of the watermark (1 to 500). | |
| [Color] | Selects the font color of the watermark. | |
| [Border] | Adds the frame to the watermark. You can select the frame type ([Circle], [Rectangle], or [None]). | |
| [Print Style] | Selects the type of watermark ([Transparent] or [Overlap]). | |
| [Prints on First Page Only] | Prints the selected watermark only on the first page of the document. | |
Some settings are not available for pre-defined watermarks. |
Custom Paper Size Settings
Clicking [Custom Paper Size] in the [Page Setup] tab sheet opens the [Custom Paper Size Settings] dialog box. This dialog box enables you to define custom paper sizes for quick selection and register new custom paper sizes to the [Paper List] box. You can specify the name, width, and height of each size.
This setting is available only when you open the [Canon L120 Printing Preferences] dialog box from the [Printers and Faxes] (windows 98/Me/2000: [Printers]) folder.
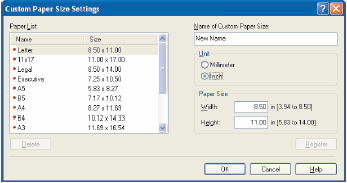
| [Paper List] | Displays the paper sizes actually available. Selects a paper size from which you can create a custom paper size. | |
You can share the custom paper sizes with all printers connected to your computer. Up to 50 sizes can be defined for [Custom Paper Size]. |
||
| [Name of Custom Paper Size] | Specifies the name of custom paper. | |
| [Unit] | Selects the unit of measurement of paper size ([Millimeter] or [Inch]). | |
| [Paper Size] | Specifies the width and height of the custom paper. | |
Be sure that [Width] does not exceed [Height] when specifying the values. |
||
| [Register] | Registers the custom paper and adds its name to [Paper List]. | |
To register a new custom paper size, be sure to log on as a member of Administrators (Windows 2000/XP) or Power User (Windows 2000 only). To change the paper size for the existing custom paper size, be sure to log on as a member of Administrators. |
||
| [Delete] | Removes the selected custom paper from [Paper List]. | |
| - - |
You cannot delete a pre-defined paper size or a paper size selected in the [Page Setup] tab. To delete a registered custom paper size, be sure to log on as a member of Administrators. |
Page Options
Clicking [Page Options] in the [Page Setup] tab sheet opens the [Page Options] dialog box. This dialog box enables you to print pages with a page frame, header, and footer. This option is disabled when [Page Layout] in the [Page Setup] tab sheet is set to [Poster].

| [Edging] | Adds a page frame to be printed on each page. 11 options are available. Edging is not available to use with [Print Grayscale Sample] in the [Quality] tab sheet. | |
| [Print Date] | Selects if the date is printed on each page or not. Six positions to print the date are available. | |
| [Print User Name] | Selects if the user name is printed on each page or not. Six positions to print the user name are available. | |
| [Print Page Number] | Selects if the page number is printed on each page or not. Six positions to print the page number are available. | |
| [Format Settings] | Allows you to set the default font type, style, size, and color, or reset to the factory default font settings. | |
| [Restore Defaults] | Resets all the current settings to their default values. |