Print borderless pictures from a memory card
Instructions to print borderless pictures from the memory card directly from the printer or through the computer using MP Navigator with Easy-Photo Print.
Using the printer's controls
The following describes the procedures when [Single-photo print] is selected.
Note: When setting [Photo Index print] or [Sticker print], borderless printing is not possible.
- Ensure that the printer is powered on and press the <Open> button. (The paper output tray will open.)
- Load paper in the auto sheet feeder (ASF) or the cassette.
The above illustration shows a PIXMA MP950
- Insert the memory card into the card slot and press the <MEMORY CARD> button.
- Set the paper settings.
- Use the right / left cursor button to select [Single-photo print] then press the <OK> button.
- Use the right / left cursor button to select the image you want to print then press <OK>.
- Use the up / down cursor button to specify the number of print copies then press the <Color> button. (Printing will start.)
Note: Printing will not start if the <Black> button is pressed.
Using MP Navigator with Easy-Photo Print
The following instructions are to use MP Navigator with Easy-PhotoPrint.
- Ensure that the printer is connected to a computer with a cable.
- Ensure that the printer is powered on and press the <Open> button to open the paper output tray.
- Load paper in the auto sheet feeder (ASF).
- Insert the memory card into the card slot.
- Launch MP Navigator and click 'Import Image Data from Memory Card'.
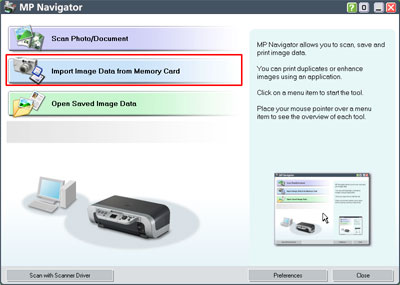
The above screen may vary by product
- Click the image you want to print, and select the check box in the lower left-hand corner of the image.
- Click 'Print Photo' to launch Easy-PhotoPrint.

- Use Easy-PhotoPrint to print the image.
Adjusting the Paper Settings
- Press the <Settings> button. (The Settings screen is displayed.)
- Use the up / down cursor button to select the item to set.
- Use the right or left cursor button to select the setting.
- Press the <Settings> button to complete setting changes.

<1> Specify the page size:: A4 / 4" x 6" (101 x 152) / 5" x 7" (127 x 177) / 8.5" x 11" (215 x 279) / Credit Card
<2> Specify the media type: Plain paper / Photo Plus / Matte Photo / Glossy Photo / Photo Paper Pro
<3> Adjust image quality: Standard or High
<4> Select [Borderless] prints to print without borders or select [Bordered] to print with a margin..
NOTE: Bordered is set when [Plain paper] is selected as the media type.
<5> Select the date and file number options desired: No date/file no., Print date only, Print file no. only or Print date & file no.
NOTE: Date is when the photo was taken and the file number is the DCF numbers.
Click toreturn to step 5 of the instructions for printing directly from the unit.
