
How to use File Viewer Utility.
| Article ID: ART154783 | | | Date published: 06/09/2015 | | | Date last updated: 08/17/2015 |
Description
Solution
Below you will find instructions how to use File Viewer Utility to display and save images stored on a CF card loaded in the camera, and also explains how to perform image processing including processing RAW images and how to transfer images to the retouching software.
- For more information on using File Viewer Utility, refer also to the sources listed below:
Readme: Click the 'Start' button and select 'All Programs' ('Programs' in other versions of Windows), 'Canon Utilities', 'FileViewerUtility xx' ("xx" is the version number), 'FileViewerUtility Readme'.
Help: Displayed by clicking the 'Help' button in the File Viewer Utility main window.
- Starting File Viewer Utility
- Displaying Images
- Selecting Images
- Selecting the Model-Specific Processing Mode
- Selecting the Image Display Mode
- Working with Selected Images
- Processing RAW Images
- Saving Images
- Transferring Images to Retouching Software
- Specifying Preferences
- Specifying Camera Settings
-
Connect the camera to your computer.
- The event screen and the Scanner and Camera Wizard dialog box appear.
- Click the 'Cancel' button and close all the open windows.
-
Click the 'Start' button and select 'All Programs' ('Programs' in other versions of Windows), 'Canon Utilities', 'FileViewerUtility xx', 'FileViewerUtility'.
- You can also start File Viewer Utility by double-clicking the FileViewerUtility icon on the desktop.
- File Viewer Utility version information is displayed in xx.
- The File Viewer Utility main window appears.
File Viewer Utility main window
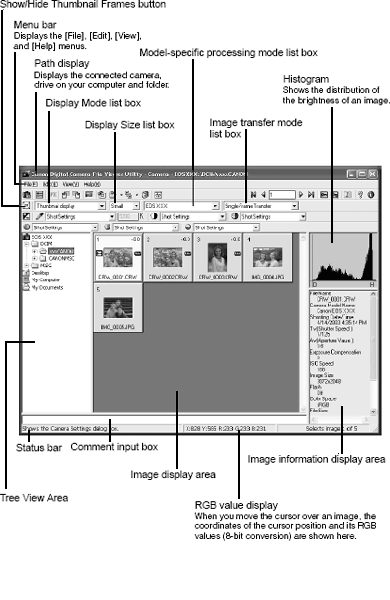
- The above window shows all the information at once. In actual use, only the information needed is displayed.
- To exit File Viewer Utility, select 'Exit' from the 'File' menu on the menu bar.


- The above windows show all the information at once. In actual use, only the information needed is displayed.
You can display images stored on a CF card in a camera or your computer. RAW images are processed and displayed according to the processing parameters set on the camera.
You can display images stored on a CF card via the dedicated USB cable while the CF card is still in the camera. Or you can display images stored on a CF card using a third-party card reader.
This section describes how to display images stored on a CF card in the camera.
Select a folder that contains images to be displayed.
- Double-click 'EOS DIGITAL REBEL' and then click the plus symbol ' + ' to the left of the 'DCIM' folder, the '100CANON' folder in Tree View Area.
- The images saved in the selected folder are displayed.

|
|
Selecting Images with the Mouse
Position the mouse cursor over the image and click on it.
- To select multiple images, hold down the <Ctrl> key and click the images.
- To select consecutive images, click the first image and then hold down the <Shift> key and click the last image.
- The frame around the selected image(s) changes color.

Selecting Images from the Control Panel
Use the button or input a value.

Selecting the Model-Specific Processing Mode
You can display the RAW image process tool bar to check and modify the processing used for RAW images.
By selecting the model of the camera on which images were shot (model-specific processing mode) in the Model-specific processing mode list box, you can check and/or modify the processing used for RAW images shot on the selected camera.
Select a model-specific processing mode from the Model specific processing mode list box.

'Common Processing'
The RAW image process tool bar is hidden and the settings for RAW image processing cannot be changed.
'EOS DIGITAL REBEL' / 'EOS 300D DIGITAL'
The RAW image process tool bar is displayed. By selecting RAW images, you can check and/or modify the image processing used. When a JPEG image is selected, however, the RAW image process tool bar is grayed out and disabled.
When images shot on Canon cameras other than your camera are saved in the selected folder or on a CF card in the connected camera, the model-specific processing mode for the camera on which the images were shot is automatically added to the Model-specific processing mode list box. |
|
Selecting the Image Display Mode
You can select the mode and size used when images are displayed. You can also display the AF point and choose whether the information display frame for thumbnail images is displayed.
Click the Display Mode list box and select the mode.
- The images are displayed in the selected display mode.

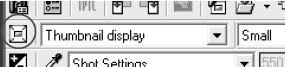
'Thumbnail display'
This shows multiple images arranged in sequence. The information shown below is also displayed for the images.

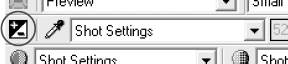
'Preview'
RAW images are displayed as single RAW images and JPEG images are displayed as single JPEG images.
'JPEG Preview'
When you select a RAW image, simultaneously recorded JPEG image (Middle/Fine) in the RAW image is displayed as a single image.
When you select a JPEG image, it is displayed as a single image just like the 'Preview' mode.
|
Click the Display Size list box and select the display size.
- The image is displayed in the selected display size.

|
The AF point used when the shot was taken can be displayed.
- Select 'Preview' or 'JPEG Preview' from the Display Mode list box.
-
Click the 'Display AF point' button.
- The AF point used when the shot was taken is displayed.
- Click the button again to hide the AF point.
|
Showing/Hiding the Information Display Frame of Thumbnail Images
You can hide the information displayed on the frame of the thumbnail images to display more images in the image display area.
- Select 'Thumbnail display' from the Display Mode list box.
- Click the 'Show/Hide Thumbnail Frames' button.
- The information display frame of the thumbnail image is hidden.
- Click the button again to display the information display frame of the thumbnail image.
Refreshing Information on Main Window
If you alter the content of the folders currently displayed in Tree View Area (by copying or deleting images) while the images in a folder are displayed in the main window, the information shown in the main window may no longer match the actual folder content. If this occurs, update the main window display so that it matches the new folder information.
Click the 'Refresh' button.
- The information displayed in the main window is updated.

Showing/Hiding Image Information
You can hide the histogram and image information display area to display more images in the image display area.
Select the 'View' menu, 'Information Area', 'Hide'.
- The histogram and image information display area are hidden.
- If you select the 'View' menu, 'Information Area', 'Show', the histogram and image information display area are displayed.
You can protect important images to prevent them from being accidentally erased.
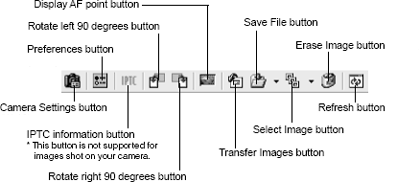
Click the 'Protect' button.

- The image is protected and the keyicon icon appears in the information display frame for the image.
- Clicking the 'Remove protect' button unprotects the image and clears the keyicon icon from the information display frame for the image.

|
This feature allows you to select multiple images in a single operation using conditions.
Click the 'Select Image' button and select the condition from the menu that appears.
- Only images that meet the condition are selected.

Use the procedure below to rotate a selected image by 90-degree increments left or right.
Rotate the image.
- To rotate the image right (clockwise), click the 'Rotate right 90 degrees' button.
- To rotate the image left (counterclockwise), click the 'Rotate left 90 degrees' button.
- The image rotates 90 degrees in the selected direction.
|
Use the procedure below to erase unwanted images from a CF card or your computer.
-
Click the 'Erase Image' button.
- An erase confirmation dialog box appears.
-
Click the 'OK' button.
- The image is erased.
|
Checking the Image Information and Entering Comments
Shooting information is recorded when images are taken. You can check the shooting information by selecting the image. Also, you can copy shooting information to paste it into another application, and you can add a comment.

|
You can use File Viewer Utility to print images in index format.
- Select images to be printed in index format.
-
Select 'Print Index' in the 'File' menu.
- Printing begins.
|
RAW images are processed based on the settings specified on the camera (including the processing parameters and white balance) and then displayed on the computer.
-
RAW images are processed in the following situations:
- When the display mode is switched from 'Thumbnail display' to 'Preview'
- When the processing parameters are changed while the image is displayed in 'Preview' or 'Thumbnail display' mode
- When the image is converted to the TIFF or JPEG format and saved
- When the image is converted to the TIFF format and transferred to the designated retouching software
- Linear processing and false color suppression can only be specified when an image is saved or is transferred to retouching software.
-
Approximate processing times
Processing Parameters
Processing Time
When RAW images saved on a CF card in the camera are processed
When the display mode is switched from 'Thumbnail display' to 'Preview'
Approx. 35 sec.
Image converted to TIFF format and transferred to the specified retouching software
Approx. 49 sec.
When RAW images saved on the computer's hard disk are processed
When the display mode is switched from 'Thumbnail display' to 'Preview'
Approx. 8 sec.
Image converted to TIFF format and transferred to the specified retouching software
Approx. 22 sec.
- The processing times given here are only approximations. Actual processing times vary widely depending on the images and the computer system.
- Processing times are based on Canon testing standards. (OS: Windows XP; CPU: 2.2 GHz Pentium 4; RAM: 256 MB)
- The processing time in the retouching software includes starting up time of the retouching software.
Modifying RAW Image Processing Parameters
File Viewer Utility allows you to modify the image processing parameters until the displayed RAW image is optimal for its intended purpose. You can also specify additional processing parameters not available on the camera, such as digital exposure compensation and white balance adjustment using the Click White Balance function.
- This processing applies the specified parameters virtually and does not affect the original RAW images in any way. Consequently, you can redo the processing as often as you like with different parameters and then reset the modified parameters to the settings used when the shot was taken.
- Select 'EOS DIGITAL REBEL' from the Model-specific processing mode list box.
-
Select the RAW image to be processed.
- See the following information on how to modify the processing parameters.
- See the following information on how to modify the processing parameters.
-
Save and transfer the image.
- You can specify the bit depth used when the image is saved and transferred in the RAW Image Processing settings tab sheet in the Preferences dialog box.
|
|
You can compensate the brightness of an image in the range of +/2 stops in 0.1-stop increments.
-
Click the 'Digital Exposure Compensation' button.
- The Digital Exposure Compensation dialog box appears.
-
Compensate the image brightness.
- Position the mouse cursor over the slider and drag it left or right to adjust the amount of compensation.
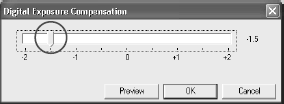
- When you click the 'Preview' button, the image brightness changes to reflect the value to which the slider was dragged.
-
Click the 'OK' button.
- The corrected value is applied to the image and the Digital Exposure Compensation dialog box closes.
- The corrected value is displayed with the corrected image.
You can adjust the white balance in your RAW images.
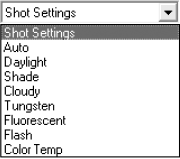
You can adjust the white balance by selecting a setting in the White Balance list box. You can also make fine adjustments to the white balance by using the Click white balance function, which allows you to adjust the white balance by selecting a white area in the image.
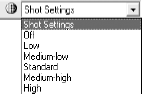
Select the desired setting from the White Balance list box.
- The table below shows the 9 available white balance settings.
- The selected setting is applied to the image.
White Balance
Details
Color temp./K (Kelvin)
Shot Settings
To apply the white balance setting used when the shot was taken.
--
Auto
File Viewer Utility automatically sets the white balance.
Approx. 3000 to 7000
Daylight
For sunny daylight outdoors.
Approx. 5200
Shade
For shaded areas outdoors.
Approx. 7000
Cloudy
For cloudy or hazy days and during sunset.
Approx. 6000
Tungsten
For tungsten (light bulb) light.
Approx. 3200
Fluorescent
For fluorescent light.
Approx. 4000
Flash
When flash is used.
Approx. 6000
Color Temp
You can manually set color temperature for 2800 to 10000K (in 100K increments).
Approx. 2800 to 10000
You can set the color temperature to a value between 2800K and 10000K (in 100K increments).
- Select 'Color Temp' from the White Balance list box.

- Enter a color temperature.
- Enter the color temperature in the Color Temp. input box.
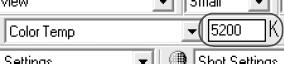
- You can enter values between 2800K and 10000K (in 100K increments).
- Press the <Enter> key.
- The specified value is applied to the image.
This function allows you to automatically adjust the white balance simply by clicking a point in a white part of the image.
- Click the 'Click White Balance' button.
- When you move the cursor over the image, it changes to the shape of an eyedropper.

- Click in a white area in the image.

- The white balance is adjusted so that the area clicked appears white and the result is displayed.
- To adjust the white balance using a different location, click the 'Click White Balance' button again.
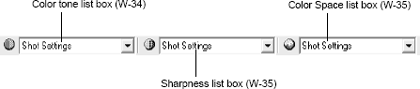
Use the procedures below to adjust the color parameters (contrast, color saturation and color tone) in images. You can adjust the color by selecting settings from the respective list boxes.
Select the desired setting from the Contrast list box.
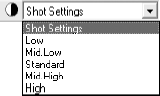
- The selected setting is applied to the image.
Adjusting the Color Saturation
Select the desired setting from the Color saturation list box.

- The selected setting is applied to the image.
Select the desired setting from the Color tone list box.
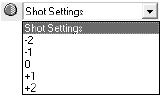
- The selected setting is applied to the image.
- [-2] strongly adjusts the colors so that skin tones appear redder while
- [-1] makes the same adjustment less strongly.
- [0] applies the standard color matching adjustment.
- [+1] makes skin tones appear yellower
- [+2] makes the same adjustment more strongly.
You can adjust the edge sharpness of the image.
Select the desired level from the Sharpness list box.
- The selected level is applied to the image.
Use the procedure below to change the color space for the image.
Select the desired setting from the Color Space list box.
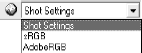
- The selected setting is applied to the image.
|
Copying the Processing Parameters for RAW Images
This process allows you to quickly and easily apply the processing parameters used for one RAW image (such as the digital exposure compensation and white balance adjustment settings) to other images.
- Right-click a RAW image that has been processed and select 'Copy Current Conditions' from the menu that appears.
-
Right-click the RAW image to which you want to apply the parameters and select 'Paste Current Conditions' from the menu that appears.
- The copied processing parameters are applied to the selected RAW image.
- You can apply the same processing parameters to multiple RAW images by copying the processing parameters, selecting the RAW images, right-clicking one of the selected images and then selecting 'Paste Current Conditions' from the menu that appears.
|
This section explains how to save captured images stored on a CF card onto your computer, how to extract JPEG images from RAW images using a simple procedure and then save the JPEG images onto your computer, and how to save multiple images as an index file on your computer.
Saving Images from the Camera to Your Computer
You should save the images you have shot on your computer.
- Select images to be saved.
- Click the 'Save File' button and select 'Convert and save in file' from the menu that appears.

- The Save File dialog box appears.
-
Specify the desired settings and click the 'OK' button.
- The images are saved in the selected folder.
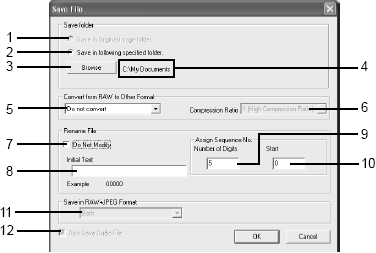
- The converted image is saved as a new image in the same folder as the selected image. You cannot use this option when the images selected are saved on a CF card in the camera. This option is only available when the selected images are saved on your computer or on a CF card in a card reader.
- Use this button when you want to specify the folder in which the image will be saved.
- When the 'Save in following specified folder' radio button is selected, this button specifies the folder in which the image will be saved.
- Shows the folder in which the image will be saved.
- Select this option when the images to be saved include RAW images. Select 'Do not convert', 'Exif-JPEG', 'Exif-TIFF(8bit/ch)' or 'TIFF(16bit/ch)'. The file extensions used for the saved files are shown below.
Conversion Format
File Extension
Do not convert
_.CRW
Exif-JPEG
_RJ.JPG
Exif-TIFF(8bit/ch)
_RT8.TIF
TIFF(16bit/ch)
_RT16.TIF
- To use linear processing, specify linear processing in the Preferences dialog box (W- 45) and select 'TIFF(16bit/ch)' when you save the image. Even when linear processing is specified, linear processing cannot be applied to images saved in 'Exif- TIFF(8bit/ch)' format.
- You can specify the 'Compression Ratio' (image quality) when you select 'Exif-JPEG' from the 'Convert from RAW to Other Format' list box. You can select from 4 compression ratios-'4 (Highest Image Quality)' to '1 (High Compression Ratio)'. The higher the value, the higher the quality of the JPEG image.
- Click this checkbox when you want to save the image without changing the name.
- This is text inserted before the file number for sorting. You can enter up to 12 characters. When you enter text, an example of the file name appears in the Example field below the text box.
- You can specify up to 9 digits for the file number.
- Specifies the first file number.
- Images shot on your camera do not support this function.
|
Extracting JPEG Images from RAW Images
When a RAW image is shot on your camera, a JPEG image (Middle/Fine) is recorded at the same time. You can save the JPEG image (Middle/Fine) included with the RAW image to your computer by selecting the RAW image shot on your camera and extracting the JPEG image.
- Select the RAW image from which a JPEG image is to be extracted.
-
Click the 'Save File' button and select 'Extract Save JPEG' from the menu that appears.
- The Extract & save JPEGs dialog box appears.

-
Specify the desired settings and click the 'OK' button.
- The JPEG image is saved in the selected folder.

- The converted image is saved as a new image in the same folder as the selected image. You cannot use this option when the images selected are saved on a CF card in the camera. This option is only available when the selected images are saved on your computer or on a CF card in a card reader.
- Use this button when you want to specify the folder in which the image will be saved.
- When the 'Save in following specified folder' radio button is selected, this button specifies the folder in which the image will be saved.
- Shows the folder in which the image will be saved.
- Click this checkbox when you want to save the RAW image without changing the name.
- This is text inserted before the file number for sorting. You can enter up to 12 characters. When you enter text, an example of the file name appears in the Example field below the text box.
- You can specify up to 9 digits for the file number.
- Specifies the first file number.

|
Saving Images as an Index File
This function combines multiple images into an index image and saves the index on your computer as a single JPEG file.
- Select images to be saved as an index.
-
Click the 'Save File' button and select 'Save Index' from the menu that appears.
- The Index Sheet Options dialog box appears.
- The Index Sheet Options dialog box appears.
- Enter the width of the index sheet to be created. You can specify values between 4 and 11 inch.
- Enter the height of the index sheet to be created. You can specify values between 4 and 11 inch.
- Enter the resolution of the index images. You can specify values between 50 and 300 pixels per inch.
- Indicates the projected image file size based on the specified width, height and resolution.
- The settings are applied and the Index Sheet Options dialog box closes.
- Cancels the index sheet options settings.
-
Enter the settings and click the 'OK button.
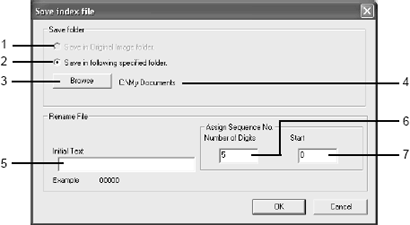
- The Save index file dialog box appears.
- The Save index file dialog box appears.
- The converted image is saved as a new image in the same folder as the selected image. You cannot use this option when the images selected are saved on a CF card in the camera. This option is only available when the selected images are saved on your computer or on a CF card in a card reader.
- Use this button when you want to specify the folder in which the image will be saved.
- When the 'Save in following specified folder' radio button is selected, this button specifies the folder in which the image will be saved.
- Shows the folder in which the image will be saved.
- This is text inserted before the file number for sorting. You can enter up to 12 characters. When you enter text, an example of the file name appears in the 'Example' field below the text box.
- You can specify up to 9 digits for the file number.
- Specifies the first file number.
-
Specify the desired settings and click the 'OK' button.
- The images are saved as an index in the selected folder.

Transferring Images to Retouching Software
This section describes how to transfer images displayed in File Viewer Utility to the retouching software and also describes how to make settings for image transfer.
- In order to transfer images, you will need the retouching software such as Adobe Photoshop Elements 2.0.
- Be sure to make the image transfer settings before transferring images.
Specifying the Image Transfer Settings
Before transferring images, it is necessary to specify the retouching software to which images will be transferred and the folder for saving the transferred images. The descriptions given here show how to transfer images to Photoshop Elements 2.0, as an example.
- Display the General Settings tab sheet in the Preferences dialog box.
-
Click the 'Browse' button of 'Image Transfer Application'.

- The dialog box for selecting the retouching software appears.
- The dialog box for selecting the retouching software appears.
-
Select the 'PhotoshopElements' icon and then click the 'Open' button.
- Select 'C:' drive, 'Program Files', 'Adobe', 'Photoshopt Elements 2'.
- Photoshop Elements 2.0 is specified as the retouching software to which images will be transferred and then the General Settings tab sheet appears.
-
Click the 'Browse' button of 'Image transfer folder'.
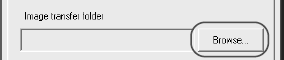
- The dialog box for selecting the folder to which images are transferred (saved) appears.
- The dialog box for selecting the folder to which images are transferred (saved) appears.
-
Select the folder to be used for saving the transferred images and then click the 'OK' button.
- The folder is specified and then the General Settings tab sheet appears.
- The folder is specified and then the General Settings tab sheet appears.
-
Click the 'OK' button.
- The settings are applied and the Preferences dialog box closes to end the procedure.
|
This section describes how to transfer the images displayed in File Viewer Utility to the retouching software. Although the descriptions given here show how to transfer images to Photoshop Elements 2.0, as an example, you can also transfer images by following the same procedure even if you specify any other retouching software in 'Specifying the Image Transfer Settings'.
- Select images to be transferred.
-
Select the transfer mode from the Image transfer mode list box.
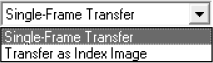
-
There are 2 available transfer modes.
- 'Single-Frame Transfer': The selected images are transferred as an individual image.
- 'Transfer as Index Image': Thumbnails are created for the selected images and transferred as an index sheet (JPEG format).
-
There are 2 available transfer modes.
-
Click the 'Transfer Images' button.
- If you selected 'Transfer as Index Image', the Index Sheet Options dialog box appears.
- If you selected 'Single-Frame Transfer', the image will be transferred.
-
Enter the settings and click the 'OK' button.
- Photoshop Elements 2.0 starts up and displays the transferred image.
- The transferred image is saved in the image transfer folder that you have set.
- RAW images are processed and then converted to TIFF format before being transferred.
|
You can use the procedure below to specify the settings for image transfer and the processing parameters used for RAW images when images are transferred and saved.
-
Click the 'Preferences' button.
- The 'Preferences' dialog box appears.
- The 'Preferences' dialog box appears.
-
Select the General Settings tab or the RAW Image Processing settings tab.
- The selected tab sheet appears.
- The selected tab sheet appears.
-
Specify the desired settings and click the 'OK' button.
- The settings are applied and the Preferences dialog box closes to end the procedure.

-
You can specify the settings shown below in the General Settings tab sheet.
- When you click the 'Transfer Images' button, the retouching software to which the image will be transferred is specified.
- Specify the folder for saving the image to be transferred to the retouching software.
- Specify the information to be displayed below images. Select 'File Name' or 'Shooting Date/Time' in the list box.
- Sets the resolution used when images are transferred to a retouching software such as Photoshop Elements 2.0. You can specify values between 10 and 2000 pixels per inch.
- When you click the 'Transfer Images' button, the retouching software to which the image will be transferred is specified.

-
You can specify the settings shown below in the RAW Image Processing settings tab sheet. The settings described here are those shown when 'EOS DIGITAL REBEL' / 'EOS 300D DIGITAL' is selected in the Model Name list box.
- Select 'EOS DIGITAL REBEL' / 'EOS 300D DIGITAL'.
* When images shot on a Canon camera are saved in the selected folder or on a CF card in the connected camera, the camera model is automatically added to the list of camera models. - If you select this option, image adjustment is not performed. Select this option when you want to use your own retouching software to make fine adjustments to the saturation.
- Clicking this checkbox neutralizes false colors.
- When you click this checkbox, a 16% reduced image is shown in the 'Preview' mode.
- Select '8 bits per color channel' or '16 bits per color channel' as the bit rate.
- Select 'EOS DIGITAL REBEL' / 'EOS 300D DIGITAL'.
-
The buttons listed below are displayed in each of the tab sheets. They function in the same way in each sheet.
- Restores the default settings for all the parameters in the currently displayed tab sheet.
- Applies the specified parameters, closes the Preferences dialog box and ends the procedure.
- Cancels all the settings, restores the parameters to their original values and ends the procedure.
- Restores the default settings for all the parameters in the currently displayed tab sheet.
|
Use the procedure described here to apply the owner name and date and time settings to the camera. The owner name, and date and time that were applied on the camera are recorded with the images.
You can also format (initialize) CF cards and check the camera properties data and the status of the battery and the CF card.
Display the Camera Settings dialog box.
- To display this dialog box from File Viewer Utility, click the 'Camera Settings' button in the main window.
- To display this dialog box from RemoteCapture, select 'Camera Settings' from the 'Camera' menu in the Shooting window.
- To display this dialog box from ZoomBrowser EX, click the 'Set' button in the Camera window and select 'Camera Settings' from the menu that appears.
- The Camera Settings dialog box appears.


|
Setting the Owner's Name, Date and Time
-
Enter the Owner's Name.
- Type in the name from your keyboard. You can enter up to 31 characters.
- Type in the name from your keyboard. You can enter up to 31 characters.
-
Set the Date and Time.
- You can click Date or Time with the mouse and use the 'uparrow' and 'downarrow' buttons to set the Date and Time, or you can enter the desired date and time from the keyboard. Clicking the 'From PC' button imports the Date and Time data from your computer.
- You can click Date or Time with the mouse and use the 'uparrow' and 'downarrow' buttons to set the Date and Time, or you can enter the desired date and time from the keyboard. Clicking the 'From PC' button imports the Date and Time data from your computer.
-
Click the 'Apply' button.
- The owner's name, date and time settings are applied to the camera.
- Once you click the 'Apply' button, the settings remain effective until you reset the owner's name, date or time.
- Clicking the 'OK' button applies the specified settings, closes the Camera Settings dialog box and ends the procedure.