|
|
Printing an image using ZoomBrowser 5.x / PhotoRecord 2.x
| Article ID: ART154816 |
| |
Date published: 06/09/2015 |
| |
Date last updated: 08/17/2015 |
Description
Printing an image using ZoomBrowser 5.x / PhotoRecord 2.x
Solution
Printing an Image Using ZoomBrowser 5.x / PhotoRecord 2.x
- Click [Print] in the Main Window, followed by [Layout Print].

- Confirm that [1. Select Images] is selected, and choose images to print by clicking on their thumbnail images.
- The background of the selected image(s) changes to blue when selected.
- You can select multiple images by pressing and holding the [Ctrl] key while clicking on successive images. To deselect images, click on the images again while holding the [Ctrl] key down.
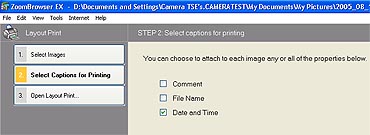
- Click [2. Select Captions for Printing] and place a check mark beside the information you would like printed with the image (multiple selection possible).
- Click [3. Open Layout Print].
- This will start PhotoRecord and display the print image in the album window.
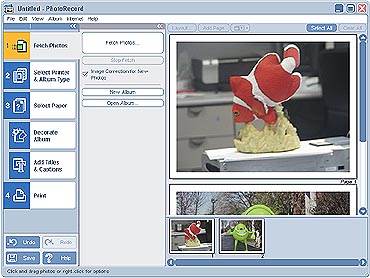
- Click [2 Select Printer & Album Type] and select a printer and an album type.
- Select among the following album types. (The displayed album types may vary according to the printer in use.)
* One Photo Per Page/One Photo Per Sheet: Prints one image on each sheet of paper.
* Free Form: Allows images to be freely positioned on the page and printed.
* Contact Sheet: Prints image thumbnails and their shooting information (Exif data) in a table format. The shooting information displayed in ZoomBrowser EX and the Exif data that can be printed using PhotoRecord differ slightly.
* Fixed Size Photo: Prints images at the heights and widths you specify.
* Mosaic: Prints a specified number of images in a spread.
* Perforated Paper: Prints images on perforated paper.
* 8-Sticker Label: Prints images on 8-label sheets.
- After you have selected the album type, you can set the detailed parameters for each album type in the area below, such as the margin placement and width and the number of images in an arrangement.

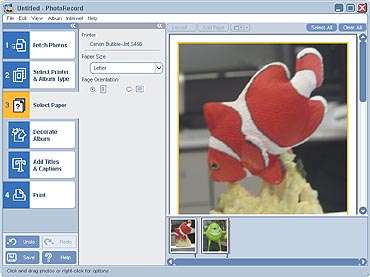
- Click [3 Select Paper] and choose the media type, paper size and paper orientation.
- The settings categories shown in this window may vary according to the printer in use.
- Click [Decorate Album] and change the image background, frame and other design elements as desired.
- The items that can be changed include the themes (a unified design for the background, photo frames and text frames, etc.) backgrounds, photo frames, text frames, and clip art.
- Select the target page, image or text first when choosing a background, photo frame or text frame.

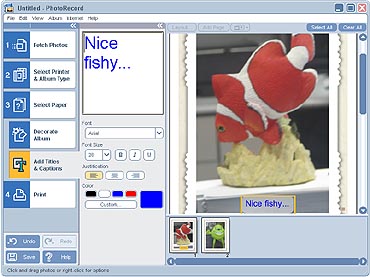
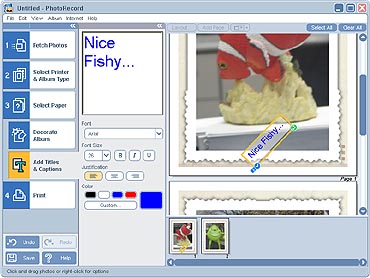
- Click [Add Titles & Captions] and change or add titles and text as desired.
- Click on text that is already displayed to change it.
- To add new text, click the target page and input the text.
- You can also adjust the font, font size, justification and color as desired.
- Change the size and rotation angle of the image, text or clip art as desired.
- The following operations can be performed in the album window:
- Move Items: You can move images, text or clip art by dragging them.
- Change Size or Rotation Angle: You can change the size or rotation angle of images, text or clip art by dragging the following points on them.
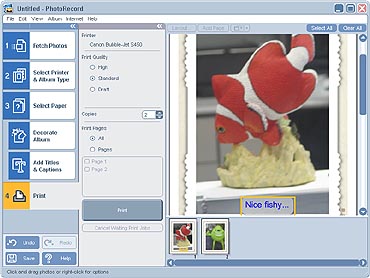
- Click [4 Print], confirm the number of copies and other print settings and click [Print].
- This starts the printing process.
- To close PhotoRecord, click the (close box), or click the [File] menu and select [Exit].
REFERENCE
- Images captured by cameras that support the Exif 2.2 standard (nicknamed the 'Exif Print' function) have the shooting settings data, such as the shooting conditions and shooting mode, embedded in them. You can obtain better prints by using this data to correct and print the images.
- PhotoRecord automatically performs image correction (default setting) on images shot by cameras that support the Exif 2.2 standard and on other image types, providing you with better print results.
|
|
