 Articles Products Cameras PowerShot PowerShot SD and ELPH Series PowerShot SD850 IS Articles Detail
Setting the My Camera settings in ZoomBrowser EX 5.x
| Article ID: ART154824 | | | Date published: 06/09/2015 | | | Date last updated: 08/17/2015 |
Description
Solution
Setting the My Camera Settings in ZoomBrowser EX 5.x
This explains how to save the "My Camera Settings" on your computer to the camera or vice versa.
The start-up image for the camera and sounds such as the start-up sound, the shutter sound, operating sounds and the self-timer sound are collectively referred to as the "My Camera Settings." You can add your favorite images and sounds from your computer to the My Camera Settings in the camera. |
Displaying the My Camera Settings
Adding New Files to the My Camera Settings
Saving the Camera Settings to the Computer
Displaying the My Camera Settings
This section explains how to display the existing My Camera Settings on the camera and those supplied with ZoomBrowser EX.
- Connect the camera, and start Canon Camera Window.
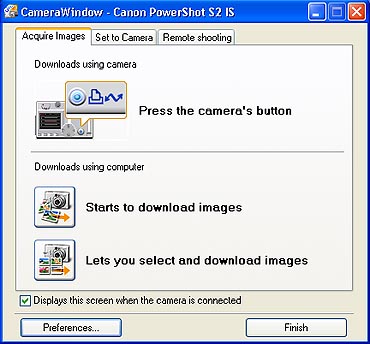
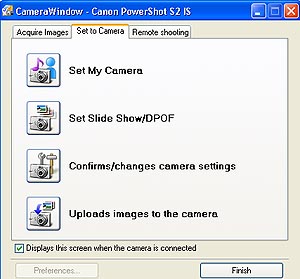
- Click the [Set to Camera] tab in the Camera Control Window, then click the [Set My Camera] button.
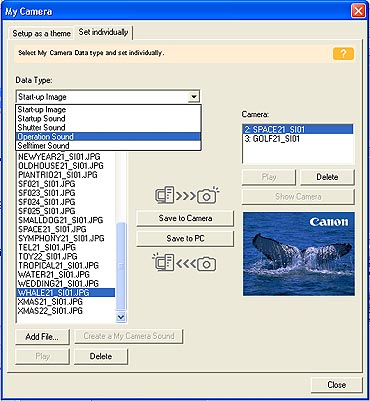
- Switch between the [Setup as a theme] and [Set individually] tabs.
- The My Computer list displays the images and sounds already saved on the computer. The Camera list displays the My Camera Settings currently in the camera (only the editable settings are shown).
- In the [Set individually] tab, switch the options in the Data Type category to show what is currently set to the camera and what is available in the computer.
Saving the My Camera settings to the camera
This topic explains how to save the pre-loaded My Camera Settings files to the camera.
- Connect the camera, and start Canon Camera Window.
- Click the [Set to Camera] tab in the Camera Control Window, then click the [Set My Camera] button.
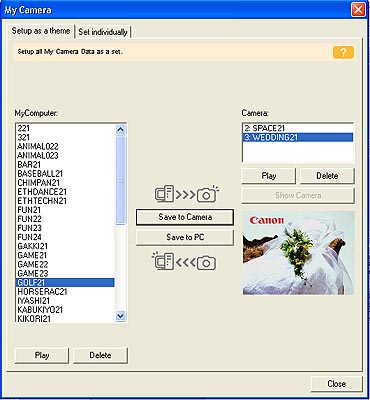
- The My Camera window will open with the [Setup as a theme] tab selected.
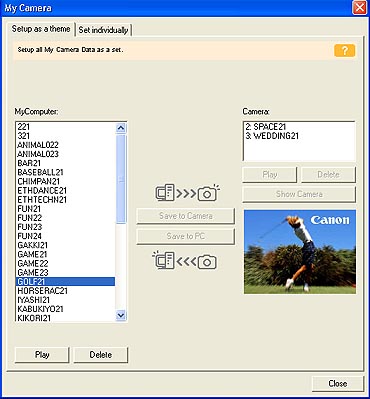
- In the My Computer list, select a setting you would like to add to the camera.
- When you select [Setup as a theme]: The start-up image will preview in the area to the right and the start-up sound, the shutter sound, the operation sound and the self-timer sound will play in order.
- When you select [Set individually]: When you select a start-up image, it will be displayed in the preview area to the right. When you select a sound file, it will automatically be played. - Select the settings file you would like to replace in the Camera list and click [Save to Camera].

- Click [OK] in the confirmation dialog.
- The settings file in the camera will now be replaced with the one you specified from the computer. - Click the [Close] button to close the dialog.
REFERENCE
|
| IMPORTANT Never detach the interface cable, turn off the camera power or do anything to stop communication between the camera and computer while the My Camera Settings are being saved to the camera. |
Adding New Files to the My Camera Settings
Create a new image or sound file and save it to the computer and then add that file as a My Camera Settings file.
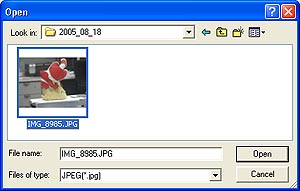
1. Create an image file or sound file that will be used as a My Camera Settings file and save it to the computer. Take note of the location you've save the file to.
- Create an image file using an image editing program. The file should be a JPEG, 320 x 240 pixels and less than 20KB in size.
- Use the functions of the My Camera Sound Maker to record and edit sounds. Creating a My Camera sound file is discussed in "Creating a My Camera Sound" below.
-
- Record the sound as an 11.025 kHz or 8.000 kHz, 8 Bit, Mono sound in the WAV format. Sound files that can be added to the camera should conform to these guidelines:
|
Type |
Duration in Seconds |
|
|
11.025 kHz |
8.000 kHz |
|
|
Start-Up Sound |
1.0 sec. or less |
1.3 sec. or less |
|
Operating Sound |
0.3 sec. or less |
0.4 sec. or less |
|
Self-Timer Sound |
2.0 sec. or less |
2.0 sec. or less |
|
Shutter Sound |
0.3 sec. or less |
0.4 sec. or less |
2. Connect the camera, and start Canon Camera Window.
3. Click the [Set to Camera] tab in the Camera Control Window.
4. Click the [Set My Camera] button.
5. Click the [Set individually] tab in the My Camera window and switch the Data Type to "Start-up Image" or one of the sounds.
6. Click the [Add File] button in the lower left part of the window.
7. In the Open dialog, select the file you created in Step 1 and click [Open].
- The selected file will appear in the My Computer list.
Saving the Camera Settings to the Computer
You can copy the My Camera Settings from the camera to the computer.
- Connect the camera, and start Canon Camera Window.
- Click the [Set to Camera] tab in the Camera Control Window, and click the [Set My Camera] button.
- The My Camera [Setup as a Theme] window will open.
- To set the My Camera Settings individually, click the [Set individually] tab instead and select the respective settings, such as the start-up sound or image, in the Data Type category. - Select (click on) the setting you would like to copy from the Camera list.
- The preview image will display in the area to the right and the start-up sound, the shutter sound, the operation sound and the self-timer sound will play in order. - Click the [Save to PC] button.
- Assign a name to the settings file and click [OK].
- The settings file will copy to the computer disk. If there is a settings file with the same name, it will be over-written. - Click [Close] to close the My Camera window.
Creating a My Camera Sound
The following section introduces the [My Camera Sound Maker] function, which allows you to record and edit the start-up sound, shutter sound, operation sound and self-timer sound.
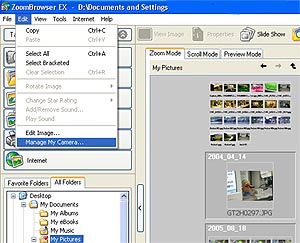
- Click the [Edit] menu in the Main Window and select [Manage My Camera].
- Click the [Set individually] tab, followed by [Create a My Camera Sound].
- The My Camera Sound Maker window will open.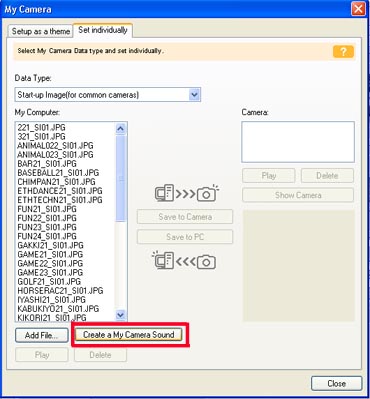
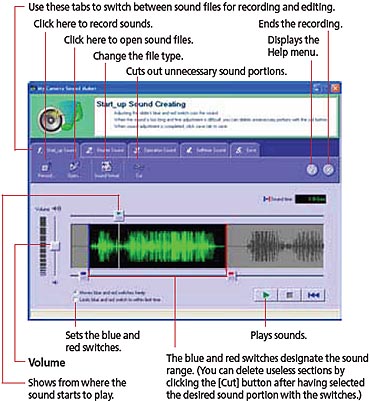
- Click the tab that corresponds to the type of sound you would like to create (i.e. Start-up Sound, Shutter Sound, etc.)
- To record a sound using a microphone (for example), click the [Record] button.
- Click [Start] to begin recording, and click [Stop] to end the recording.
- When you have recorded or set all the sounds you would like, click the [5. Save] tab to save the sound file(s).
| IMPORTANT The "Sound time" will display in red if the sound file exceeds the time limit. If this happens, select the desired sound portion using the blue and red switches and select [Cuts switches, before blue and after red] from the [cut] menu to delete unnecessary sound portions. In addition, when you select [Limits blue and red switch to within limit time], the switches can no longer be moved outside of the time limit width. |
| REFERENCE The Volume switch setting affects the volume of the sound file to be saved. In other words, if you turn down the volume of a sound you recorded on the computer because it is too loud when you play it, the sound will have a low volume when you upload it to the camera. So when the playback volume is too loud on the computer, turn down the volume of the speakers. |