Operating the Shutter Remotely - RemoteCapture
You can use a computer to control the shutter of a connected camera to record still images. This is particularly useful for checking images on the larger computer display as you record them.
Starting RemoteCapture
1. Attach the supplied USB cable to the computer's USB port and the camera's Digital terminal. Prepare the camera for communication with the computer.
2. Open the lens cover or remove the lens cap on models equipped with them.
3. Select 'ZoomBrowser EX' in the dialog (Events dialog) that allows you to select an application program, and click 'OK'.
This will start ZoomBrowser EX and display its Camera Window.
4. Close the Camera Window.
This will open ZoomBrowser EX's Main Window.
5. Click 'Camera & Memory Card', then 'Remote Shooting' in the next menu.
This will start RemoteCapture.
6. Click 'Connect' when the "Connect to camera?" prompt appears.
This will display the Shooting - RemoteCapture window.
RemoteCapture Features
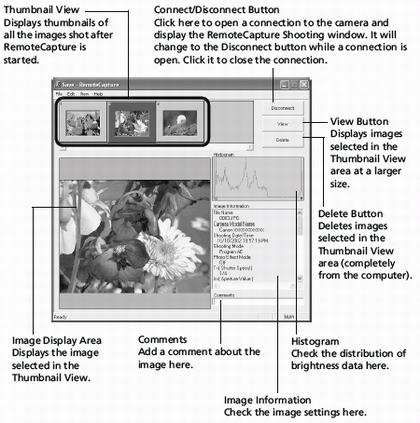
RemoteCapture has two windows: the Shooting-RemoteCapture window and the Save-RemoteCapture window. Use these windows to record and save images, respectively.
Shooting-RemoteCapture Window
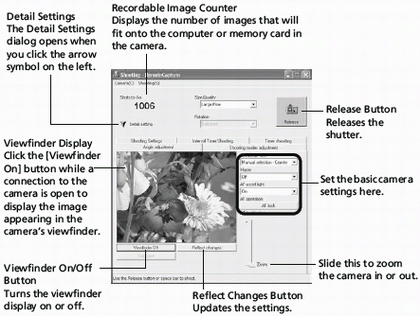
 RemoteCapture locks the exposure and focus settings for the subject matter in the Viewfinder section. If the lighting or distance to the subject changes, click [Reflect changes] to reset these settings. RemoteCapture locks the exposure and focus settings for the subject matter in the Viewfinder section. If the lighting or distance to the subject changes, click [Reflect changes] to reset these settings. |
 The following limitations apply when the Viewfinder image is displayed with a DIGITAL ELPH/DIGITAL IXUS series camera. The following limitations apply when the Viewfinder image is displayed with a DIGITAL ELPH/DIGITAL IXUS series camera.
- The Viewfinder will automatically turn off after you shoot or after 1 minute passes after it is turned on. Click [Viewfinder On] again to turn it back on. However, you may have to wait a moment for it to come back on if the camera body temperature has risen.
- The camera's LCD monitor does not display while the Viewfinder is on. In addition, the Video OUT settings cannot be set with RemoteCapture.
|
Save-RemoteCapture Window
Shooting with RemoteCapture
| If your computer is set to go into standby mode, there is no guarantee that RemoteCapture will continue to function after the computer enters standby mode. Always turn off the standby function before you start shooting with RemoteCapture. |
1. Click the arrow to the left of 'Detail Settings'.
The full-view Shooting-RemoteCapture window will display.
2. Click 'Viewfinder On' and view the image in the Shooting-RemoteCapture window.
Change the settings if required. To update any changes made in the Detail settings window, click the 'Reflect changes' button.
3. Set the Size/Quality and Rotation settings in the Shooting- RemoteCapture window.
You can save images of people and other subjects that are shot in portrait orientation (camera held 90o on end) to the computer in the correct viewing orientation by setting the 'Rotation' category to '90 degrees left' or '90 degrees right'.
- The rotation settings in RemoteCapture cannot be used if your camera is equipped with the Auto Rotate function and it is set to On.
- To change the destination of the saved image, see Changing the File Destination and Method of Saving information listed below.
|
4. Click the 'Release' button.
Images shot with RemoteCapture are automatically saved to the folder selected in ZoomBrowser EX.
- You can also release the shutter by pressing the camera's shutter button or the keyboard's space key.
- The zoom controls and other camera buttons and switches, except for the shutter button, cannot be operated while RemoteCapture is controlling the camera.
- You may notice that the interval between the shutter release and activation is slightly longer when RemoteCapture is used to shoot than when the camera is used in the normal fashion.
|
Changing the File Destination and Method of Saving
1. In the Save-RemoteCapture window, click the 'File' menu and select 'Preferences'.
This will display the Preferences dialog.
2. Select the way images are saved and the folder to which they are saved and click 'OK'.
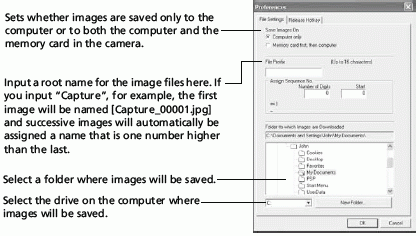
| Selecting [Computer only] in the "Save Images On" category allows you to shoot when there is no memory card in the camera or when the camera's memory card is full. |
Displaying the Subject in the Camera's LCD Monitor
You can view the subject you are shooting in the camera's LCD monitor.
1. In the Shooting-RemoteCapture window, click the 'Camera' menu and select 'Camera Display Settings'. The Camera Display Settings dialog will display.
2. Select 'Camera LCD monitor' and click 'OK'.
3. In the Shooting window, click the 'Viewfinder On' button.
| You can display the subject on a TV connected to the camera by selecting [Video Out terminal] in Step 2. |
Printing an Index of the Thumbnail Images
You can print an index of all the thumbnails displayed in the Thumbnail View area of the Save-RemoteCapture window by clicking the 'File' menu and selecting 'Print Index'. This provides a convenient register and means of checking your images since the file name and shooting date are also printed with each image.
Interval Timer Shooting
Interval timer shooting is a method of shooting that records a specified number of frames at set intervals.
1. In the Shooting-RemoteCapture window, click the 'Interval Timer Shooting' tab.
This will display the Interval Timer Shooting window.
2. Set the number of frames and the interval value and click 'Start'. This will record the specified number of frames at the specified interval.
- You can set the time interval between 5 seconds to 60 minutes.
- You can capture up to the number of recordable frames displayed in the Shooting-RemoteCapture window (the actual limit is 9999 frames when the displayed number is 10,000 or higher).
|
| Please note that the camera will not be able to shoot at the specified interval if it is shorter than the time required to transmit the data and save it to the computer. |
Timer Shooting
Timer shooting is a method of shooting that records a frame after a specified number of seconds.
1. In the Shooting-RemoteCapture window, click the 'Timer Shooting' tab.
The Timer Shooting dialog will display.
2. Set the timer interval and click 'Start'.
This will record an image after the specified time has elapsed.
| You can specify a timer interval from 2 to 30 seconds. |
