How to Perform Maintenance Functions
How to display MAINTENANCE
1. Ensure that the printer is powered on.
2. Press the <Stop/Reset> button to display the main setup screen.
3. Press the <Configuration> button four times to display the MAINTENANCE screen.
How to print a nozzle check pattern
1. Extend the paper output tray. (Confirm that the paper thickness lever is set to the left.)
2. Load a sheet of A4 or Letter-sized plain paper in the auto sheet feeder.
3. Display the MAINTENANCE screen. (See How to display MAINTENANCE above.)
4. Use the <right cursor / left cursor> button to select NOZZLE CHECK and press the <OK> button. The printer prints a nozzle check pattern.
5. Confirm the nozzle check pattern.
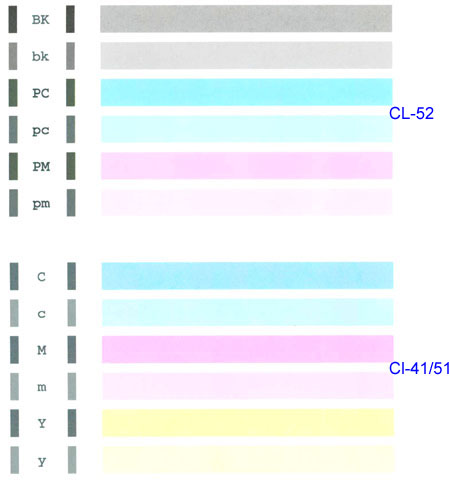
Normal nozzle check pattern (above)

Abnormal nozzle check pattern (color missing , above ) or if there are white streaks in any of the color ink patterns ( example below).

Top of Page
How to do print head cleaning
Note: Cleaning the print head consumes a certain amount of ink.
1. Display theMAINTENANCE screen. (See How to display MAINTENANCE above.)
2. Use the <right cursor / left cursor> button to select CLEANING and press the <OK> button. Cleaning starts.
Note: Do not do any other operations until cleaning is completed.
3. Print the nozzle check pattern and check the print head status. (See How to print a nozzle check pattern above.)
Top of Page
How to do print head deep cleaning
Note: Print head deep cleaning consumes more ink than print head cleaning.
Perform this procedure only when print head cleaning cannot resolve the print problem.
1. Display the MAINTENANCE screen. (See How to display MAINTENANCE above.)
2. Use the <right cursor / left cursor> button to select DEEP CLEANING and press the <OK> button.
Deep cleaning starts.
Note: Do not do any other operations until deep cleaning is completed.
3. Print the nozzle check pattern and check the print head status. (See How to print a nozzle check pattern above.)
Note: If the printed result does not improve even after doing print head deep cleaning, turn off the printer. Then, after 24 hours or later, do print head deep cleaning again. After a given time interval, ink could dissolve itself, resulting in ink unclogging.
When the printed result does not improve even after these steps, replacement of ink cartridges may be required.
Top of Page
