How to Crop an Image Prior to the Final Scan
Note: This example uses the Advanced Mode of the CanoScan 8400F driver. However, the procedures will be the same or similar for other CanoScan models.
In order to crop an image prior to the final scan, you must first perform a preview scan of your image. ScanGear is set by default to automatically crop the preview image therefore removing the white area around the image.
When the original image contains a white border, many times ScanGear will detect the edges of the borders and crop the image up to those borders. This means that the final scan will also contain these borders. Some users prefer to maintain these borders in the final scan. However, the cropping area can be adjusted as desired.
Using the Crop button

Click the Crop button to automatically crop the image. In the screenshot below, the image has been cropped up to the white border on the original image. Clicking the crop button again will crop further into the image usually cropping passed the white borders and up to the image.

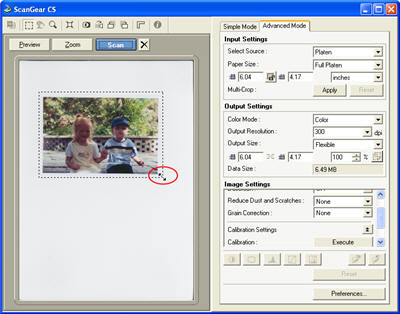
Manually Cropping
Using the mouse, you can create and or modify a cropping area. If a cropping area is not displayed in the preview, place the mouse pointer at one corner of the image to crop. Hold the mouse button and drag the mouse diagonally until you have your desired cropping area. When the mouse button is released, a cropping area is created. In some ScanGear versions you can adjust the cropped area by placing the mouse pointer at the edge of the cropping lines as seen below. The mouse pointer will turn to a double-ended arrow. Hold the mouse button and drag the mouse to create the desired cropping area.