Run the CanoScan Setup CD Manually (N670U / N676U / N1240U / N650U / N656U / N1220U)
| Article ID: ART155526 |
| |
Date published: 06/09/2015 |
| |
Date last updated: 08/17/2015 |
Description
Run the CanoScan Setup CD Manually (N670U / N676U / N1240U / N650U / N656U / N1220U)
Solution
Running the CanoScan Setup manually (Windows)
- For Windows XP, click 'Start', and then select 'My Computer'.
For other Windows operating systems, double-click the 'My Computer' icon on in the Windows desktop.
- Double-click on the 'CANOSCAN' icon to start the CanoScan setup utility.
- Double-click the 'Setup' icon. The CanoScan installation will start.
Running the CanoScan Setup manually (Macintosh)
- First, double-click the "CD-ROM" icon on desktop.

-
Double-click the appropriate file.
- If using OS 9 or OS X Classic Mode, double-click the "Setup" icon in the finder.

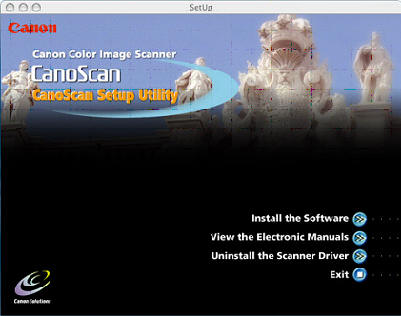
The main menu screen of CanoScan Setup will appear.
Mac OS X (Navitve Mode)
Mac OS X was not available when this scanner model was released and therefore the CanoScan Setup CD-ROM will not include the Mac OS X compatible scanner drivers or Toolbox. These files must be downloaded
If you will be installing Toolbox, you should install it prior to installing the plug-in driver for the scanner..
- Visit Canon's website at: www.canontechsupport.com
- Select 'DOWNLOAD LIBRARY' from the gray bar at the top of the page.
- From the Download Library page, just below 'Please choose your product from the menus below:', select your model in the following manner:
-
- Click the down arrow on the top drop-down box and select the appropriate category (Printers, Scanners, Multifunction, etc.).
- Click the down arrow on the middle drop-down box and select the appropriate product type.
- Click the down arrow on the bottom drop-down box and select the appropriate model.
- On the Download Library page for your model, click 'Drivers / Software'.
Note: Some links may launch in a new window. If you are having troubling viewing, please disable any active pop-up blockers.
- Select the desired download listing.
- Click 'I Agree - Begin Download' to agree to the Disclaimer and continue the download process.
- Note: Please read and follow any on-screen instructions throughout this process. Some products may have a separate file that includes detailed installation instructions. The instructions may vary and should be referenced prior to the download.
To Download:
Windows: Click the file link, select 'Save', and specify the directory where you want to save the file. The download will start automatically. The file will be in a self-extracting form (.exe format). Mac: Click the file link, the download will start automatically. Downloaded files are saved on the desktop as a disk icon.
- Running the Downloaded file:
Double-click the file or disk icon to decompress . A new folder will be created in the same folder as the downloaded driver (Windows) or on the desktop (Mac) . The new folder has the same name as the decompressed file.
- Open the folder, then double-click the decompressed executable file to start the installation.
-
- Windows - usually Setup.exe or something similar
- Mac - .pkg file (Mac)
- Follow any on-screen instructions.
