Audio Recording Setup
You can set the audio mode to 16 bit or 12 bit. With 12 bit, you can select to record on two channels, leaving two channels free for adding sound later (12bit CH  ), or to record on four channels simultaneously (12bit CH ,
  ).
).
The sampling frequency in 16 bit is 48 kHz and in 12 bit 32 kHz. The 16 bit mode provides higher sound quality.
Audio dubbing cannot be performed with this camcorder.
16bit audio recording uses the full available space on the tape and will not allow additional audio to be added.
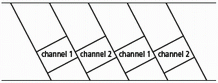
12bit CH leaves the space between channels 1 and 2 available for audio to be added later.
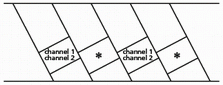
12bit CH , records all four channels simultaneously and does not leave any space for audio to be added later.

Selecting the Audio Mode (16bit, 12bit CH , 12bit CH , )

Press the <MENU> button to open the menu and select [AUDIO SETUP]. Select [AUDIO MODE], select a setting option and close the menu.
Recording on Channels 1 and 2
Select the audio input from FRONT MIC (supplied microphone unit), AUDIO1 (RCA terminals) or REAR (XLR terminals).
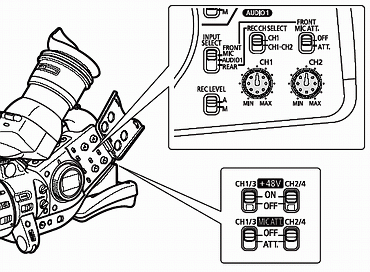
When Using the Front Microphone
Set the <INPUT SELECT> switch to FRONT MIC.
Turn on the microphone attenuator (20 dB) as necessary by setting the FRONT MIC ATT. switch to ATT.
When Connecting to the RCA terminals of AUDIO1 (Line-in Recording)
-
Connect the device to the RCA terminals of AUDIO1.
-
Set the <INPUT SELECT> switch to <AUDIO1>.
When Connecting to the XLR terminals
-
Connect a microphone to the XLR terminals.
To supply a microphone with phantom power, set the +48V switch next to the XLR terminals to <ON>. Make sure to connect the microphone first, before turning on the phantom power. Keep the microphone connected when turning off the phantom power.
-
Set the <INPUT SELECT> switch to <REAR>.
-
Set the <REC CH SELECT> switch to <CH1> or <CH1?CH2>.
-
Turn on the microphone attenuator (20 dB) as necessary by setting the <MIC ATT.> switch to <ATT>.
-
For 12dB gain-up: Press the <MENU> button to open the menu and select [AUDIO SETUP]. Select [R-XLR GAINUP], set it to [12dB] and close the menu.
 When connecting a microphone not supporting phantom power, make sure to set the +48V switch to <OFF>. Otherwise the microphone may be damaged. When connecting a microphone not supporting phantom power, make sure to set the +48V switch to <OFF>. Otherwise the microphone may be damaged. |
Recording on Channels 3 and 4
Select the audio input from <SHOE> (optional MA-300 Microphone Adapter), <AUDIO2> (RCA terminals) or <REAR> (XLR terminals).
Make sure to set [AUDIO MODE] to [12bit CH , ].
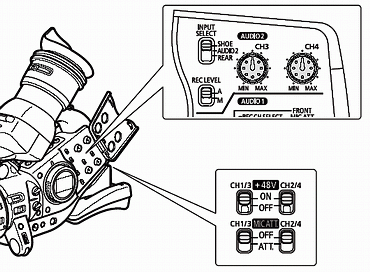
When Connecting to the Advanced Accessory Shoe
-
Attach the optional MA-300 Microphone Adapter to the advanced accessory shoe.
- With the MA-300, you can use balanced (XLR) microphones on all 4 channels.
- Refer also to the MA-300 instruction manual.
-
Set the <INPUT SELECT> switch to <SHOE>.

- Phantom power cannot be used with the MA-300.
- MA-100 and MA-200 cannot be used.
|
When Connecting to the RCA terminals of AUDIO2 (Line-in Recording)
-
Connect the device to the RCA terminals of AUDIO2.
-
Set the <INPUT SELECT> switch to AUDIO2.
When Connecting AUDIO2 to the XLR terminals
-
Connect a microphone to the XLR terminals.
To supply a microphone with phantom power, set the +48V switch to <ON>. Make sure to connect the microphone first, before turning on the phantom power. Keep the microphone connected when turning off the phantom power.
-
Set the <INPUT SELECT> switch to <REAR>.
-
Turn on the microphone attenuator (20 dB) as necessary by setting the <MIC ATT.> switch to ATT.
-
For 12 dB gain-up: Press the <MENU> button to open the menu and select [AUDIO SETUP]. Select [R-XLR GAINUP], set it to [12dB] and close the menu.
| When connecting a microphone not supporting phantom power, make sure to set the +48V switch to <OFF>. Otherwise the microphone may be damaged. |
Adjusting the Audio Recording Level
Hiding/Displaying the Audio Level Indicator on the Screen

Press the <MENU> button to open the menu and select [DISPLAY SETUP/ ]. Select [AUDIO LEVEL], select a setting option and close the menu.
The audio level indicator can also be turned on/off with the custom key.
Automatic Audio Adjustments
Set the <REC LEVEL> switch to A.
Manual Audio Adjustments
-
Set the <REC LEVEL> switch to M.
-
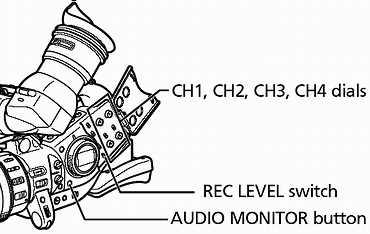
When recording on 4 channels, press the <AUDIO MONITOR> button and select CH1/2 or CH3/4.
The setting changes with each press of the button in the order of CH1/2, CH3/4, CH1+3/2+4. Do not select CH1+3/2+4 when adjusting the level.
-
Turn the respective CH1, CH2, CH3 or CH4 dial to adjust the audio level.
- We recommend using headphones when adjusting the audio level. If the input level is too high, audio may become distorted even if the audio level indicator is displaying an appropriate level.
- You can select to synchronize the audio signal with the video signal by adding an equal amount of delay to the audio. Open the menu and select [AUDIO SETUP]. Select [AUD.M.SET], set it to [LINE OUT] and close the menu. If you wish to monitor audio in real time, select [NORMAL]. In either setting, audio and video signals will be recorded synchronized on a tape.
|
