In ZoomBrowser EX, the PhotoRecord window is used to print images. In addition to the printing modes supported in Exif 2.2 (ExifPrint), PhotoRecord also supports layout printing and index printing.
- Select the images to be printed in the ZoomBrowser EX main window or the Camera window.
-
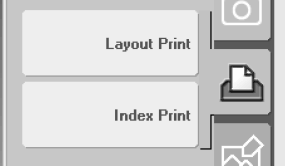
Click the 'Print' button and select 'Layout Print' or 'Index Print'.
- In the ZoomBrowser EX main window, a window appears in which you can select the information to be printed with the images.
- The Download Settings dialog box appears in the Camera window. Specify the desired settings and click the 'OK' button. A window then appears in which you can select the information to be printed with the images.
-
Click the checkboxes for the information to be printed with the image ('Comment', 'File name' and 'Date and Time') and then click the 'Finish' button.
- If you selected 'Layout Print' in step 2, PhotoRecord starts up and the PhotoRecord Print Modes dialog box appears.
- If you selected 'Index Print' in step 2, the Index Print Settings dialog box appears. Set the printer and paper settings and then click the 'Print' button to begin printing.
- You can select multiple items of information to be printed with an image.
- You can enter a comment by selecting the image displayed in the ZoomBrowser EX main window, clicking the 'Properties' button and entering your comment in the window displayed.
-
Select the print mode and click the 'Next' button.
- The Page Setup window appears.
- The following explanation describes the procedure when the 'Artwork/Layout album' radio button is selected.

|
Selecting the 'Artwork/Layout album' radio button allows you to set any position or size for your printed images. Other print modes allow you to print tiled images or print on Canon perforated paper.
|
-
Set the paper type, paper size and orientation, and then click the 'Next' button.
- The layout settings window appears.
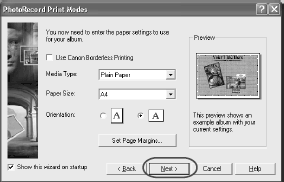
- Do not select 'Custom' in the Paper Size list box. Depending on the printer you are using, this could prevent the image from being printed correctly.
-
Select the layout mode and click the 'Finish' button.
- The PhotoRecord window appears.

-
Edit the print window and click the 'Print' button.
- The Print dialog box appears and the image is printed.
PhotoRecord Window

- Saving the page layout: You can save the page layout as an 'Album' by selecting 'Save As' from the 'File' menu.
- Adding images to the page: You can drag and drop displayed images from the ZoomBrowser EX main window to the PhotoRecord window.
- Changing the decorations for the entire page: To select your preferred decorative design, open the Change Page Artwork dialog box by clicking the 'Options' button and selecting 'Change Page Artwork' from the menu that appears.
- Changing the image frames: To select your preferred frame, open the Change Photo Frame dialog box by rightclicking the image and selecting 'Change Photo Frame' from the menu that appears.
- Changing the image size and angle: You can change size and angle of an image by moving the cursor over the image and dragging the displayed arrows and buttons.

* Depending on the print mode, you may not be able to change image size or angle.
- Changing the number of images displayed per page: You can change the number of images displayed on each page using the 'Number of Photos per page when fetching' setting in the 'Preferences' dialog box that appears when you select 'Preferences' from the 'Edit' menu.
-
Click the 'Print' button.
|
If you are using a network printer and the printer name exceeds 31 characters when the path name is included, it may not be possible to print from PhotoRecord. If this problem occurs, open the Control Panel and select 'Printers and other hardware', 'Printers and Faxes'. (In other versions of Windows select 'Printer' from the Control Panel.) Then change the path and printer name so that it is no longer than 31 characters.
|
