Clearing jam from inside the machine
When print media jams inside the machine, the LCD displays [REC. PAPER JAM] and [OPEN PRINTER COVER].

There are some areas inside the machine and cartridge which are subject to high voltage and high temperatures. Take adequate precaution when performing inspections to avoid burns or electrical shock.

When removing jammed paper from inside the machine, take care not to allow the toner on the jammed paper to come into contact with your hands or clothing. If they become dirty, wash them immediately with cold water. Washing with warm water will set the toner, and make it impossible to remove the toner stains.
- Open the printer cover.
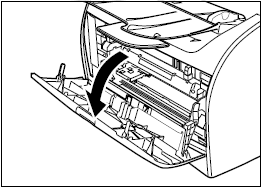
-
Remove the cartridge.
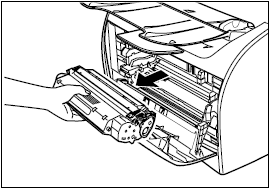
If you find jammed paper in this step, proceed to the next step WITHOUT removing it.

- Remove watches and any bracelets or rings when touching the inside of the machine. These items might be damaged if they come into contact with the parts inside the machine.
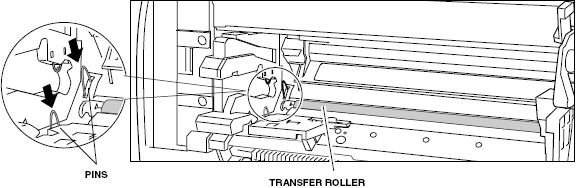
- When removing the jammed paper; do not touch the transfer roller (shaded part) as its surface is very delicate and susceptible to finger oil and scratches, which may lead to print deterioration.
- To avoid possible damage to the printer, do not touch the pins near the left end of the transfer roller.
Do not expose the cartridge to light for more than 5 minutes. If necessary, put the cartridge in its original protective bag or wrap it with a thick cloth to prevent exposure to light.
- Open the face up cover and push down the green paper release levers on sides of the face up paper output.
If you find jammed paper in this step, proceed to the next step WITHOUT removing it.
- Hold sides of the jammed paper and carefully move it inward, then gently pull it out.

- Roll the leading end of the paper outwards so that the printed surface is on the inside of the roll, then gently pull the rolled up paper out of the machine.

-
If the leading edge of the paper is visible but has not entered the imaging area, pull the paper forwards and roll it inwards.

- Do not pull the jammed paper forward from the cassette. It may cause a malfunction.


- Do not pull the jammed paper upward; the toner on the paper will stain the printer and cause a permanent reduction in print quality.

- If you cannot remove jammed paper easily, proceed to the next step. Do not try to remove it forcefully.
- Gently pull the jammed paper between the output rollers until the leading edge emerges from the back side of the machine.

- Carefully pull the jammed paper straight out through the rollers.

If the jammed paper is badly folded, similar to the folds on an accordion, ease the jammed paper loose and then pull it out of the machine.
- Close the printer cover.
- Pull out the paper cassette tray.
When pulling out the paper cassette tray, be sure to pull it out slowly and completely.
-
Slowly pull jammed paper in the direction of the arrow.
 |
When feeding paper from the cassette |
| |
 |
While putting your hand on paper as shown in the figure, slowly pull jammed paper in the direction of the arrow. |

- When removing jammed paper, be sure to put your hand on paper. If you remove jammed paper without putting your hand on it, paper may be torn.
- Do not touch the paper feed roller. If you touch it, this may result in misfeeds.
|
When feeding paper from the multi-purpose feeder |
| |
|
Slowly pull jammed paper in the direction of the arrow. |

-
Push the paper release levers back to their original position and close the face up cover.
- Be sure to push the paper release levers back to their original position. If the levers are left pushed down, the paper jam error will not be resolved.
- Never push down the paper release levers while printing. This could result in damage to the fixing assembly.
- Open the printer cover.
-
Insert the cartridge back into the machine, then close the printer cover.
If the paper that you set into the manual feed slot is jammed, set paper into the manual feed slot and perform printing operation again in this step .
- After you replace the cartridge and close the printer cover, the machine should be ready for operating. If the machine returns to the ready state for operating, troubleshooting has been successful. If the machine does not return to the ready state for operating, confirm that the paper release levers are pushed back to their original position, and check to see that jammed paper is not left in the machine.
- If you cannot close the front cover, confirm that the toner cartridge is set properly. If you close the front cover forcefully, this may cause damage to the machine.
- Do not leave the front cover open for a long time after setting the toner cartridge.
- Set the cassette in the machine.
Push the cassette into the machine firmly until the front surface of the cassette is flush with that of the machine.
