Recording to a VCR or Digital Video Device - ZR60, ZR65mc, and ZR70mc
You can copy your recordings by connecting the camcorder to a VCR or a digital video device. If you connect a digital video device, you can copy recordings with virtually no generation loss in image and sound quality.

When connecting a VCR:
- Make sure that ?
 ? is not displayed on the screen. If ?? is displayed, change the setting. ? is not displayed on the screen. If ?? is displayed, change the setting.
- The quality of the edited tape will be slightly lower than that of the original.
When connecting a digital video device:
- You can connect only one device to the camcorder with the DV cable.
- Blank sections may be recorded as anomalous picture.
- If the picture does not appear, reconnect the DV cable or turn the camcorder off and back on again.
|
Recording
- Connect the camcorder to the VCR or Digital Video Device.
- See Connecting the devices
- Set the camcorder to PLAY (VCR) mode and load a recorded cassette.
- Connected device: Load a blank cassette and set the device to record pause mode.
- Locate the scene you wish to copy and pause playback shortly before the scene.
- Play back the tape.
- Connected device: Begin recording when the scene you wish to copy appears. Stop recording when copying is complete.
- Stop playback.

- When connecting a digital video device:
- If the picture does not appear, reconnect the DV cable or turn the camcorder off and back on again.
- Proper operation cannot be guaranteed for all digital video devices equipped with a DV terminal. If operation does not work, use the S-Video or AV terminal.
- We recommend powering the camcorder from a household power source.
|
Connecting the devices
Connecting to a Digital Video Device
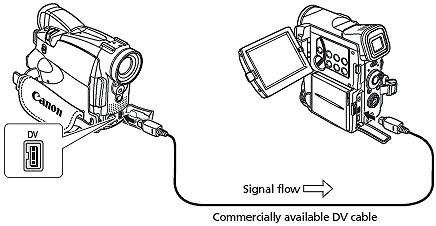
Connect the DV cable from one camcorder's DV port to the other's DV port.*
* Refer also to the instruction manual of the digital video device.
- When you use the TV as a monitor during recording, keep the TV volume turned down as long as the camcorder's audio terminals are connected. An unpleasant high-pitched squeal, called feedback, may be produced if sound from the TV speakers is picked up by the microphone.
|
Return to procedure
Connecting to the Television or VCR
Skip to TVs with Audio/Video Terminals
TVs with S (S1)-Video Input Terminal
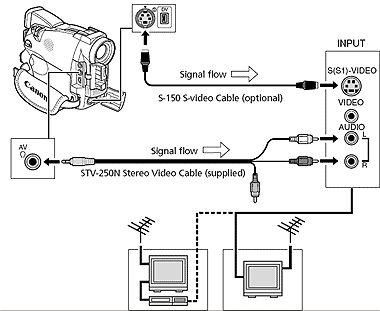
- Turn off all devices before starting the connections.
- Connect the S-150 S-video Cable (optional) to the S-video terminals.
- Connect the STV-250N Stereo Video Cable to the camcorder's AV terminal and the audio terminals of the TV/VCR.
- Connect the white plug to the white AUDIO terminal L (left), and the red plug to the red AUDIO terminal R (right). Do not connect the yellow plug.
- If connecting to a TV, set the input selector to VIDEO. If connecting to a VCR, set the input selector to LINE.
Return to procedure
TVs with Audio/Video Terminals
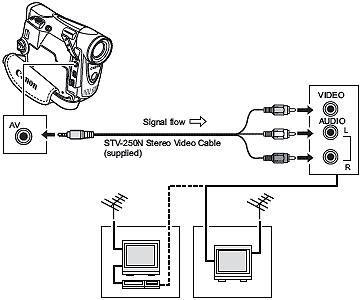
- Turn off all devices before starting the connections.
- Connect the STV-250N Stereo Video Cable to the camcorder?s AV terminal and the audio/video terminals on the TV/VCR.
- Connect the white plug to the white audio terminal L (left), the red plug to the red audio terminal R (right) and the yellow plug to the yellow video terminal VIDEO.
- If connecting to a TV, set the input selector to VIDEO. If connecting to a VCR, set the input selector to LINE.
Return to procedure
