Click here to view the Operator Panel
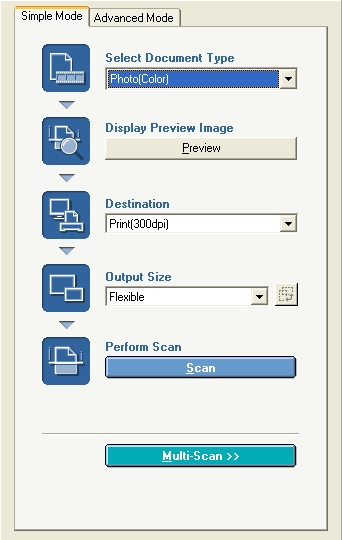
Using Simple Mode
You can select to specify where the document is loaded, the document type, and output method.
- Place the document face-down on the platen glass. You can also load documents face-up in the machine's ADF.
-
Select Select Document Type.
- Photo (Color) - Scan in color photos in color from the platen glass.
- Magazine (Color)- Scan in color magazines in color from the platen glass.
- Newspaper (B&W)- Scan in text and line drawings in monochrome from the platen glass.
- Document (Grayscale)- Scan in color photos and documents in monochrome from the platen glass.
- Document (Color) ADF - Scan in color photos and documents in color from the ADF.
- Document (Grayscale) ADF - Scan in color photos or documents in monochrome from the ADF.
If you select Photo (Color), Magazine (Color) or Document (Grayscale), the Auto Tone function will be active. However, if you disable Always Execute the Auto Tone on the Color Settings tab of the Preferences dialog box in Advanced Mode, the Auto Tone function will be disabled. If you select other options than Newspaper (B&W), the Unsharp Mask function will be active. If you select Magazine (Color), the Descreen function will be active.
- To see a preview image (provisional scan), click 'Preview'. The document will be scanned for preview and appear at the left of the screen. Preview is not available when scanning documents from the ADF.
-
Select Destination.
- Print (300 dpi) - Select this to print the scanned image by a printer.
- Image display (150 dpi)- Select this to display the scanned image on the monitor.
- OCR (300 dpi)- Select this to scan characters with OCR software. You can select this option when Select Document Type is Newspaper (B&W), Document (Grayscale), or Document (Grayscale) ADF.
- Select Output Size.
- Flexible: When no cropping frame is displayed, the entire preview area will be scanned. You can specify the cropping frame by dragging the mouse in the preview area. When a cropping frame is displayed, only the image in the cropping frame will be scanned. You can adjust the cropping frame by dragging the cropping frame. The cropping frame immediately after preview will be displayed depending on Cropping Frame on Previewed Images on the Preview tab of the Preferences dialog box in Advanced Mode. Click outside a cropping frame to delete it.
- Paper size (such as Letter and A4): The cropping frame of the selected paper size will be displayed and only the image in the cropping frame will be scanned. You can drag the cropping frame to zoom in/out the image with the aspect ratio kept. You can also rotate the cropping frame 90 degrees with (Aspect ratio switching button). You can select this option when Destination is Print (300 dpi).
- Monitor size (such as 1024 x 768 pixels): The cropping frame of the selected monitor size will be displayed and only the image in the cropping frame will be scanned. You can drag the cropping frame to zoom in/out the image with the aspect ratio kept. You can also rotate the cropping frame 90 degrees with (Aspect ratio switching button). You can select this option when Destination is Image display (150 dpi).
- Add/Delete: The Add/Delete the Output Size dialog box will be displayed to allow you to add options to the Output Size list. You can select this option when Destination is Print (300 dpi) or Image display (150 dpi).
Enter values for Output Size Name, Width and Height. You can enter values in centimeters or inches for Unit when you select Print (300 dpi) for Destination and you can only select pixels when you select Image display (150 dpi). Click 'Add' to add the value to Output Size List. To delete output sizes listed on Output Size List, select the output size to be deleted from Output Size List and click 'Delete'. Click 'Save' to enroll output sizes listed on Output Size List.
Up to 10 output sizes can be enrolled on Output Size List. You may not delete predefined output sizes such as A4 and 1024 x 768 pixels. You cannot select Output Size when Select Document Type is Document (Color) ADF or Document (Grayscale) ADF.
- Make image rotation and invert settings as required.
- Click 'Scan'. The document will be scanned
- Save the scanned image(s) on your computer.
