Install the printer driver using the prepackaged CD (Mac OS X)
To enable printing, it is necessary to copy (install) the printer driver to the hard disk of the computer. Screenshots for Mac OS X v.10.3.x are used in the following procedures.
Note:
- When Mac OS X is shared by multiple users (accounts), first log in as an Administrator.
- If anti-virus software or system-resident programs have been installed in the computer, close them before installing the drivers and applications.
-
Do not remove and re-insert the USB cable during the following procedures as this may cause the Macintosh computer or the printer to operate improperly:
- While Mac OS is launching after the printer is powered on
- During printer driver installation
- During printing
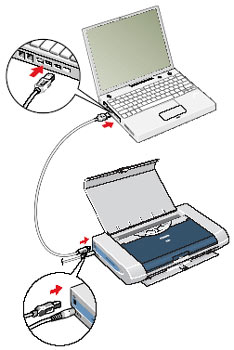
- Connect the printer to the computer with the USB cable. Confirm that the printer is powered on.
- Turn the computer on to start Mac OS X.
- Double-click the CD icon on the desktop, open the Mac OS X and Printer Driver folders, and double-click the Installer icon.

- When the Install BJ printer driver dialog box is displayed, click 'Continue'.

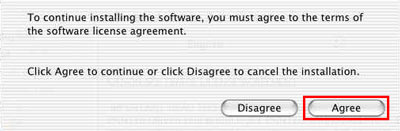
- Read the contents of the Software License Agreement, and click 'Accept' to agree and continue.

Note: Depending on the printer driver's type and version, Information Message may appear before the Software License Agreement dialog box appears. In this case, also, read the contents, and click 'Continue'.
- To agree with the terms of the Software License Agreement, click 'Agree'.
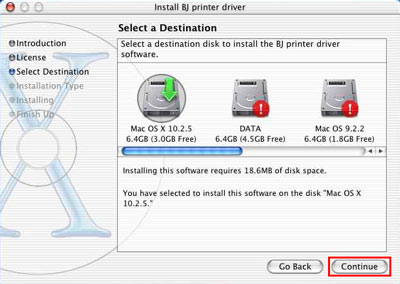
- When the destination disk is selected, click 'Continue'.
- Click 'Install'.

- When the Authenticate dialog box is displayed, enter the name and password, and click 'OK'.

Note: Enter the administrator's name and password.
(The following message is displayed)

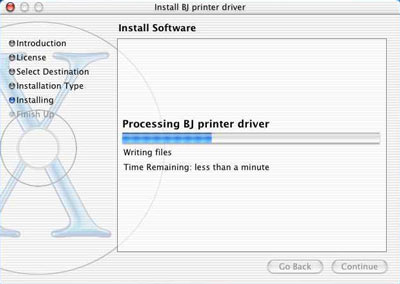
- Click 'Continue Installation' to continue. (The printer driver installation starts.)
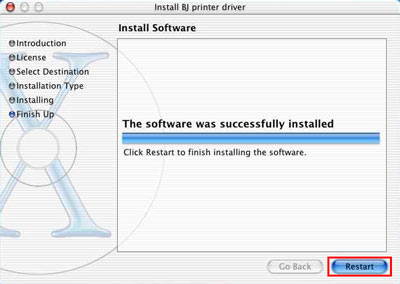
- When installation is completed, click 'Restart'.
Note: Depending on the printer model used, after restarting, the dialog box below may be displayed. To close the dialog box, click 'OK', and perform the Print Head Alignment

Printer driver installation using the prepackaged CD is completed.
