Performing Correction and Enhancement Automatically
You can perform the following Correction and Enhancement functions from the Correction/Enhancement screen in Easy-PhotoPrint.
Correction Function
Red-Eye Correction corrects red-eyes caused by a camera flash.
Face Brightener corrects and brightens a person's face.
Face Sharpener corrects a blurred image to bring a person's face into focus.

Enhancement Function
You can perform Digital Face Smoothing which reduces facial imperfection to create a more youthful appearance.

Steps
Selecting a Photo
1. Select 'Start', '(All) Programs', 'Canon Utilities', 'Easy-PhotoPrint', then 'Easy-PhotoPrint'. Easy-PhotoPrint will start and the 1. Image Selection tab will be displayed.
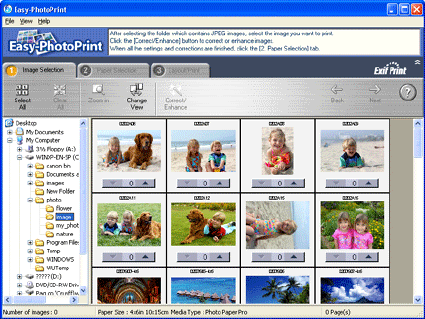
2. Select the folder containing the JPEG image you want to print from the folder window. Thumbnails of the JPEG images in the folder will be displayed.
3 Click either the thumbnail or  for an image you want to correct or enhance. The background of the photo you have selected will turn gray and the number of images will be displayed as 1 below the image.You can select multiple images for correcting or enhancing.
Notes
- Clicking 'Zoom in' after clicking the image, or simply double-clicking the image will display the enlarged image in a separate window.
- The thumbnail size can be changed with Thumbnail Size in the View menu.
- Clicking 'Select All' after selecting the folder will allow you to select 1 image each of all images in the folder. Clicking 'Clear All' will reset the number of images for all to 0.
4. Click 'Correct/Enhance'.
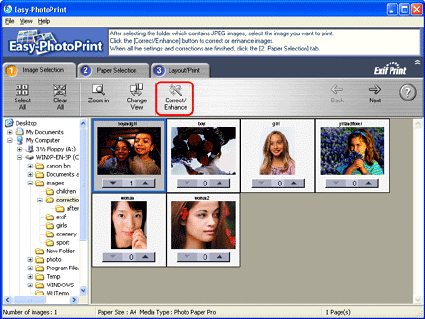
The Correction/Enhancement screen appears.
Note: You can also display the Correction/Enhancement screen by clicking 'Correct/Enhance' on the 3. Layout/Print tab. In this case, only the image displayed in the Preview section at the 3. Layout/Print tab will be corrected or enhanced.
Return to top of page
Using the Red-Eye Correction/Face Brightener/Face Sharpener Functions
1. Select an image you want to correct from the 1. Correction tab. The image appears on the Preview section.

Note: If only one image is selected in the Print Setting screen, thumbnails will not be displayed below the Preview section.
2. Make sure that 'Auto' is selected and then check the desired correction function.
- Red-Eye correction
Corrects red-eyes caused by a camera flash.
- Face Brightener
Corrects and brightens a face which appears dark relative to a bright background.
- Face Sharpener
Corrects a blurred image to bring a person's face into focus rather than the background.
Note: Effect levels for Face Brightener and Face Sharpener can be changed from the standard level to Strong or Weak using the slide bar displayed below each function.
3. Click the 'OK' button. The correction function you have selected will be performed.
Notes
- If you have selected multiple images in the Print Setting screen, you can apply the correction to all images displayed in the Thumbnail section at once by checking 'All Images'.
- For the corrected images,
 appears to the left side of the file name on the Preview section.
- Click 'Compare' to display the images before and after the correction side by side so that you can compare and check the result.
- Click 'Cancel Correction' to undo the correction operation.
4. To continue correcting or enhancing images before printing, click another function or tab.
5. Click 'Finish' for printing. A message appears prompting whether or not to save the modified images. Click 'Yes' button to save the modified images as separate files. If you don't want to save the images, click 'No' button. After returning to the Print Setting screen, you will be able to print these modified images.
Note: If you have chosen not to save the modified images, the correction informations will be discarded when Easy-PhotoPrint is terminated. It is recommended that you save the modified images if you are planning to print them again.
Return to top of page
Using the Digital Face Smoothing Function
1. Click the '2. Enhancement' tab. The 2. Enhancement tab appears.
2. Select an image you want to enhance from the 2. Enhancement tab. The image appears on the Preview section.

Note: If only one image is selected in the Print Setting screen, thumbnails will not be displayed below the Preview section.
3. Make sure that 'Auto' is selected, and then check 'Digital Face Smoothing' .
Note: Effect levels can be changed from the standard level to Strong or Weak using the slide bar displayed below Digital Face Smoothing.
4. Click the 'OK' button. The Digital Face Smoothing function will be performed.
Notes:
- If you have selected multiple images in the Print Setting screen, you can apply the Digital Face Smoothing function to all images displayed in the Thumbnail section at once by checking 'All Images'.
- For the enhanced images,
 appears to the left side of the file name on the Preview section.
- Click 'Compare' to display the images before and after the enhancement side by side so that you can compare and check the result.
- Click 'Cancel Enhancement' to undo the enhancement operation.
- After performing Digital Face Smoothing, the 1. Correction tab will be unselectable.
Click 'Cancel Enhancement' to undo all enhancements in order to restart from the 1. Correction tab.
5. To continue correcting or enhancing images before printing, click another function or tab.
6. Click 'Finish' for printing. A message appears prompting whether or not to save the modified images. Click 'Yes' button to save the modified images as separate files. If you don't want to save the images, click 'No' button. After returning to the Print Setting screen, you will be able to print these modified images.
Note: If you have chosen not to save the modified images, the enhancement informations will be discarded when Easy-PhotoPrint is terminated. It is recommended that you save the modified images if you are planning to print them again
Return to top of page
