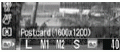
You can shoot images with settings appropriate for postcard size printing.
* When printing standard image data to postcard size, sometimes the top, bottom and sides may not get printed. By shooting images in the Postcard Print mode, you can check the printing area (vertical/horizontal ratio of 3:2) beforehand. In addition, the resolution locks to M1 (1600 x 1200) and the compression locks to the (Fine) setting, rendering smaller file sizes.
Press the <FUNC.> button.
Select L* using or .
* The current setting is displayed.
Select (Postcard) using or .
You can shoot the image right after selecting settings by pressing the shutter button. The menu displays again after the shot, allowing you to change the settings easily.
Press the <FUNC.> button.
Shoot the image.
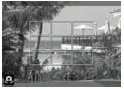
When you press the shutter button halfway, the area that will not get printed grays out.
Shooting procedures are the same as for the mode.
Selecting cancels the [On] setting of the digital zoom.
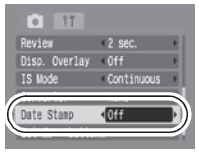
If the date and time are not set the [Date Stamp] feature will not be selectable until the date and time are set.
When [Date Stamp] is set to [Date] or [Date & Time], appears on images in step 2 and 3.
Setting the Date and Time to Imprint.
In the postcard mode only you can choose to embed the date as a part of the image data. Imprinting the Date and Time on the image makes it a permanent imprint on the image and requires photo editing software to remove. The date and time is recorded along with the image and can be added later using software to print or add the date using ZoomBrowser or other editing software should you choose to not have it superimposed as a part of the image.
1. Press the <MENU> button.
2. Choose the (Rec.) Menu
3. Use the or buttons to choose (Date Stamp)
4. Using or toggle to the desire option of [Off], [Date] or [Date & Time].
Ensure that the Date/time is set before using the Date Stamp feature.
The Date Stamp cannot be deleted from the image once it has been set since it is embedded in the image and is a part of the image.

 L* using
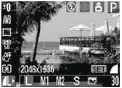
 (Date Stamp)