How to protect and unprotect an image from deletion on the EOS 1D Mark II, EOS 1D Mark II N, and EOS 1Ds Mark II.
| Article ID: ART158559 |
| |
Date published: 06/09/2015 |
| |
Date last updated: 08/18/2015 |
Description
How to protect and unprotect an image from deletion on the EOS 1D Mark II, EOS 1D Mark II N, and EOS 1Ds Mark II.

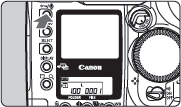

 > button.
 > icon will then appear to indicate that the image is protected.