Loading the Ink Cassette
CP-400 model shown in steps below.
1. Open the ink cassette compartment cover.
If you are replacing an ink cassette, see Note in step 3 for removal information
2. Remove any slack from the ink sheet.

Push in on the sprocket, and turn it gently in the indicated direction to take up the slack until the ink sheet straightens out (It will not be possible to print to all of the paper if you overwind the ink sheet).
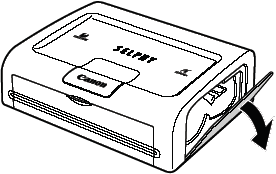
3. Hold the cassette so that the embossed arrow is at the top, and insert it all the way into the compartment (in the direction of
the arrow).

Be careful to avoid touching or pulling on the ink sheet when inserting the cassette.
Push the cassette all the way in, so that it clicks into place.
Note: When you are ready to remove the ink cassette, lift the clip and pull the cassette out.
4. Close the ink cassette compartment cover.

You can check the name of the ink cassette in the printer through the window on the top of the printer.
Caution: Do not reuse empty ink cassettes. Attempting to reuse an empty ink cassette may result in malfunction or damage to the printer.
.
