If cleaning the print head does not improve print quality, replace the BX-3 cartridge.
Solution
Replace BX-3 Cartridge
Note:
Do not replace the BX-3 cartridge while the fax is printing or performing another operation.
If you need to unplug the fax, wait until it returns to standby mode (time and receive mode displayed on the LCD). Otherwise the cartridge holder may not be in its home position, causing the BX-3 Cartridge to remain uncapped and dry out.
Make sure the fax is plugged in.
Open the printer cover.
Caution:
Do not try to manually move or stop the cartridge holder.
Do not touch any metal parts.
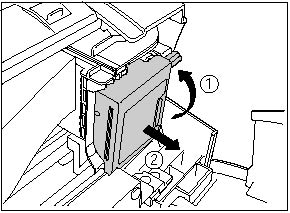
Raise the cartridge lock lever (1) on the cartridge holder and remove the BX-3 Cartridge (2).
Discard the old BX-3 cartridge immediately according to the local laws and regulations for disposal of consumables. You may want to place it in a plastic bag to keep any residual ink from spilling.
Spilled ink can stain any surface; protect yourself and your work area.
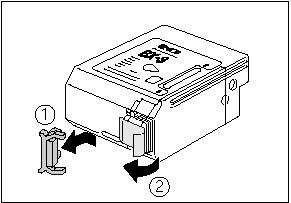
Remove the new BX-3 cartridge from its package.
Remove the orange protective cap (1) and tape (2).
Discard the cap and tape. Never attempt to reattach them to the BX-3 Cartridge print head.
Install the BX-3 cartridge immediately after removing the cap and tape.
Spilled ink can stain any surface; protect yourself and your work area.
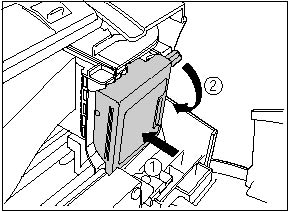
With the label facing outwards and the slot in the cartridge aligned with the yellow post, insert the BX-3 cartridge into the cartridge holder (1). Lower the cartridge lock lever (2) until you hear a click to lock the cartridge in place.
The yellow post (BX-3 cartridge guide) should be visible through the slot.
The BX-3 cartridge tilts slightly to the left before lowering the cartridge lock lever.
Close the printer cover. If the [AUTO TEST PRINT] setting is set to ON: The fax automatically prints a test page. The fax prints a test page every time you insert a BX-3 cartridge.
Note:
Load the paper in the multi-purpose tray before you replace the BX-3 cartridge.
You can turn off automatic test printing by changing the [AUTO TEST PRINT] setting.