How to set a custom white balance on the EOS 20D and EOS 5D.
Article ID: ART160146
|
Date published: 06/09/2015
|
Date last updated: 11/04/2015
Description
How to set a custom white balance on the EOS 20D and EOS 5D.
Solution
With custom white balance, you shoot a white object that will serve as the basis for the white balance setting. By selecting this image, you import its white balance data for the white balance setting.
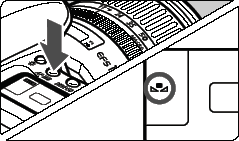
1. Press the <AF WB> button. ()
2. Select the custom white balance.
Look at the LCD panel and turn the <> to select <>.
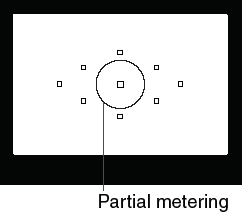
3. Photograph a white object.
The plain, white object should fill the partial metering circle.
Set the lens focus mode switch to <MF>, then focus manually.
Set any white balance setting.
Shoot the white object so that a standard expsoure is obtained.
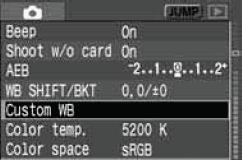
4. Select [Custom WB].
Turn the <> dial to select [Custom WB], then press <>.
The custom white balance screen will appear.
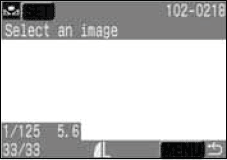
5. Select the image.
Turn the <> dial to select the image captured in step 3, then press <>.
The image's white balance data will be imported and the menu will reappear.
If the exposure obtained in step 3 is underexposed or overexposed, a correct white balance might not be obtained.
If an image was captured while the processing parameter was set to [B/W], it cannot be selected in step 5.
Instead of a white object, an 18% gray card (commercially available) can produce a more accurate white balance.

 >.
>.
 > dial to select the image captured in step 3, then press <