
Install the CP printer (model CP330 and older) driver properly - Windows
| Article ID: ART160339 | | | Date published: 06/09/2015 | | | Date last updated: 10/02/2015 |
Description
Solution
Installing the CP Printer Driver
Important: If the printer driver is not installed correctly, it is impossible to print. You must install the printer driver as outlined in the following procedure. Using any other procedure to install the printer driver may lead to printing problems.
The screen examples and descriptions given in this section are for the CP-330 connected to a computer. Install the printer driver for the CP-220, CP-200 and CP-300 in the same way (substitute the appropriate model number for the '330' in the path names, etc).
- If you are reinstalling the CP printer, you will first need to uninstall it. Click here for uninstall instructions.
| Windows 98 | Windows ME | Windows 2000 | Windows XP |
1. Close any programs that are running.
2. Place the Canon CP Printer Solution Disk in the CD-ROM drive. When the installer panel appears, click 'Exit' to close it.
3. Turn the printer on.
4. Connect the printer to your computer, using the USB cable. After a moment, the Add New Hardware Wizard dialog appears.
5. Click the 'Next' button.

6. Select 'Search for the best driver for your device. (Recommended).', and then click the 'Next' button.

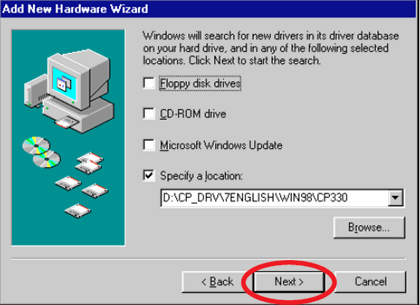
7. Select 'Specify a location'. Click the 'Browse' button to select the \CP_DRV\7ENGLISH\WIN98\CP330 folder on the CD-ROM and click the 'OK' button. Then click the 'Next' button. Do not select 'CD-ROM drive'.
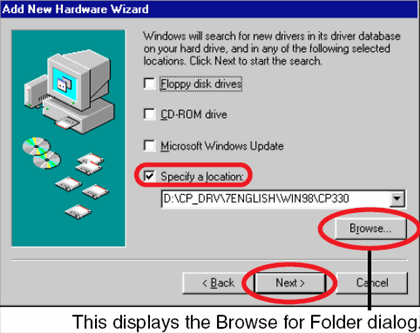

Specify the \CP_DRV\7ENGLISH\WIN98\CP330 folder and then click the 'OK' button to enter the folder path at Specify a location.
8. Click the 'Next' button.
The USB driver for the printer is installed.
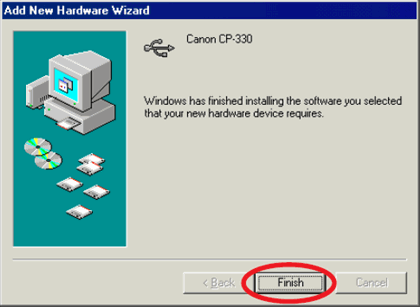
9. When the following message appears, click the 'Finish' button.

Now you can continue and install the printer driver.
10. When the following message appears, click the 'Next' button.

11. Select 'Search for the best driver for your device (Recommended).' and then click the 'Next' button.

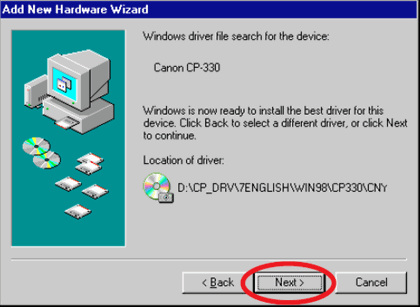
12. Because the folder specified in step 7 already appears here, simply click the 'Next' button. Do not select 'CD-ROM drive'.
13. Click the 'Next' button.

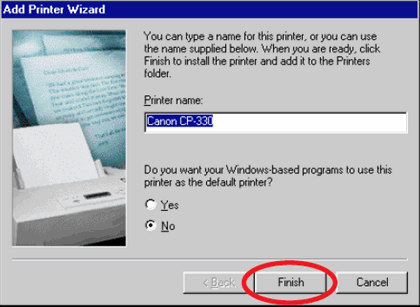
14. Adjust any necessary settings, and then click the 'Finish' button.
The printer driver is installed.
15. When the following message appears, click the 'Finish' button.

1. Close any programs that are running.
2. Place the Canon CP Printer Solution Disk in the CD-ROM drive. When the installer panel appears, click 'Exit' to close it.
3. Turn the printer on.
4. Connect the printer to your computer, using the USB cable. After a moment, the Add New Hardware Wizard dialog appears.
5. Select "Automatic search for a better driver (Recommended)" and then click the 'Next' button.

6. In the list of printer drivers, select 'Canon CP-xxx' so that '\CP_DRV\7ENGLISH\WIN98\CP330\CNY330U.INF' appears in 'Location', then click the 'OK' button.

The USB driver for the printer is installed.
7. When the following message appears, click the 'Finish' button.
Now you can continue and install the printer driver.
8. Select 'Automatic search for a better driver (Recommended)' and then click the 'Next' button.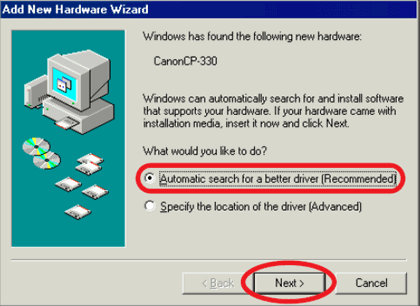
9. In the list of printer drivers, select 'Canon CP-330' so that '\CP_DRV\7ENGLISH\WIN98\CP330\CNY3309X.INF' appears in 'Location', then click the 'OK' button.
10. Adjust any necessary settings, and then click the 'Finish' button.
The printer driver is installed.
11. When the following message appears, click the 'Finish' button.
1. Close any programs that are running.
2. Place the Canon CP Printer Solution Disk in the CD-ROM drive. When the installer panel appears, click 'Exit' to close it.
3. Turn the printer on.
4. Connect the printer to your computer, using the USB cable. After a moment, the Add New Hardware Wizard dialog appears.
5. Click the 'Next' button.

6. Select 'Search for a suitable driver for my device (recommended)' and then click the 'Next' button.
7. Select 'Specify a location' and then click the 'Next' button. Do not select 'CD-ROM drives'.
8. Click the 'Browse' button, select the 'CNY3302k.inf' file in the \CP_DRV\7ENGLISH\WIN2K\CP330 folder on the CD-ROM, click the 'OPEN' button, then click the 'OK' button.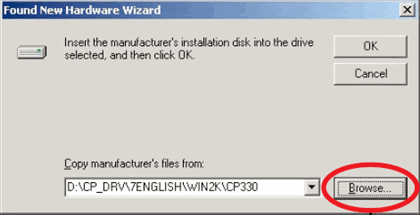
This displays the Locate File dialog.
Specify the 'CNY3302k.inf' file in the \CP_DRV\7ENGLISH\WIN2K\CP330 folder and then click the 'Open' button to enter the folder path at Copy manufacturer?s files from:.
9. Click the 'Next' button.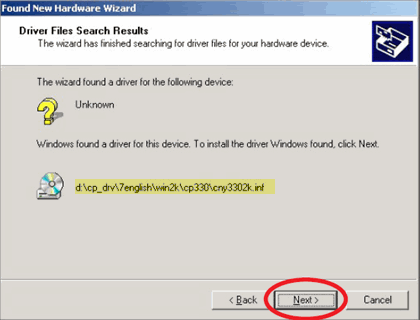
The printer driver is installed.
10. When the following message appears, click the 'Finish' button.
Log on to Windows XP with administrator privileges before installing the software.
1. Close any programs that are running.
2. Place the Canon CP Printer Solution Disk in the CD-ROM drive. When the installer panel appears, click 'Exit' to close it.
3. Turn the printer on.
4. Connect the printer to your computer, using the USB cable. After a moment, the Add New Hardware Wizard dialog appears.
5. Select 'Install the software automatically (Recommended)', and then click the 'Next' button.

6.In the list of printer drivers, select 'Canon CP-330' so that \CP_DRV\7ENGLISH\WIN2K\CP330\CNY3302k.INF appears in Location, then click the 'Next' button.
The printer driver is installed.
7. When the following message appears, click the 'Finish' button.
Uninstalling the CP printer driver
1. Turn off your computer.
2. Disconnect the USB cable from your computer and make sure that the printer is not connected to your computer.
3. Start your computer. With Windows 2000 or Windows XP, be sure to log on with Administrator privileges. Close any programs that are running.
4. Place the Canon CP Printer Solution Disk in the CD-ROM drive.
5. When the installer panel appears, click 'Exit'.
6. Start Windows Explorer, and then double-click the \CP_DRV\7ENGLISH\UNINST folder on the CD-ROM drive to open the folder.
7. Double-click 'CNYCPUN.EXE' icon to start the uninstaller. The uninstaller starts.
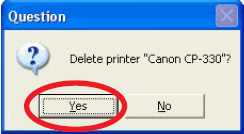
8. From the list of printers available for deletion, select the appropriate CP printer and then click the 'Delete' button.

9. When the confirmation message appears, check the printer name and then click the 'Yes' button.
The printer driver is deleted, and the CP Printer Driver Uninstaller window reappears.
10. Click the 'Exit' button.
11. Restart your computer.
Click here for installation / reinstallation instructions.